In Microsoft .NET Framework 32-bit you can use any of the following versions:
/NET indicates the 32-bit edition of the /NET assembly version
/COM indicates the 32-bit edition of the ActiveX version
The application built using /NET or /COM version runs on any Windows 32 or 64-bit machine.
In Microsoft .NET Framework 64-bit you can use any of the following versions:
/NET/64 indicates the 64-bit edition of the /NET assembly version
/COM/64 indicates the 64-bit edition of the ActiveX version
The application built using /NET/64 or /COM/64 version runs on Windows 64-bit machine only. The application built using /NET/64 or /COM/64 version cannot run on Windows 32-bit machine.
If you want to use your application on 32 and 64-bit machines, you can go for:
/COM/ANY indicates the 32 and 64-bit editions of the ActiveX versions
/NET/ANY indicates the 32 and 64-bit editions of the /NET assembly version
The /NET Assemblies requires a runtime license key that's provided in the
same registration e-mail you have received with your development license
key. The runtime and development license keys are different.
For instance, your registration e-mail shows as follows:
Thanks for your purchase of the ExG2antt/NET Retail! To make use
of your license for the ExG2antt/NET Retail, you need to install the
registered product with the key XXXX-XXXX-XXXX-XXXX (select the key, copy it
to the clipboard, and then paste it to the "License Key" field). Your
runtime license key is "your runtime license key"
The runtime license key should be passed to RuntimeKey property as
follow:
VB.NET
	Private Sub Form1_Load(ByVal sender As System.Object, ByVal e As System.EventArgs) Handles MyBase.Load
		exontrol.EXG2ANTTLib.exg2antt.RuntimeKey = "your runtime license key"
	End Sub

C#
     public Form1()
        {
            exontrol.EXG2ANTTLib.exg2antt.RuntimeKey = "your runtime license key";
            InitializeComponent();
        }

or

     private void Form1_Load(object sender, EventArgs e)
        {
            exontrol.EXG2ANTTLib.exg2antt.RuntimeKey = "your runtime license key";
        }
All this information can be found in redist.txt file that has been installed on your development machine.
This problem is usually happen on Windows 64-bit machines, when only a
single ( x32 or x64 ) development setup has been installed.
For instance, the Microsoft Visual Studio 2010 environment is a 32-bit
process, even on a Windows 64-bit systems, so it runs on WOW64. It means,
that when it is in design mode, the environment loads 32-bit files, so if
you have a previously trial version installed, this will be shown. The
registration message may appear on design mode, and when running not ( or
reverse ). And this because usually, the project configuration is set on ANY
CPU, so on a Windows 64-bit system the projects runs as 64-bit, so the
64-bit files are loaded.
In conclusion, you need to install both setups that were provided at the
purchasing time ( /NET/ANY configuration ), on your development
machine.
The following code, helps you to determine the path where the .net or .wpf
files are located ( they should be placed on the same folder as your
application, or where the .dll file goes )
Dim p As ProcessModule
For Each p In Process.GetCurrentProcess().Modules()
    If p.ModuleName Like "*.net" Then
        MessageBox.Show(p.FileName)
    End If
Next
Another option is using GetIPictureDispFromPicture
method of the AxHost class.
In VB.NET you can
have something like:
With AxGrid1.Items
.CellPicture(.FocusItem, 0) = IPDH.GetIPictureDisp(Image.FromFile("c:\winnt\zapotec.bmp"))
End With
where the IPDH class is defined like follows:
Public Class IPDH
    Inherits System.Windows.Forms.AxHost

    Sub New()
        MyBase.New("")
    End Sub

    Public Shared Function GetIPictureDisp(ByVal image As Image) As Object
        GetIPictureDisp = AxHost.GetIPictureDispFromPicture(image)
    End Function

End Class
With AxGrid1
.set_HTMLPicture("pic1") = IPDH.GetIPictureDisp(Image.FromFile("c:\winnt\zapotec.bmp"))
End With
where the IPDH class is defined like follows:
Public Class IPDH
    Inherits System.Windows.Forms.AxHost

    Sub New()
        MyBase.New("")
    End Sub

    Public Shared Function GetIPictureDisp(ByVal image As Image) As Object
        GetIPictureDisp = AxHost.GetIPictureDispFromPicture(image)
    End Function

End Class
You can use the ColorTranslator.ToOle to convert a color to a unit
type. Also, you can use the ColorTranslator.FromOle to convert an uint
type to a color.
or
You can use the following VB function:
Shared Function ToUInt32(ByVal c As Color) As UInt32
	Dim i As Long
	i = c.R
	i = i + 256 * c.G
	i = i + 256 * 256 * c.B
	ToUInt32 = Convert.ToUInt32(i)
	End Function
You can use the following C# function:
private UInt32 ToUInt32(Color c)
{
	long i;
	i = c.R;
	i = i + 256 * c.G;
	i = i + 256 * 256 * c.B;
	return Convert.ToUInt32(i);
}
This is applicable only
to COM object being inserted to NET forms. Use the INSERT key. Click the control's Images panel
and press INSERT key. The control will shows up an open file dialog
where you can insert the icon/dll file name to be included.
The NET Assemblies doesn't display the
images panel, instead you can use the ImageList control
to add icons to your .NET assembly using the Images method. For
instance, if you need to add a collection of icons to your
eXG2antt/NET control you have to add an ImageList control to your
form, and then just call the Exg2antt1.Images(ImageList1) and so the
control gets the icons being inserted in the image list control.
This is applicable
only to COM object being inserted to NET forms. This is NOT
applicable to NET Assemblies.
By default, the Dispose method of the MDI child
form looks like follows:
Protected Overloads Overrides Sub Dispose(ByVal disposing As Boolean)
    If disposing Then
        If Not (components Is Nothing) Then
            components.Dispose()
        End If
    End If
    MyBase.Dispose(disposing)
End Sub
The Dispose handler should call the Clear method of Controls
object before calling the Dispose method of the form's base class
like in the following sample:
Protected Overloads Overrides Sub Dispose(ByVal disposing As Boolean)
    If disposing Then
        If Not (components Is Nothing) Then
            components.Dispose()
        End If
    End If
    Me.Controls.Clear()
    MyBase.Dispose(disposing)
End Sub
The code to add new MDI Child forms looks like follows:
Dim myChild As Child
Private Sub Button1_Click(ByVal sender As System.Object, ByVal e As System.EventArgs) _
    Handles Button1.Click
    myChild = New Child(Me)
    myChild.Show()
End Sub
The component supports the standard Windows Forms data-binding model. This means the data source can be of any type that implements one of the following interfaces:
The IList interface, including one-dimensional arrays (A).
The IListSource interface, such as the DataTable and DataSet
classes (B)
The IBindingList interface, such as the BindingList<T>
class
The IBindingListView interface, such as the BindingSource class.
Typically, you will bind to a BindingSource component and bind the BindingSource component to another data source or populate it with business objects. The BindingSource component is the preferred data source because it can bind to a wide variety of data sources and can resolve many data binding issues automatically.
When binding to a data source that contains multiple lists or tables, you must set the DataMember property to a string that specifies the list or table to bind to. When binding to a BindingSource component that contains multiple lists or tables, however, you can set the DataMember property of the BindingSource component instead.
A) Sample using IList interface:
List<User> list = new List<User>();
User userA = new User();
{
    userA.FirstName = "Larry";
    userA.LastName = "Riley";
}
list.Add(userA);
User userB = new User();
{
    userB.FirstName = "Yvonne";
    userB.LastName = "Buckley";
}
list.Add(userB);
exgrid1.DataSource = list; // Loads Data using IList
where a definition for User class can be:
class User
{
    private string firstname;
    public string FirstName
    {
        get
        {
            return firstname;
        }
        set
        {
            firstname = value;
        }
    }

    private string lastname;
    public string LastName
    {
        get
        {
            return lastname;
        }
        set
        {
            lastname = value;
        }
    }
}
This is applicable to COM
or /NET object being inserted to NET forms.
Datasets store data in a disconnected cache. The
structure of a dataset is similar to that of a relational database;
it exposes a hierarchical object model of tables, rows, and columns.
In addition, it contains constraints and relationships defined for
the dataset.
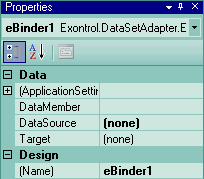
The Exontrol.DataSetAdapter.dll file provides the EBinder .NET
component that provides the following properties:
DataSource property. Gets or sets the data source that the control is displaying data for.
DataMember property. Indicates a sub-list of the DataSource to show in the control.
Target property. Indicates a target object to bind data to.
At design time, the Target property shows a list of objects that
can use the EBinder component such as eXGrid, eXG2antt, eXList,
eXTree, eXGantt, eXComboBox control and so on. The EBinder can
list compatible versions, /COM and /NET assemblies as well.
UpdateOnChange property specifies whether the DataSet is
updated once the user updates a cell in the component. This is
available only for components that supports Change event such as
eXGrid or eXG2antt.
Here's the steps you need to follow in order to bind your
component ( in our case we used eXList ) to a data set object:
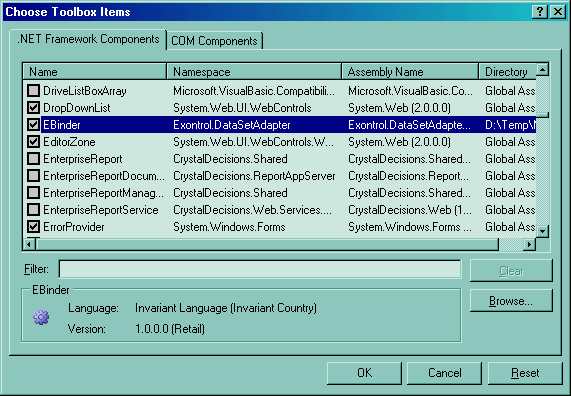
Download and unpack the Exontrol's EBinder component here.
In .NET environment, click the Toolbox\Choose Items, Select
the .NET Framework Components, and then click Browse.
In the Open dialog, locate and select the Exontrol.DataSetAdapter.dll,
you have unpacked at step 1
The EBinder component is checked, selected, so click OK to
insert the component to the toobox.
Select the EBinder in the toolbox, and drag it to your form.
Click the EBinder1 component that's created in the bottom of the
page, and the Properties browser should look like follows:
Insert the eXList to the form, by double clicking the ExList
ActiveX Control from the toolbox ( if you have not included in
the toolbox, select Toolbox\Choose Items\COM Components,
and locate the eXList or other component you want to bind ).
Select the EBinder1 component, so its properties are shown in
the properties browser
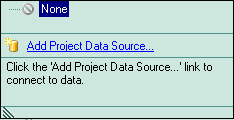
Select the DataSource property, and click the drop down
button, so you start selecting a data source using the following
editor.
Select the DataMember property, and choose a member of the
DataSource if exists.
Select the Target property and choose from its sub-list the
axList1 item, so the target you have selected is able to display
the data you have selected.
Save and Run the project.
The following movie
shows how to connect the eXGrid/NET with the Employees table in the
sample.mdb database, using EBinder or DataSets object.
This is applicable only to NET
Assemblies being inserted to NET forms.
Properties that have parameters must be preceded by a get_
or set_ words. For instance, you have been looking for
Items.ItemBold property that takes an argument the Item, so it
is a property with a single argument. In this case, in the .NET
framework you have to call Items.set_ItemBold( Item, newValue ),
and so you can change the bold state for the entire item. In
case you require the bold state you need to call the
Items.get_ItemBold(Item) function
Color properties that ends on 32 may pass an identifier
of your skin object. For instance, let's say that you want to
change the visual appearance ( to apply a skin ) of a specified
item using the Items.ItemBackColor property. So, we have the
VisualAppearance.Add( 4, "test.ebn") which adds the
test.ebn skin file to your control. So if you need to apply this
test.ebn skin file to your item you need to use the
Items.set_ItemBackColor32 as follows: Items.set_ItemBackColor32(
Item, 0x4000000 ) in c# or Items.set_ItemBackColor32( Item,
&H4000000 ) in vb.net.
This is applicable only to COM object
being inserted to NET forms.
To distinguish members of the ActiveX control from members of
the wrapper's base classes, the ActiveX importer places a Ctl
prefix (which stands for control) on any members with
conflicting names. For instance, if the control exports a method
called Refresh, please make sure that you will call CtlRefresh
in case the base classes provides a Refresh method.
Properties that have parameters may be preceded by a get_
or set_ words.
So, In case you won't find the property you are looking for
please try also with prefixes like: Ctl, get_ or set_.
This is applicable only to COM object being
inserted to NET forms. This is NOT applicable to NET Assemblies.
The wrapper classes of the component need to be refreshed when VC++ is used.
The simplest way to refresh the wrapper classes is to insert the component to a
new project, and to copy the generated wrapper classes to your old project.
In case you are using .NET environment, C# or VB.NET you need to
replace the wrapper files AxInterop.NAMEOFTHETYPELib.dll and
Interop.NAMEOFTHETYPELib.dll ( for instance, AxInterop.EXCOMBOBOXLib.dll
or Interop.EXCOMBOBOXLib.dll for exComboBox control ) in the bin and obj
folders with the new versions. TO get the new versions, just create a
new project, insert the component to the form, and build the project.
Please copy the wrapper files from new bin\Debug folder to old bin\Debug
folder, and so on.
Almost all of our components expose a Version property that specifies the control's
version. The control's release notes specify all changes to the component for
each version.
This is applicable to NET
Assemblies being inserted to NET forms.
The common cause is calling initialization of the component
during form's constructor instead initialization during the Form.Load
event. The exception can occur also if the initialization of the control
is performed before calling of the form's InitializeComponent()
method. The best way of loading your data is using the Load event of
the form. The Form.Load event occurs before a form is displayed for the
first time.
VB/NET
For instance, the following sample gives the "An unhandled exception of type
'System.InvalidOperationException' occurred in
.exe Additional information: Object reference not set to an instance of an object."
when calling the initComponent ( the form includes an eXG2antt object of the
eXG2antt/NET
Assembly.
Public Class Form1
    Public Sub New()
        initComponent()    'WRONG
        ' This call is required by the Windows Form Designer.
        InitializeComponent()
    End Sub
End Class
Instead you should call such as:
Public Class Form1
    Public Sub New()
        ' This call is required by the Windows Form Designer.
        InitializeComponent()
        ' Add any initialization after the InitializeComponent() call.
        initComponent()    'GOOD
    End Sub
End Class
or
Public Class Form1
    Private Sub Form1_Load(ByVal sender As System.Object, ByVal e As System.EventArgs) Handles MyBase.Load
        initComponent()    'GOOD
    End Sub

    Public Sub New()
        ' This call is required by the Windows Form Designer.
        InitializeComponent()
    End Sub
End Class
C#
For instance, the following sample gives the "An unhandled exception of type 'System.NullReferenceException' occurred in
.exe Additional information: Object reference not set to an instance of an object."
when calling the initComponent ( the form includes a ChartView
object of the eXOrgChart/NET
Assembly.
This is applicable only to NET
Assemblies being inserted to NET forms.
Drag-and-drop is one of the fundamental metaphors underlying the
Microsoft� Windows� family of operating systems. Users understand
that some items can be moved around by holding the mouse down on
them, and that they'll get appropriate visual feedback when they're
over a spot where the item can be dropped. They expect to be able to
move data and images from one spot to another this way. Visual Basic
.NET makes it easy to implement drag-and-drop in your own
applications. You can control all aspects of the process, including
which controls allow dragging, what data they make available to
drag, and where it can be dropped. You can implement this both
within a single application and between applications. In this
document, you'll learn how to manage drag-and-drop in Visual Basic
.NET. You can add scrolling the control's content during
Drag-And-Drop here.
Beginning a Drag-and-Drop Operation
To begin a drag-and-drop operation, you call the DoDragDrop
method of a Windows Forms control. The DoDragDrop method is
implemented on the System.Windows.Forms.Control class, which means
that it is available on all controls within the Windows Forms
namespace.
The DoDragDrop method takes two arguments: the data to be
dragged, and the drag operations that this control allows. You can
call the DoDragDrop method at any time, although most frequently
you'll want to use the MouseDown event as a way to trigger dragging
when the user expects it.
For example:
Private Sub exg2antt1_MouseDownEvent(ByVal sender As System.Object, _
                                    ByVal Button As System.Int16, _
                                    ByVal Shift As System.Int16, _
                                    ByVal X As System.Int32, _
                                    ByVal Y As System.Int32) Handles exg2antt1.MouseDownEvent
    ' Gets the item from the cursor
    Dim hItem As Integer = exg2antt1.get_ItemFromPoint(X, Y)
    If hItem <> 0 Then
        ' Gets the bar from the cursor
        Dim keyBar As Object = exg2antt1.Chart.get_BarFromPoint(X, Y)
        If Not (keyBar Is Nothing) Then
            Dim barName As Object = exg2antt1.Items.get_ItemBar(hItem, keyBar, exontrol.EXG2ANTTLib.ItemBarPropertyEnum.exBarName)
            Dim barStart As DateTime = exg2antt1.Items.get_ItemBar(hItem, keyBar, exontrol.EXG2ANTTLib.ItemBarPropertyEnum.exBarStart)
            Dim barEnd As DateTime = exg2antt1.Items.get_ItemBar(hItem, keyBar, exontrol.EXG2ANTTLib.ItemBarPropertyEnum.exBarEnd)
            Dim barDuration As TimeSpan = barEnd.Subtract(barStart)
            ' Composes a string that will be carried during drag and drop that specifies the name of the bar and it's duration.
            exg2antt1.DoDragDrop(barName + "," + barDuration.ToString(), DragDropEffects.Copy)
        End If
    End If
End Sub
In this particular case, the code starts a drag operation
whenever the user depresses the primary mouse button on any bar
inside the exg2antt's chart. The data to be dragged is the name of
the bar and it's duration and the control allows copy operation in
drag-and-drop.
Tip The data to be dragged
should be an instance of the String, Bitmap, or MetaFile class, or
an object that implements the ISerializable or IDataObject
interfaces.
The second argument to the DoDragDrop method is a combination of
members from the DragDropEffects enumeration, indicating which
target operations are valid for this data.
Accepting Data From a Drag Operation
Any control can accept data from a drag-and-drop operation in
progress. To designate a control as a drop zone, you must do three
things:
Set the AllowDrop property of the control to True.
Handle the DragEnter event of the control.
Handle the DragDrop event of the control.
The DragEnter event occurs when a drag-and-drop operation is in
progress (that is, some control has called the DoDragDrop method)
and the cursor enters the control. This event passes an argument of
the System.Windows.Forms.DragEventArgs class. You should set the
Effect property of this argument to a value from Table 1 to indicate
the action that will be taken if the operation is completed on this
control. The system will use this value to pick the appropriate drop
cursor to display.
For example:
Private Sub exg2antt2_DragEnter(ByVal sender As System.Object, _
                                ByVal e As System.Windows.Forms.DragEventArgs) _
                                    Handles exg2antt2.DragEnter
    e.Effect = DragDropEffects.Copy
End Sub
The DragEnter event provides visual feedback to the user that a
drop is allowed on this particular control. If the user actually
releases the mouse button on this control, then the DragDrop event
is triggered. In this event, you should handle the actual mechanics
of processing the dropped data.
For example, this procedure inserts the a copy of dragged bar at
the cursor position:
Private Sub exg2antt2_DragDrop(ByVal sender As System.Object, ByVal e As System.Windows.Forms.DragEventArgs) Handles exg2antt2.DragDrop
    Dim hItem As Integer = exg2antt2.get_ItemFromPoint(-1, -1)
    If (hItem <> 0) Then
        Dim eData As String = e.Data.GetData(DataFormats.Text).ToString()
        Dim sData As String() = eData.Split(New [Char]() {","})
        If (sData.Length = 2) Then
            ' Gets data as bar,duration
            Dim barName As String = sData(0)
            Dim barDuration As TimeSpan = TimeSpan.Parse(sData(1))
            Dim barStart As DateTime = exg2antt2.Chart.get_DateFromPoint(-1, -1)
            ' Checks whether the bar is droped to the chart area
            If (barStart.ToOADate() <> 0) Then
                With exg2antt2
                    .BeginUpdate()
                    ' Adds a new prodefined bar with a different color
                    Dim rBarName As String = "R" + barName
                    Dim rBar As exontrol.EXG2ANTTLib.Bar = exg2antt2.Chart.Bars(rBarName)
                    If (rBar Is Nothing) Then
                        rBar = exg2antt2.Chart.Bars.Copy(barName, rBarName)
                        With rBar
                            .Color = Color.Red
                            .StartColor = Color.Red
                            .EndColor = Color.Red
                        End With
                    End If
                    ' Adds a the new bar at the drag and drop position, using a different color
                    With .Items
                        Dim barKey As String = "DD" + .get_ItemBar(hItem, Nothing, exontrol.EXG2ANTTLib.ItemBarPropertyEnum.exBarsCount).ToString()
                        Dim barCaption As String = "DD" + .get_ItemBar(hItem, Nothing, exontrol.EXG2ANTTLib.ItemBarPropertyEnum.exBarsCount).ToString() + ""
                        .AddBar(hItem, rBarName, barStart, barStart.Add(barDuration), barKey)
                        .set_ItemBar(hItem, barKey, exontrol.EXG2ANTTLib.ItemBarPropertyEnum.exBarCaption, barCaption)
                        .set_ItemBar(hItem, barKey, exontrol.EXG2ANTTLib.ItemBarPropertyEnum.exBarHAlignCaption, exontrol.EXG2ANTTLib.AlignmentEnum.RightAlignment Or exontrol.EXG2ANTTLib.AlignmentEnum.exHOutside)
                    End With
                    .EndUpdate()
                End With
            End If
            End If
        End If
End Sub
This is applicable only to NET
Assemblies being inserted to NET forms.
Drag-and-Drop is one of the fundamental metaphors underlying the
Microsoft� Windows� family of operating systems. Users understand
that some items can be moved around by holding the mouse down on
them, and that they'll get appropriate visual feedback when they're
over a spot where the item can be dropped. They expect to be able to
move data and images from one spot to another this way. Visual Basic
.NET makes it easy to implement drag-and-drop in your own
applications. You can control all aspects of the process, including
which controls allow dragging, what data they make available to
drag, and where it can be dropped. You can implement this both
within a single application and between applications. In this
document, you'll learn how to manage drag-and-drop in Visual Basic
.NET. You can check the Drag-and-Drop operations for /NET assemblies
for more details on implementing the general mechanism for
Drag-And-Drop support.
The following sample shows how to scroll the control's content
when DragOver event occurs. The sample scrolls up if the cursor
hovers the first visible item in the control, or scrolls down if the
cursor hovers the last visible item of the control.
long hWait = 0, hWait2 = 32;
private void exg2antt2_DragOver(object sender, DragEventArgs e)
{
    int h = exg2antt2.get_ItemFromPoint(-1, -1);
    if (h == exg2antt2.Items.FirstVisibleItem)
    {
        if (++hWait == hWait2)
        {
            exg2antt2.Scroll(exontrol.EXG2ANTTLib.ScrollEnum.exScrollUp);
            hWait = -1;
            hWait2 /= 2;
        }
    }
    else
        if (h == exg2antt2.Items.LastVisibleItem)
        {
            if (++hWait == hWait2)
            {
                exg2antt2.Scroll(exontrol.EXG2ANTTLib.ScrollEnum.exScrollDown);
                hWait = -1;
                hWait2 /= 2;
            }
        }
        else
        {
            hWait = 0;
            hWait2 = 16;
        }
}
This is applicable only to NET
Assemblies being inserted to NET forms.
Drag-and-Drop is one of the fundamental metaphors underlying the
Microsoft� Windows� family of operating systems. Users understand
that some items can be moved around by holding the mouse down on
them, and that they'll get appropriate visual feedback when they're
over a spot where the item can be dropped. They expect to be able to
move data and images from one spot to another this way. Visual Basic
.NET makes it easy to implement drag-and-drop in your own
applications. You can control all aspects of the process, including
which controls allow dragging, what data they make available to
drag, and where it can be dropped. You can implement this both
within a single application and between applications. You can check the Drag-and-Drop operations for /NET assemblies
for more details on implementing the general mechanism for
Drag-And-Drop support.
The following VB.NET sample shows how to get file being dropped:
Private Sub pnlLabel_DragDrop(ByVal sender As System.Object, ByVal e As System.Windows.Forms.DragEventArgs) Handles pnlLabel.DragDrop
    Dim rgFileNames As String() = DirectCast(e.Data.GetData("FileName", True), String())
    If Not rgFileNames Is Nothing Then
        Dim s As String = ""
        For Each f As String In rgFileNames
            If Not (Len(s) = 0) Then s = s + vbCrLf
            s = s + f
        Next
        s = "You have dropped the following file: " + s
        MsgBox(s)
    End If
End Sub
The following C# sample shows how to get file being dropped:
private void pnlLabel_DragDrop(object sender, DragEventArgs e)
{
    string[] rgFileNames = e.Data.GetData("FileName") as string[];
    if (rgFileNames != null)
    {
        string s = "";
        foreach (string f in rgFileNames)
        {
            if (s.Length != 0)
                s += "\r\n";
            s += f;
        }
        s = "You have dropped the following file: " + s;
        MessageBox.Show(s);
    }
}
This is applicable only to /COM objects being inserted to NET forms.
The same is applied for AxEXG2ANTTLib.AxG2antt vs
EXG2ANTTLib.G2antt, AxEXGRIDLib.AxGrid vs EXGRIDLib.Grid, AxEXSCHEDULELib.AxSchedule
vs EXSCHEDULELib.Schedule, and so on.
A container hosts a collection of elements/controls. When
inserting a control to a container, the programming environment
creates a wrapper object that will host the component. This wrapper
provides properties like Name, Visible, Position, Size, Object, and
so on, so it provides general properties for all elements in the
container. The component itself does not provide such of properties
( Name, Visible, ... ), as they are provided by the wrapper or also
called the extended control.
Having these, if we insert the Exontrol's ExOrgChart
to a form, the wrapper object is of AxEXORGCHARTLib.AxChartView
type, while the hosted object is of EXORGCHARTLib.ChartView type. In
the /NET framework, the GetOcx() ( or Object ) method returns the
hosted object, in other words here's some equivalent samples:
(axChartView1.GetOcx() as EXORGCHARTLib.ChartView).Nodes.Add("child", null, null, null, null);
So, the axChartView1 of AxEXORGCHARTLib.AxChartView type is the
extended control, while the GetOcx property returns the object
itself of EXORGCHARTLib.ChartView type.
This is applicable to /COM objects being inserted to NET forms.
An application is considered an isolated application if all of its components are side-by-side assemblies. A side-by-side assembly is a collection of resources?a group of DLLs, windows classes, COM servers, type libraries, or interfaces?available for an application to use at runtime. Typically, a side-by-side assembly is one to several DLLs.
Isolated COM allows your application to use ActiveX components without having to register them. The original vision of this was to allow
copy deployment of the application, but Isolated COM has many benefits. You can have a private copy of the DLL without worrying that another application will install an older or newer copy that breaks your application. Isolated COM also allows you to successfully install and run on non-Administrator accounts.
The solution is to include the control's manifest file to the application's resource under 24( Manifest Resource Type ) with the identifier 1.
Follow the next steps to include the control's manifest file to
app's manifest file.
Go to Application's Properties, by selecting the Project \
Properties, so you get displayed, Application, Compile, Debug,
...
Select the View Windows Settings, in the Application page.
The Visual Studio opens the app.manifest file, which we are
going to update with the control's manifest file, so it will be
used as an isolated component ( no registration required )
Go to the end of the app.manifest file, before
</asmv1:assembly> and adds the control's manifest file (
red part ) as shown bellow. If you are using the eXHelper
to "Generate Assembly Manifest" for the component,
includes the <file> and <comInterfaceExternalProxyStub>
sections.
Rebuild the project, so no error occurs ( build the x86 or
x64, not Any CPU configuration, based on what configuration of
control you have 32 or 64 ). The EXE file being created
includes 24( Manifest Resource Type ) with the identifier 1, in
the resources.
For the first time you run the project you may get CLR20r3
(Problem Event Name), and if you choose "Debug the
program" you get "Additional information: An error
occurred creating the form. See Exception.InnerException for
details. The error is: The specified module could not be
found. (Exception from HRESULT: 0x8007007E)"
The previously error indicates that the control's DLL is
missing from the Release/Debug folder, so copy the control's
DLL to Release/Debug folder, and run the project again
Now, the project/EXE uses the control as isolated, so on
client machine requires no registration.
In conclusion, all dll and the exe located in the
Release/Debug folder, must be included in your deployment
project, to be on the same folder on the target machine. The
following files are required to be included in your deployment
project:
<CONTROL>.dll
AxInterop.<CONTROL>Lib.dll
Interop.<CONTROL>Lib.dll
<APP>.exe
You can download it here
the .NET Framework project (Visual Studio 2010). In the Release folder, you can find the sample.exe
that uses the exg2antt.dll as isolated.
If you run the project on on a computer where .NET Framework 4.0 is not
installed you get:
.NET Framework Initialization Error
To run this application, you first must install one of the following versions of the .NET Framework:
v4.0.30319
Contact your application publisher for instructions about obtaining the appropriate version of the .NET Framework.
The tutorial shows how you can build the isolated application, so
the idea is the same for any Visual Studio version, or .NET
Framework version
This is applicable to /COM, /NET, /WPF objects being inserted to NET forms.
The compiler error CS0031: Constant value '...' cannot be converted to a 'uint', may occur when an attempt was made to assign a value to a variable whose type cannot store the value.
For instance, you are trying to change the VisualAppearance's RenderType property such as:
The RenderType property of VisualAppearance object, for /NET or /WPF assemblies is of uint type. The RenderType property supports values such as -3(or 0xFFFFFFFD, no color is applied), -2(or 0xFFFFFFFE, OR-color scheme) and -1(or 0xFFFFFFFF, AND-color scheme)
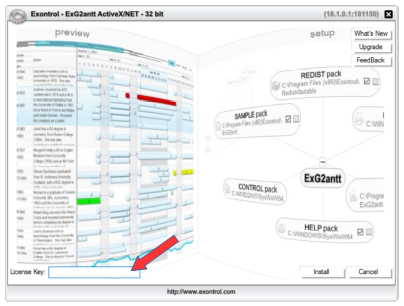
The development license key allows you to install the component/product on
your development machine, so it must be used with the setup you received once you purchased
the component on the "License Key" field, as shown bellow. The format
of your development license key is XXXX-XXXX-XXXX-XXXX, and must be used in the
"License Key" field only (red
arrow).
The runtime-license key is different than your development-license key. Once
you purchased a /NET or /WPF version, the registration email automatically
includes your runtime-license field as shown bellow (red arrow).
The redist.txt file explains everything you must do with your runtime-license
key. Shortly, you must set the control's RuntimeKey with the provided
runtime-key
When using the runtime-license key, please uses it as it was provided (using any other key won't work).
When using the control on a docking panel, you may find that the control gets empty as soon as you dock the form to a different place. This is happen because the control is recreated, and its content needs to be
re-loaded.
There are two methods to prevent that:
Change the DocumentStyle property of the DockPanel object to DockingWindow as shown bellow:
This way you ensure that the control won't be recreated when the dock changes.
The advantage of this method is that the control(s) gets loaded only once during
the Form_Load event. Also, when the dock is changing the state of each child
of the docking panel remains as it is, like scrolling position, selection and
so on.
In case you consider that there is a problem with the control itself
please do the following test.
Add a single TreeView control ( System.Windows.Forms.Control ) to a dock panel,
adds a few nodes, so the vertical scroll bar will be required and shown. Now,
run the project. Scroll the TreeView, so you get a specified node in the
middle of its client view, dock the form to a different position, you will
notice that the scrolling position is lost, and there is another node in the
middle of your panel. It simple happens because the handle of the TreeView is
re-created, and so all the nodes were re-inserted to the TreeView as soon as
the dock changes.
Imagine, if you have thousands of nodes, so they need to be reinserted each time the user docks the panel to a different position.
Initializes the control during the ActiveDocumentChanged event of the
DockPanel object as shown bellow:
Private Sub DockPanel1_ActiveDocumentChanged(ByVal sender As Object, ByVal e As System.EventArgs) Handles DockPanel1.ActiveDocumentChanged
    With f2.Exlist1
        If (.Columns.Count = 0) Then
            .BeginUpdate()
            .Columns.Add("Default")
            With .Items
                .Add(0)
                .Add(1)
                .Add(2)
            End With
            .EndUpdate()
        End If
    End With
End Sub
This way the control's content gets loaded when dock changes. The disadvantage
of this method is that the control's state ( scroll position, selection ) is
lost when dock is change. You can restore it's state using the Layout
property of the control. You need to save the control's Layout as soon as it
gets destroyed ( HandleDestroyed event ) , and restored when
ActiveDocumentChanged event occurs as in the following sample:
Imports WeifenLuo.WinFormsUI.Docking

Public Class Form1
    Private f2 As New Form2

    Private Sub Form1_Load(ByVal sender As System.Object, ByVal e As System.EventArgs) Handles MyBase.Load
        f2.Show(DockPanel1, DockState.Document)
    End Sub

    Private Sub DockPanel1_ActiveDocumentChanged(ByVal sender As Object, ByVal e As System.EventArgs) Handles DockPanel1.ActiveDocumentChanged
        With f2.Exlist1
            If (.Columns.Count = 0) Then
                .BeginUpdate()
                .Columns.Add("Default")
                With .Items
                    .Add(0)
                    .Add(1)
                    .Add(2)
                End With
                .Layout = f2.sLayout
                .EndUpdate()
            End If
        End With
    End Sub
End Class

Public Class Form2
    Public sLayout As String

    Private Sub Form2_HandleDestroyed(ByVal sender As Object, ByVal e As System.EventArgs) Handles Me.HandleDestroyed
        sLayout = Exlist1.Layout
    End Sub
End Class
In order to show a modal dialog, you can use the ShowDialog method of the
Form, which shows the Form as modal. You can use this method to display a modal dialog box in your application. When this method is called, the code following it is not executed until after the dialog box is closed.
Once the ShowDialog method is closed, the form is destroyed ( not hidden ), and all child components are destroyed as well.
Calling again the ShowDialog method may produce the "Attempted to read or write protected memory. This is often an indication that other memory is corrupt."
exception, which indicates re-using a control that has been already destroyed.
Shortly, it is recommended re-creating the form instead reusing it as shown in
the following samples.
The following sample shows how you create correctly a modal dialog box:
Public Class Form1
    Private Sub Button1_Click(ByVal sender As System.Object, ByVal e As System.EventArgs) Handles Button1.Click
        Dim dlgModal As Form2 = New Form2
        With dlgModal
            .InitControl()
            .ShowDialog()
            .Dispose()
        End With
    End Sub
End Class
where InitControl is an initialization function for the child components of
the Form2 object.
The following sample fires "Attempted to read or write protected memory. This is often an indication that other memory is corrupt."
exception, after re-opening the dialog:
Public Class Form1
    Private dlgModal As Form2 = New Form2
    Private Sub Button1_Click(ByVal sender As System.Object, ByVal e As System.EventArgs) Handles Button1.Click
        With dlgModal
            .InitControl()
            .ShowDialog()
        End With
    End Sub
End Class
In case you are wondering why a ListBox component works both ways please consider the following:
Internally the ListBox keeps an ObjectCollection member, that holds all
items added through the Items.Add method
When the ListBox's Handle is created, the ObjectCollection is enumerated
and added to inner ListBox ( native ListBox )
Before saying that's the best way:
(memory) find out that the ListBox duplicates the information for each item. The
first information is keep into ObjectCollection object, and the second
information is keep in native ListBox's item. We are trying to keep the
memory usage at the minimum not to extend. Many times, we have been asked to
improve the memory usage, rather than use it unlimited.
(speed) as Items.Add method adds items into the collection and the native
ListBox's item, it is clear that it takes longer than adding to just the
native ListBox's item.
This is applicable to /COM, /NET, /WPF objects being inserted to NET forms.
The compiler error BC30439: Constant expression not representable in type 'UInteger', may occur when an attempt was made to assign a value to a variable whose type cannot store the value.
For instance, you are trying to change the VisualAppearance's RenderType property such as:
The RenderType property of VisualAppearance object, for /NET or /WPF assemblies is of uint type. The RenderType property supports values such as -3(or &HFFFFFFFDUI, no color is applied), -2(or &HFFFFFFFEUI, OR-color scheme) and -1(or &HFFFFFFFFUI, AND-color scheme)
This is applicable to /COM being inserted to NET forms.
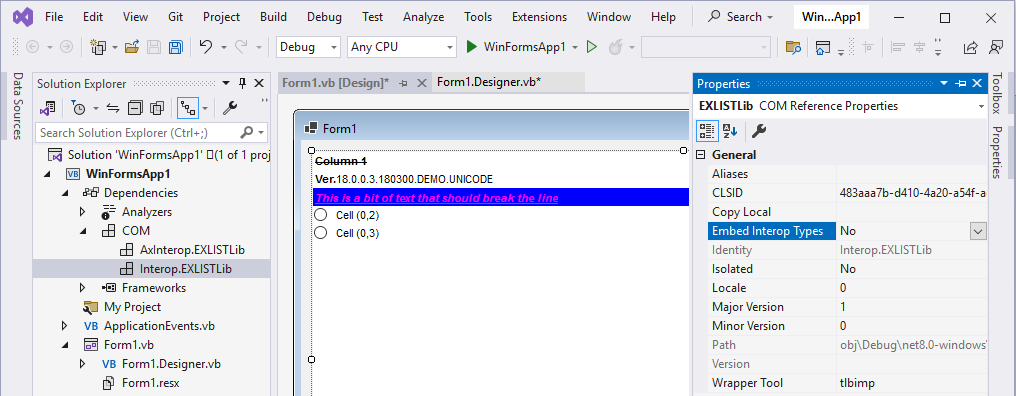
The compiler error BC31549: Cannot embed interop types from assembly '...' because it is missing the 'System.Runtime.InteropServices.GuidAttribute' attribute, occurs when trying to build a project that includes a /COM component. This error is related with the other errors as well:
error BC31553: Cannot embed interop types from assembly '...' because it is missing either the 'System.Runtime.InteropServices.ImportedFromTypeLibAttribute' attribute or the 'System.Runtime.InteropServices.PrimaryInteropAssemblyAttribute' attribute.
error BC31541: Reference to class '...' is not allowed when its assembly is configured to embed interop types.
The solution is to change the Embed Interop Types from "Yes" to "No".
In Visual Studio, "Embed Interop Types" is a property that you can set for a reference to a COM (Component Object Model) type library or a .NET assembly that contains COM types. This property determines how the interop types are embedded into your project.
Here's how to find and set the "Embed Interop Types" property in Visual Studio:
Right-click on the reference in the Solution Explorer.
Select "Properties" from the context menu.
In the Properties window, locate the "Embed Interop Types" property.
Set the value of this property to either "Yes" or "No" depending on your requirements.
If you set it to "No," Visual Studio will generate a separate interop assembly for the COM types, and you'll need to deploy this interop assembly along with your application.
This is applicable to /COM being inserted to NET forms.
For instance, error CS1061: 'ComboBox' does not contain a definition for 'OcxState' and no accessible extension method 'ComboBox' accepting a first argument of type 'EXCOMBOBOXLib.ComboBox' could be found.
The error might occur due to a missing or corrupted assembly.
To resolve this, delete the 'bin' and 'obj' folders in your project.
Rebuilding the project will regenerate all necessary files, including the AxInterop.* or Interop.* files.
If the problem persists, create a new empty project and add the component there.
Should the issue continue, reinstall the component and ensure it is correctly registered.
You can verify this by running the exehelper for the component after installation and checking if it appears in the right panel.


