The ExGrid control is an easy-to-implement tree-grid component that delivers fast and reliable performance along with a wide range of formatting capabilities that set it apart from traditional grid controls. It is a versatile data visualization system capable of displaying information in tree, grid, or list form, as well as combinations of these views, operating in both data-bound and unbound modes.
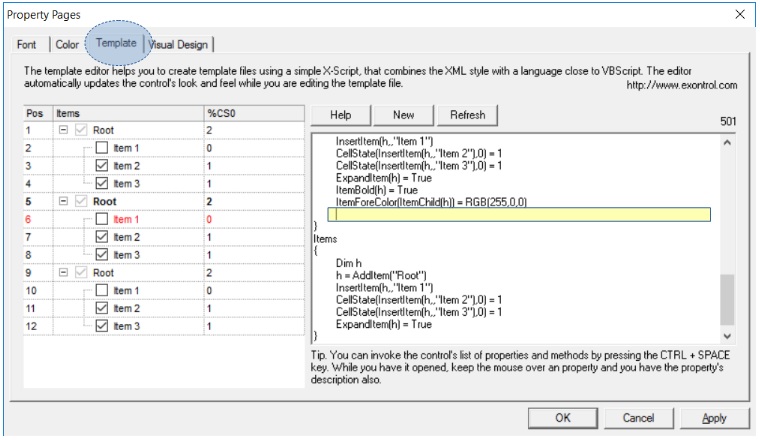
The control provides a WYSWYG template editor that helps you to
create template files. A template file is a collection of instructions that
control loads at runtime. In other words the template file holds a collection
of properties and their values, methods and objects, into a TEXT file. The
template file combines XML style with something close to VBScript. We call it
X-Script. It is important to specify that the editor and the X-Script DO NOT
USE any external VB script engine, Active script engine, XML parser or DOM. The
X-Script was implemented from scratch as lite as possible to let users
customize the control in design mode no matter what programming languages they
are using. The template files are the same for any programming language, and do
the same thing for all! For instance, you can copy and paste the template file
from a VFP control to a C++ control!
The editor automatically updates the control's look and feel while
you are editing the template file. This way you can learn easy how a property
or a method reacts! Also, the editor provides a type library context menu that
helps you to find quickly a property ( CTRL + SPACE invokes it ). Here's a
screen shot of control's template editor:
To check the following samples open the control's template page and paste them to
the editor. The X-Script supports variables using the sequence like Dim
v1, v2, v3, supports RGB function like RGB(0,255,255).
The following sample shows how to add 3 columns, and how to change few
properties for them:
By default, your property page is derived from CDialogImpl class. The Activate
method of the IPropertyPageImpl class calls CreateDialogParam method that's not
able to handle CONTROL tags in the resource file. In order to get a fix for
that your property page object should derive from the CAxDialogImpl class
instead CDialogImpl. The AtlAdviseSinkMap method should be called in
OnInitDialog method, if you want to handle events using BEGIN_SINK_MAP,
SINK_ENTRY and END_SINK_MAP macros.
The version 1.0.2.1 includes built-in HTML format inside cell. The
CellValueFormat property specifies how the cell's value (
CellValue property ) is displayed. If the CellValueFormat property is
exText no HTML formatting is applied. Else, if the CellValueFormat property is
exHTML the CellValue is formatted using HTML tags. The list of valid tags are:
<b> tag - draws a text bolded until </b> is reached.
<br> tag - breaks the line.
<i> tag - draws the text using italic font attribute until </i> is
reached.
<s> tag - draws the text using strikeout font attribute until </s>
is reached.
<u> tag - draws the text using underline font attribute until </u>
is reached.
<fgcolor=RRGGBB> tag - draws the text using the RGB(RR,GG,BB) foreground
color. </u>, until </fgcolor> is reached. RR, GG and BB should be
hexa values.
<bgcolor=RRGGBB> tag - draws the text using the RGB(RR,GG,BB) background
color. </u>, until </bgcolor> is reached. RR, GG and BB should be
hexa values.
< dotline > - draws a dotted line.
< solidline > - draws a dotted line
< upline > - draws up the line
< r > - right aligns the line
For instance: the HTML formatting"<b>Inbox</b>
<fgcolor=0000FF>(78)</fgcolor>" draws the Inbox using bold font
attributes, and (78) using the blue color, like: Inbox (78)
Usually it is happen when you load data from a record set. When you call
CellValue() = rs("Field") the CellValue property holds a reference to a Field
object not to the field's value. In order to fix that you have to pass the
rs("Field").Value to the CellValue property as shown in the following sample:
The following code enumerates the records within a recordset, and adds a new item for each record found:
rs.MoveFirst
While Not rs.EOF()
    .AddItem rs(0)
rs.MoveNext
Wend
The list shows nothing, so you need to use a code as follows:
rs.MoveFirst
While Not rs.EOF()
    .AddItem rs(0).Value
rs.MoveNext
Wend
In conclusion, the rs("Field") returns a reference to an object of Field type, while rs("Field").Value returns the value of the field itself.
In design mode, the control provides a WYSWYG Template
feature, that helps the user to initialize the control in
design mode. For instance, the following x-script adds three
columns to your control.
The control provides a
Columns property that helps you to add, remove or changes the columns
of the control. By default, the control has no columns. The following
VB code
shows you how to add two columns to the control, at
runtime:
With Grid1
    .BeginUpdate
        With .Columns
            With .Add("Column 1")
                .Width = 164
                .HTMLCaption = "<b>Column<b> <fgcolor=0000FF>1</fgcolor>"
            End With
            With .Add("Column 2")
                .HeaderImage = 1
            End With
        End With
    .EndUpdate
End With
When many changes are made to the control , you should invoke the
BeginUpdate method to temporarily freeze the drawing of the control.
This results in less distraction to the user, and a performance gain. After all
updates have been made, invoke the
EndUpdate method to resume drawing of the control.
The control provides an Items property that helps you to add, remove or changes
the items in the control. Before adding any new item to the control make sure
that your control has at least one column. There are 4 methods to load
items to the control.
Because control can load a list as well as a hierarchy each item is specified by
a handle HITEM not by index. Each property that refers a cell requires a handle
and an index to a column.
By default, the control has no columns, so before adding new
items you need to add columns like in the following sample
With Grid1.Columns
        .Add "Column 1"
        With .Add("Column 2")
            .HTMLCaption = "Column <b>2</b>"
        End With
End With
The following sample uses the first method to add few items to the Items
collection.
With Grid1.Items
    Dim h As HITEM, hChild As HITEM
    h = .AddItem("Group 1")
    .CellValue(h, 1) = "Information about Group 1"
    hChild = .InsertItem(h, , "Child 1")
    .CellValue(hChild, 1) = "Information about Child 1"
    hChild = .InsertItem(h, , "Child 2")
    .CellValue(hChild, 1) = "Information about Child 2"

    h = .AddItem("Group 2")
    .CellValue(h, 1) = "Information about Group 2"
    hChild = .InsertItem(h, , "Child 1")
    .CellValue(hChild, 1) = "Information about Child 1"
    hChild = .InsertItem(h, , "Child 2")
    .CellValue(hChild, 1) = "Information about Child 2"
End With
When many changes are made to the control, you should invoke the
BeginUpdate method to temporarily freeze the drawing of the control.
This results in less distraction to the user, and a performance gain. After all
updates have been made, invoke the
EndUpdate method to resume drawing of the control like in the following
sample:
With Grid1
        .BeginUpdate
            With .Columns
                .Add "Column 1"
            End With
            With .Items
                For i = 0 To 20000
                    .AddItem i
                Next
            End With
        .EndUpdate
End With
If you are using MS Access environment ( which is DAO based ), you should be
carefully with GetRows property of Recordset object, that retrieves only one
record if the 'rows' argument is missing, so you can use a sample like follows:
    Dim rs As Object
    Set rs = CurrentDb.OpenRecordset("Table1")
    With Grid1
        .BeginUpdate
            With .Columns
                For Each f In rs.Fields
                    .Add f.Name
                Next
            End With
	    .PutItems rs.GetRows(rs.RecordCount)
        .EndUpdate
    End With
The following sample uses the VB Array function to insert items to a multiple
columns control:
With Grid1
    .BeginUpdate

    .LinesAtRoot = exLinesAtRoot
    .HasLines = exNoLine
    .HasButtons = exArrow

    .Columns.Add "Column 1"
    .Columns.Add "Column 2"

    With .Items
        Dim h As HITEM
        h = .AddItem(Array("Cell 1", "Cell 2"))
        .InsertItem h, , Array("Sub Cell 1.1", "Sub Cell 2.1")
        .InsertItem h, , Array("Sub Cell 1.2", "Sub Cell 2.2")

    End With

    .EndUpdate
End With
The control provides a property
ShowImageList that shows or hides that images list. By default, the
property is True, to let new customers know that they can drag images without
using an ImageList control. If you are going to add icons at runtime the
control provides Images and
ReplaceIcon methods. The
Images method takes the handle to an ImageList control. The ReplaceIcon
method works like follows:
ReplaceIcon( Icon, -1) method. Adds a new icon to control's image list, and retrieves the
index of the image. Sample: .ReplaceIcon Image1.Picture.Handle, adds a new icon
to the end of the control's image list, .ReplaceIcon
LoadPicture("D:\Icons\help.ico").Handle adds a new icon, loads the icon from a
file, and adds it to control's image list
ReplaceIcon( Icon, n ) ( where n >= 0 ) method. Replaces an icon to
control's image list. Sample: .ReplaceIcon Image1.Picture.Handle, 0 replaces
the first icon in the control's image list
ReplaceIcon( 0, n ) (where n>= 0 ) method. Removes an icon given its index.
Sample: .ReplaceIcon 0, 0 removes the first icon in the control's image
list
ReplaceIcon( 0, -1) method. Clears the images collection. Sample: .ReplaceIcon,
clears the entire image list.
You can delete an icon from the images list window in design mode by selecting
the icon and pressing the BackSpace key. You can delete the icon using the
Delete key but some containers delete the object when Delete key is used. You
can insert new icon files to the control's images list by pressing INSERT key.
The Items object provides properties like:
Items.SelectCount
,
Items.SelectItem
,
Items.SelectedItem
that helps you to access the selected items. The
control fires
SelectionChanged
event when user changes the selection. The following
sample uses the
FindItem
method to looks for an item that contains in the column
"Column 1" the value "Child 2"
The following sample displays the selected items. Only the caption on the first
column are displayed. If you want to display more columns you have to change
the 0 with index of column being displayed.
With Grid1.Items
        Dim i As Long
        For i = 0 To .SelectCount - 1
            Debug.Print .CellValue(.SelectedItem(i), 0)
        Next
End With
There Items object provides few methods like
FindItem,
FindPath in order to find an item. The FindItem method looks for the
first item that has in a column the giving value. For instance the following
sample gets the handle of the item that contains in the first column ( "Column
1" ) the value "Child 2":
If the FindItem method fails to locate the item the 0 is returned. If a non 0
value is returned that means that the control was able to locate the
item.
The FindPath method looks for a path in the control's hierarchy using the
SearchColumnIndex property that indicates the searched column. The
method requires the full path separated by the "/".
Once that we have found the searched item all that we need to call
EnsureVisibleItem method in order to ensure that the item is visible.
If the item was a child of an item that was collapsed the EnsureVisibleItem
method expands that item too.
The control provides multiple ways to do that. If you only need to alternate
the background color for items you should use the
BackColorAlternate property. If only a particular item needs to be
colorized, you have to use properties like:
ItemForeColor,
ItemBackColor,
CellForeColor or
CellBackColor. Also HTML tags like <fgcolor> or <bgcolor>
can be used in the
CellValue property. Remember that control fires the
AddItem event when a new item is inserted to the Items collection. You
can use the AddItem event to apply different colors for the newly added items.
The Def(exCellBackColor)
property of Column object specifies the background color for
all cells in the column. The following sample changes the
background color for all cells in the first column:
With Grid1.Columns(0)
    .Def(exCellBackColor) = RGB(&HF0, &HF0, &HF0)
End With
Another option that you have to color a column is if you are using the
CountLockedColumns property. The CountLockedColumn property specifies
the number of visible columns that are frozen on the left side. A frozen column
is not scrollable. The control provides in that case a property called
BackColorLock that specifies the background color for frozen area of
the control. The same thing is for
ForeColorLock property except that it specifies the foreground color
for the frozen area. In case that CountLockedColumn > 0 the
BackColor and
ForeColor properties are applicable to the scrollable area of the
control.
By default, the control automatically sort a column when the user clicks the
column's header. If the
SortOnClick property is exNoSort, the control doesn't sort the items if
the user clicks the column's header. There are two methods to get items sorted
like follows:
Using the
SortOrder property of the
Column object. The SortOrder property displays the sorting icon in the
column's header if the
DisplaySortIcon property is True:
Grid1.Column(ColIndex).SortOrder = SortAscending
Using the
SortChildren method of t the
Items object. The SortChildren sorts the items. The SortChildren method
sorts the child items of the given parent item in the control. SortChildren
will not recurse through the tree, only the immediate children of Item will be
sorted. The following sample sort descending the list of root items on the
"Column 1"( if your control displays a list, all items are considered being
root items ).
Grid1.Items.SortChildren 0, "Column 1", False
The
SortType property of the
Column object specifies the way how a column gets sorted. By default, a
column gets sorted as string. If you need to sort your dates, the following
snippet of code should be used:
With Grid1
        With .Columns(0)
            .SortType = SortDate
        End With
End With
If you need to sort a column using your special way you may want to use the
SortType = SortUserData that sorts the column using
CellData property for each cell in the column. In this case, the
CellData property holds numeric values only.
There are the several ways of enumerating the
items/cells in the control. The following samples
are in VB, but they can be easily converted to any other
programming language. This samples shows you an idea how
easily you can enumerate through the items.
A). Using the GetItems method of the control. The
GetItems method gets the items as they are displayed,
sorted and filtered to an array or vector. Also, the GetItems method collect
the child items as well, no matter if the parent item is
collapsed. The GetItems method returns an array. For
instance, if your control contains 1 column, the
GetItems will retrieves a one-dimensional
array. A 2 columns will get a two-dimensional
array, an so on. You can use the PutItems method to
insert the array to the control.
B). Using the for each statement for Items
property of the control. The Items property gets a
collection of items as they were added. This method lists
the items by index not by their positions. The items is represented
by handles, so the handle can be used in the Cell properties
to refer the cell. For instance,
Items.CellCaption(Handle,Column) gets the cell from the Item
with the specified handle on specified column. The following
sample displays the cells in the first column as they were
added:
With Grid1
        Dim h As Variant
        For Each h In .Items
            Debug.Print .Items.CellCaption(h, 0)
        Next
End With
If you need to access multiple columns add the Debug.Print
.Items.CellCaption(h, 1), Debug.Print .Items.CellCaption(h,
2) ... for each column you require.
C). A similar approach to B is using the
Items.ItemCount and Items.ItemByIndex properties. This method
lists the items by index not by their positions.
With Grid1
    Dim i As Long
    With .Items
        For i = 0 To .ItemCount - 1
            Debug.Print .CellCaption(.ItemByIndex(i), 0)
        Next
    End With
End With
The Items.ItemByIndex retrieves the handle of the item
giving its index. For instance, the first added item has the
index 0, the second added item has the index 1, and so on.
D). Using the Items.NextVisibleItem property. This
method gets the items as they are displayed, sorted and
filtered.
With Grid1
    With .Items
        Dim h As Long
        h = .RootItem(0)
        While Not h = 0
            Debug.Print .CellCaption(h, 0)
            h = .NextVisibleItem(h)
        Wend
    End With
End With
E). Using the Items.ItemChild and
Items.NextSiblingItem property. This method enumerates recursively
the items and its children. This
method gets the items as they are displayed, sorted and
filtered, including the children items that are not visible
aka parent item is collapsed.
With Grid1
    With .Items
        For i = 0 To .RootCount - 1
            RecItem Grid1, .RootItem(i)
        Next
    End With
End With
Sub RecItem(ByVal c As Object, ByVal h As Long)
If Not(h = 0) Then
Dim hChild As Long
With c.Items
Debug.Print .CellCaption(h, 0)
hChild = .ItemChild(h)
While Not (hChild = 0)
RecItem c, hChild
hChild = .NextSiblingItem(hChild)
Wend
End With
End If
End Sub
Yes. The following function displays all child items ( recursively )
Sub RecItem(ByVal c As EXGridLibCtl.Grid, ByVal h As HITEM)
    If Not (h = 0) Then
        Dim hChild As HITEM
        With c.Items
            Debug.Print .CellValue(h, 0)
            hChild = .ItemChild(h)
            While Not (hChild = 0)
                RecItem c, hChild
                hChild = .NextSiblingItem(hChild)
            Wend
        End With
    End If
end sub
The
ColumnAutoResize property is what you are looking for. If the control's
ColumnAutoResize property is True, the control arranges all visible columns to
fit the control's client area. In this case no horizontal scroll bar is
displayed. If the ColumnAutoResize property if False, control displays a
horizontal scroll bar if the width of visible columns doesn't fit the width of
the client area.
Changing the Name property of the Font object doesn't notify the control that
the used font has been changed, so calling Grid1.Font.Name = "Arial Unicode MS"
has effect only for the control's drop-down window, but it doesn't change the
font for control inside text editors. Remember that Font is a system object,
and it is not implemented by the control, so that's the reason why the control
is not notified that the user has changed the font's name. The following sample
changes the font used by inside text editors as well for the drop-down window:
Dim f As New StdFont
f.Name = "Arial Unicode MS"
Grid1.Font = f
When you expect performance you have to be carefully to each line of code in
your project. Here's few hints about improving performance when you are using
the control:
The Items
property performs a QueryInterface each time when it is called. It is
recommended using a variable that holds the Items property instead
calling the property itself. For instance call set its = Grid1.Items when form
is loaded, and use 'its' variable each time when you need to access the Items
collection.
Use With .. End With statements each time you can. It avoids calling too many
times a QueryInterface by the control.
Holds a column to a variable instead calling
Item property. For instance, the Item property of the Columns object
searches for a column. The
Add method of
Columns object retrieves the added Column object. For instance use code
like follows to add and initialize a new column:
With Grid1.Columns
    With .Add("Column 1")
        .Width = 128
        .AllowSizing = False
        .AllowDragging = False
        .DisplaySortIcon = False
    End With
End With
or
With Grid1.Columns
    Dim c As EXGridLibCtl.Column
    Set c = .Add("Column 1")
    c.Width = 128
    c.AllowSizing = False
    c.AllowDragging = False
    c.DisplaySortIcon = False
End With
Use
BeginUpdate and
EndUpdate
methods when multiple operations require changing the control.
Whenever you want to access an column use its index instead its name. For
instance if the "Column 1" is the first column in the control use the
.Items.CellValue( Handle, 0 ) instead .Items.CellValue( Handle, "Column 1"). or
.Columns(0) instead .Columns("Column 1")
If you are using the control using the unbound mode make sure that the ReadItem
method is light and easy. The ReadItem method is called each time when the
control requires an item. Obviously, once that an item was retrieved when
control requires the same item, it was already cached so no ReadItem method is
called. Also an improvement to ReadItem method could be using a variable its (
that holds the control's Items property ) instead Source.Items.
If you are using the unbound mode, but you still get data from a recordset make
sure that you are using an index on the table instead using FindItem method.
You can use also hash tables. The Select property uses the FindItem method that
does a linear search.
The sample cannot be run because you have installed Access 97, and it is not
able to recognize the database. There is a VB\Acceess97 folder where you can
find a sample for Access 97.
The ExGrid supports divider items. A divider item is an item that's fixed and
cannot be scrolled. Using divider items you can create application looks like
Windows Explorer XP. The
ItemDivider and
ItemDividerLine properties help you to add divider items. The
VB\Divider sample explains better how divider items work.
The control supports editors for the entire column as well for a specific cell.
The
Column.Editor property specifies the editor for the entire column. The
Items.CellEditor specifies an editor for a particular item. The
following sample shows how to specify a different editor for a cell ( the
handle specifies the handle of the item, and col specifies the column's index
or column's name ):
With .Items
	With .CellEditor( handle, col )
		.EditType = DropDownListType
		.AddItem 0, "Zero"
		.AddItem 1, "One"
		.AddItem 2, "Two"
	End With
End With
Yes. The Items object provides a property
Items.CellEditorVisible that helps you to hide the default editor. If
the cell's has no its own editor ( CellEditor ), the column's editor is
used.
The
Items object exposes methods like
AddItem,
InsertItem or
InsertControlItem. These help you to add new items to the control.
Also, please check the entry "How can I add new items to the control?".
The ExG2Host component, includes the new-row feature.
The control provides ability to use any third part
control as an user editor. In other words, you can show/hide
a custom editor when the control's cell gets or loses the focus. The control provides a new editor type
EditTypeEnum.UserEditorType. The
UserEditor method of the
Editor object specifies the control's identifier ( like
Exontrol.ComboBox, MSCAL.Calendar, and so on ), and the control's
runtime license key. The runtime license key is not the same with your
development license key. If the control uses a
runtime-license key you have to request for its vendor. Once
the UserEditor method is invoked, the Editor
object creates the editor based on the control's identifier. In that case, you
can access the newly created object using the
UserEditorObject property. The property UserEditorObject allows you to
initialize the user editor before using it as a built-in editor.
There are three steps to follow when using an user editor
as listed:
building and filling the user editor with values (UserEditorObject
property)
preparing the user editor to be shown when the cell
get the focus (UserEditorOpen event)
updating the cell's value when the user editor loses
the focus (UserEditorClose
event)
The control
fires the
UserEditorOpen event when the UserEditorType editor is about to be
displayed ( the control's cell gets the focus or Edit method
has been called ) . Using this event, you have the ability to prepare the user
editor before showing it. When the UserEditorType is about to be
closed ( the control's cell loses the focus, the user clicks
outside of the user editor ), the
control fires the
UserEditorClose event, so you have to handle
this event to specify the new value to be updated on the
control. The user editor fires its events through the
UserEditorOleEvent event. The control fires the UserEditorOleEvent
event when an user editor fires an event. The event has an argument CloseEditor
that helps you to close the editor when a certain action
occurs.
Having these said, let's show how you can insert the Exontrol.ComboBox
as an user editor, to provide a multiple-columns drop
down within the control:
building and filling the user editor with values (
UserEditorObject property)
With Grid1.Columns.Add("Exontrol.ComboBox").Editor
    .EditType = UserEditorType
    .UserEditor "Exontrol.ComboBox", ""
    With .UserEditorObject
        .BeginUpdate
        .Style = 2
        .ColumnAutoResize = False
        Set rs = CreateObject("ADOR.Recordset")
        With rs
            .Open "Orders", "Provider=Microsoft.Jet.OLEDB.4.0;Data Source=C:\Program Files\Exontrol\ExGrid\Sample\SAMPLE.MDB", 3, 3
        End With
        .DataSource = rs
        .MinHeightList = 128
        .EndUpdate
    End With
End With
The code adds a new column to the control, assigns an
Exontrol.ComboBox user editor, and fills the combobox
with the values ( this sample loads the values from a
ADO table )
Let's have some items to be shown on the control:
With Grid1
    .DefaultItemHeight = 21
    .DrawGridLines = exRowLines
    With .Items
        .CellEditorVisible(.AddItem(10248), 0) = exEditorVisible
        .CellEditorVisible(.AddItem(10249), 0) = exEditorVisible
        .CellEditorVisible(.AddItem(10250), 0) = exEditorVisible
    End With
End With
preparing the user editor to be shown when the cell
get the focus (
UserEditorOpen event)
Private Sub Grid1_UserEditorOpen(ByVal Object As Object, ByVal Item As EXGRIDLibCtl.HITEM, ByVal ColIndex As Long)
    With Object
        .SearchColumnIndex = 0
        .Value = Grid1.Items.CellValue(Item, ColIndex)
        .Items.EnsureVisibleItem .Items.FocusItem
    End With
End Sub
The Object parameter indicates refers the Exontrol.ComboBox
editor that has been assigned to the cell/column. The
code selects the value in the combobox to be the one
that the control's displays.
updating the cell's value when the user editor
loses the focus (
UserEditorClose event)
Private Sub Grid1_UserEditorClose(ByVal Object As Object, ByVal Item As EXGRIDLibCtl.HITEM, ByVal ColIndex As Long)
    Grid1.Items.CellValue(Item, ColIndex) = Object.Value
End Sub
The Object parameter indicates refers the Exontrol.ComboBox
editor that has been assigned to the cell/column. The
updates the control cell's value with the selected value
in the combobox control.
Now, let's say we want to ( this samples can
be combined in any way you desire, it shows how you can do
something, but does not mean that's all you can do ) :
navigate the items of the control up
or down while pressing UP or DOWN keys and the drop down
portion of the Exontrol.ComboBox
is not shown, and navigate through the items of
the Exontrol.ComboBox,
when it is opened.
In this case, we must handle the
UserEditorOleEvent event, which notifies the
application when an event is fired by the inside user
editor.
Before all, you must see for a but how you
can display information about firing events, so just add the
following handler:
Private Sub Grid1_UserEditorOleEvent(ByVal Object As Object, ByVal Ev As EXGRIDLibCtl.IOleEvent, CloseEditor As Boolean, ByVal Item As EXGRIDLibCtl.HITEM, ByVal ColIndex As Long)
    Debug.Print Ev.ToString
End Sub
This handler displays information about the
events that inside user editor fires, like in the following
output:
This is how the information about firing
events is shown, but the content is different when using a
different user editor.
Let's show step by step how we can do the:
navigate the items of the
control up or down while pressing UP or DOWN keys and
the drop down portion of the Exontrol.ComboBox
is not shown, and navigate through the items of
the Exontrol.ComboBox,
when it is opened (F4 key).
Dim iPreventChangeCellValue As Long

Private Sub Grid1_UserEditorClose(ByVal Object As Object, ByVal Item As EXGRIDLibCtl.HITEM, ByVal ColIndex As Long)
    If (iPreventChangeCellValue = 0) Then
        Grid1.Items.CellValue(Item, ColIndex) = Object.Value
    End If
End Sub

Private Sub Grid1_UserEditorOleEvent(ByVal Object As Object, ByVal Ev As EXGRIDLibCtl.IOleEvent, CloseEditor As Boolean, ByVal Item As EXGRIDLibCtl.HITEM, ByVal ColIndex As Long)
    Debug.Print Ev.ToString
    Dim nKeyCode As Long
    If (Ev.ID = -602) Then                                              ' KeyDown
        nKeyCode = CLng(Ev(0).Value)                                    ' The code of the key being pressed
        If (nKeyCode = 38) Or (nKeyCode = 40) Then                      ' Up or Down
            If (Not Object.DropDown(Nothing)) Then                      ' Is the ExComboBox's DropDown portion closed?
                Ev(0).Value = 0                                         ' Eats the key, so cancels any further operation on ExComboBox

                '
                ' Selects the next/prev visible item in the control, makes the current editor to be close, so
                ' the Grid1_UserEditorClose, and so prevents changing the cell's value, by using the iPreventChangeCellValue internal counter
                '

                iPreventChangeCellValue = iPreventChangeCellValue + 1
                With Grid1.Items
                    Select Case nKeyCode
                        Case 38
                            If (Not .PrevVisibleItem(.FocusItem) = 0) Then
                                .SelectItem(.PrevVisibleItem(.FocusItem)) = True
                            End If
                        Case 40
                            If (Not .NextVisibleItem(.FocusItem) = 0) Then
                                .SelectItem(.NextVisibleItem(.FocusItem)) = True
                            End If
                    End Select
                End With
                iPreventChangeCellValue = iPreventChangeCellValue - 1
            End If
        End If
    Else
        If (Ev.ID = 6) Then ' SelectionChanged
            If (Object.DropDown(Nothing)) Then                          ' Is the ExComboBox's DropDown portion opened?
                Grid1.Items.CellValue(Item, ColIndex) = Object.Value    ' Updates the cell'value with the new selected value in the combobox
            End If
        End If
    End If
End Sub
The sample selects the next/prev items
in the control, when user presses the Up/Down key and
the Exontrol.ComboBox
is closed, updates the cell's value when the
SelectionChanged event is fired while the Exontrol.ComboBox
is opened. The UserEditorClose event has been
changed, so we can prevent when the cell's value is
updated. For instance, selecting a new item in the
control makes the current editor to be closed, so the
UserEditorClose is fired, but we do not want to update
the cell's value as we need just to advance to a next
field
Private Sub Grid1_UserEditorOleEvent(ByVal Object As Object, ByVal Ev As EXGRIDLibCtl.IOleEvent, CloseEditor As Boolean, ByVal Item As EXGRIDLibCtl.HITEM, ByVal ColIndex As Long)
    Debug.Print Ev.ToString
    If (Ev.ID = 6) Then ' SelectionChanged
        Grid1.Items.CellValue(Item, ColIndex) = Object.Value    ' Updates the cell'value with the new selected value in the combobox
    End If
End Sub
The sample updates the cell's value when
an item gets selected in the Exontrol.ComboBox
user editor.
close the editor once the user
hits the ENTER key,
Private Sub Grid1_UserEditorOleEvent(ByVal Object As Object, ByVal Ev As EXGRIDLibCtl.IOleEvent, CloseEditor As Boolean, ByVal Item As EXGRIDLibCtl.HITEM, ByVal ColIndex As Long)
    Debug.Print Ev.ToString
    If (Ev.ID = -603) Then   ' KeyPress event
        If (CLng(Ev(0).Value) = 13) Then    ' 13 is the code for ENTER key
            CloseEditor = True
        End If
    End If
End Sub
The sample changes the CloseEditor
parameter to True, when the user hits the ENTER key.
In case you have an alternative COM object that can be used, you
need to use its identifier when using the
UserEditor method. Please consult the object's documentation for its
properties, methods or events. Unfortunately, we can't provide
information or specifications for third parties ActiveX controls. We can
provide technical support only for controls that we own. For instance, the
following sample uses the Microsoft ComboBox control as an user editor:
With Grid1.Items
    With .CellEditor(.AddItem(0), 0)
        .EditType = UserEditorType
        .UserEditor "Forms.ComboBox.1", ""
        With .UserEditorObject
            .BackColor = vbBlue
            .ForeColor = vbWhite
            .AddItem "One"
            .AddItem "Two"
        End With
    End With
End With
Before running the sample, the control needs to have at least a
column.
The Items object provides properties like
ItemDivider,
ItemDividerLine helps you to merge cells of the row into a single cell.
The setup installs a sample VB\Divider that helps you to understand how
ItemDivider works. Also, the ItemDivider property helps you to group items in
the control. The divider items are not scrolled when the user drags the
horizontal scroll bar so the groups titles will be visible most of the time.
The ItemDivider property specifies the index of cell being displayed instead
displaying the entire item.
The
CellPicture property of the
Items object helps you to attach a picture file ( bmp, gif, whatever )
to a cell. The following sample shows how to attach a picture to the first
visible cell of the control:
With Grid1.Items
    .CellPicture(.FirstVisibleItem, 0) = LoadPicture("c:\winnt\Zapotec.bmp")
End With
If the picture's height is larger than item's height you can use the
ItemHeight property to let picture fits the item's client area. The
CellPicture property accepts objects of IPictureDisp type. The LoadPicture
function retrieves an IPictureDisp object. The following sample can be used
too:
With Grid1.Items
    .CellPicture(.FirstVisibleItem, 0) = "c:\winnt\Zapotec.bmp"
End With
If the CellPicture property points to a string value, the control loads the
picture file. If the CellPicture refers a Picture object the picture object is
loaded.
The control requires a runtime license key before calling Add method of Controls
collection. The VB environment provides a Licenses collection that holds
runtime license keys. So, your sample should look like following:
Private Sub Form_Load()
    Dim obj As Object
    Licenses.Add "Exontrol.Grid", "xxxxxxxx"
    Set obj = Controls.Add("Exontrol.Grid", "grid", Me)
    obj.Visible = True
End Sub
The value "xxxxxxxx" is NOT a valid runtime license key. Please contact us if
you require the control's runtime license key. The site version of the control
doesn't require a runtime license key. Your development key machine is not the
control's runtime key.
The 'License' optional parameter of the
InsertControlItem method needs to provide the control's runtime license
key. For instance, if you have something like:
.InsertControlItem(,"Exontrol.Grid")
it should look like:
.InsertControlItem(,"Exontrol.Grid", "xxxxxxxx")
Please note that the "xxxxxxxx" is NOT a valid runtime license key. Please
contact us if you require the runtime license key for any of our components.
Yes, that's possible. You can have different editors for each cells
in the same column, by using
CellEditor property like in the following sample:
With Grid1.Items
	With .CellEditor(.ItemByIndex(0), 0)
		.EditType = CheckListType
		.AddItem 1, "Item1"
		.AddItem 2, "Item2"
		.AddItem 4, "Item3"
	End With
	With .CellEditor(.ItemByIndex(1), 0)
		.EditType = CheckListType
		.AddItem 1, "NewItem1"
		.AddItem 2, "NewItem2"
		.AddItem 4, "NewItem3"
	End With
End With
If you want to provide different shortcut menus for control depending on clicked
cell, the
MouseUp or
MouseDown events should be used. Else, if you want to provide a general
shortcut menu, the
RClick event can be used too. The following sample handles the MouseUp
event and displays a shortcut menu when user right clicks a cell:
Private Sub Grid1_MouseUp(Button As Integer, Shift As Integer, X As Single, Y As Single)
    ' Checks whether the user right clicks the mouse
    If (Button = 2) Then
        ' Gets the cell from point
        Dim h As HITEM, c As Long, i As Long, hit as Long
        h = Grid1.ItemFromPoint(X / Screen.TwipsPerPixelX, Y / Screen.TwipsPerPixelY, c, hit)
        ' Displays a popup menu if the right clicks a cell
        If (h <> 0) Then
            i = PopupMenu1.ShowAtCursor()
            If (i > 0) Then
                ' Displays the identifier of the context menu item  selected
                Debug.Print "You have selected the item " & i
            End If
        End If
    End If
End Sub
The sample uses the exPopupMenu that can be downloaded here.
The SHGetFileInfo API function gets the icon associated to a file. The following
sample associates a Windows Explorer icon to a cell.
The sample requires the following declarations:
Private Declare Function SHGetFileInfo Lib "shell32.dll" Alias "SHGetFileInfoA" (ByVal pszPath As String, ByVal dwFileAttributes As Long, psfi As SHFILEINFO, ByVal cbFileInfo As Long, ByVal uFlags As Long) As Long
Private Const SHGFI_ICON = &H100
Private Const SHGFI_OPENICON = &H2
Private Const SHGFI_SMALLICON = &H1
Private Type SHFILEINFO
	hIcon As Long
	iIcon As Long
	dwAttributes As Long
	szDisplayName As String * 1024
	szTypeName As String * 80
End Type
The following sample shows how to associate a Windows Explorer icon to a cell.
Dim s As SHFILEINFO
SHGetFileInfo "c:\winnt\system32\sndrec32.exe", 0, s, 0, SHGFI_SMALLICON Or SHGFI_ICON Or SHGFI_OPENICON
Grid1.ReplaceIcon s.hIcon, 0
Grid1.Items.CellImage(Grid1.Items.FirstVisibleItem, 0) = 1
The control provides the
ASCIILower and
ASCIIUpper properties that helps you to specify the set of characters
that are converted by the auto search feature. If you want to make the auto
search feature case sensitive you have to use ASCIIUpper = "".
The control provides the
ASCIILower and
ASCIIUpper properties that helps you to specify the set of characters
that are converted by the auto search feature. For instance if you have the set
?/? ?/? Ā/ā Ă/ă Ą/ą Ć/ć Ĉ/ĉ
Ċ/ċ Č/č Ď/ď Ē/ē Ĕ/ĕ
Ė/ė Ę/ę Ě/ě Ĝ/ĝ Ğ/ğ
Ġ/ġ Ģ/ģ Ĥ/ĥ Ō/ō Ŏ/ŏ
Ŕ/ŕ Ŗ/ŗ Ř/ř Ś/ś, you have to call
something like: ASCIILower like "abcdefghijklmnopqrstuvwxyz??ā....", and
ASCIIUpper like "ABCDEFGHIJKLMNOPQRSTUVWXYZ??A....
If you are using VB, the setup installs the VB\UserEdit sample that will help
you to add an ExComboBox control as an user editor. Shortly, in order to add a
new user editor to one of your grid columns, or cells, you have to know that
EditType property of Editor object should be
EditTypeEnum.UserEditorType. Once that you have set this property, the
user has to specify the type of the user control using the
UserEditor method of
Editor object. For instance, UserEditor
"Exontrol.ComboBox", ""
initializes an user editor of ExComboBox type. If the grid creates the user
editor successfully, the UserEditorObject
property of Editor object points to the newly created user control. So, in this
case it references an ExComboBox control. Use the UserEditorObject property any
time when you need to access the user editor control. The events like
UserEditorOleEvent,
UserEditorOpen or
UserEditorClose are fired anytime when grid control has to deal with an
user editor control.
The UserEditorOpen event is fired when the grid control needs to display the
user editor control. The user has to handle this event to prepare the user
editor control before showing. For instance, in VB your handler should look
like:
Private Sub Grid1_UserEditorOpen(ByVal Object As Object, ByVal Item As EXGRIDLibCtl.HITEM, ByVal ColIndex As Long)
    With Object
        .Select(0) = Grid1.Items.CellValue(Item, ColIndex)
    End With
End Sub
If you are using C++ the handler should look like:
VOID __stdcall OnUserEditorOpenGrid1(IDispatch * Object, EXGRIDLib::HITEM Item, LONG ColIndex)
{
	// Selects the associated item into the user editor control. ( In this case the user editor is an ExComboBox control )
	EXCOMBOBOXLib::IComboBoxPtr spCombo = Object;
	spCombo->PutSelect( _variant_t((long)0), m_spGrid->Items->CellValue[Item][_variant_t(ColIndex)] );
}
The UserEditorOleEvent event occurs when an user editor control fires an event.
In VB, the handler should look like follows:
Private Sub Grid1_UserEditorOleEvent(ByVal Object As Object, ByVal Ev As EXGRIDLibCtl.IOleEvent, CloseEditor As Boolean, ByVal Item As EXGRIDLibCtl.HITEM, ByVal ColIndex As Long)
    CloseEditor = Ev.Name = "Change"
    If (CloseEditor) Then
        Grid1.Items.CellValue(Item, ColIndex) = Object.Select(0)
    End If
End Sub
In C++ the handler should look like follows:
VOID __stdcall OnUserEditorOleEventGrid1(IDispatch * Object, EXGRIDLib::IOleEvent * Ev, VARIANT_BOOL * CloseEditor, EXGRIDLib::HITEM Item, LONG ColIndex)
{
	// Closes the user editor when it fires the "Change" event. In this case the user editor is an ExComboBox control
	if ( *CloseEditor = (Ev->Name == _bstr_t("Change")) )
	{
		// Changes the grid's value based on the user selection.
		EXCOMBOBOXLib::IComboBoxPtr spCombo = Object;
		m_spGrid->Items->CellValue[ Item ][ _variant_t((long)ColIndex) ] = spCombo->GetSelect( _variant_t( (long)0 ) );
	}
}
The UserEditorClose event occurs when the control hides the user editor control.
The user editor (inner control) acts independently when hosting by the
control (master control), in other words, the inner control handles the keys
/ mouse the same way as it were hosted by a form, window, or
dialog.
So, in order to overwrite the behavior of tab TAB key inside the
inner control you have two options: 1) sending the TAB key
to the master control, 2) changes the FocusColumnIndex
property, during the master's UserEditorOleEvent event, when
the KeyDown inner event occurs, and the KeyAscii parameter
is 9 ( TAB character code).
1) The following sample handles the UserEditorOleEvent
event, so when the user presses the TAB key inside the inner
control, sends the TAB key to the master control:
Private Sub Grid1_UserEditorOleEvent(ByVal Object As Object, ByVal Ev As EXGRIDLibCtl.IOleEvent, CloseEditor As Boolean, ByVal Item As EXGRIDLibCtl.HITEM, ByVal ColIndex As Long)
    Debug.Print Ev.ToString()                                       ' Print brief information of the inner event
    If (Ev.ID = -602) Then                                          ' Is KeyDown event of the inner control?
        If (CInt(Ev.Param(0).Value) = 9) Then                       ' Is the TAB key pressed?
            With Grid1
                .SetFocus                                           ' Focuses the master control
                CreateObject("WScript.Shell").SendKeys ("{TAB}")    ' Simulates pressing the TAB key, so focuses the next visible column, and edits it if case
            End With
        End If
    End If
End Sub
This method has the advantage that it uses the control's
TAB mechanism to move the focus to the next / previously
visible column, as they are displayed. For instance, if you
have hidden columns, they are ignored
2) The following sample handles the UserEditorOleEvent
event, so when the user presses the TAB key inside the inner
control, changes the control's FocusColumnIndex property,
and so edits the next column/cell.
Private Sub Grid1_UserEditorOleEvent(ByVal Object As Object, ByVal Ev As EXGRIDLibCtl.IOleEvent, CloseEditor As Boolean, ByVal Item As EXGRIDLibCtl.HITEM, ByVal ColIndex As Long)
    Debug.Print Ev.ToString()                       ' Print brief information of the inner event
    If (Ev.ID = -602) Then                          ' Is KeyDown event of the inner control?
        If (CInt(Ev.Param(0).Value) = 9) Then       ' Is the TAB key pressed ?
            Ev.Param(0).Value = 0                   ' Prevents any further action of the inner control
            With Grid1
                .EditClose                          ' Closes the current user editor
                .FocusColumnIndex = ColIndex + 1    ' Focus the next column
                .Edit                               ' Opens the editor of the focused column ( Has effect only AutoEdit property is False )
            End With
        End If
    End If
End Sub
This method has the disadvantage that you have to collect
the visible columns as they are displayed, and provide the
next / previously valid index for FocusColumnIndex, based on
the ColIndex parameter..
By default, the drop down portion of an editor is loaded with the predefined
values as they were added. In order to sort them, the
Editor object provides a method called
SortItems. The SortItems method sorts the list of items into an Editor
object.
By default, the column gets sorted descendent when user clicks the column's
header. The
DefaultSortOrder property of the
Column object specifies whether the default sort order for a column is
ascending or descending.
By default, the
SortOnClick property is exDefaultSort. If the Grid1.SortOnClick =
exUserSort the control displays the sort icons on the column's header but it
doesn't sort the items. The
ColumnClick event is fired when user clicks the column's header.
Yes. The
Column object provides the
HTMLCaption property that allows you display the column's caption using
built-in HTML tags. If the HTMLCaption property is empty ( by default it is
empty ), the Caption property is displayed on the column's header. If the
HTMLCaption property is not empty, the control displays the HTMLCaption in the
column's header using built-in HTML tags.
The
HeaderHeight property helps you to specify the height for the control's
header. The <br> built-in HTML tag can be used to break a line, so you
can use it in the
HTMLCaption property of the
Column object like in the following sample:
The
Option property of
Editor object provides the ability to add scroll bars to a memo editor
using the
exMemoHScrollBar and
exMemoVScrollBar options. For instance, the following sample adds both
scroll bar to the editor of the first column:
With Grid1.Columns(0).Editor
        .Option(exMemoAutoSize) = False     ' Disables auto resizing when user alters the text
        .Option(exMemoVScrollBar) = True    ' Adds the vertical scroll bar
        .Option(exMemoHScrollBar) = True    ' Adds the horizontal scroll bar
End With
If the column has associated an editor all cells in the column display the
cell's value depending on the type of the column's editor. For instance if you
have an editor of DropDown type, the cell's value should be the value of the
item in the predefined list. In this case, if you want to display another
caption to the cell you have to use the
CellEditorVisible property to hide the cell's editor, and to set the
newly caption using
CellValue property like in the following sample:
With Grid1
	Dim h As HITEM
	h = .Items.ItemByIndex(1)		' Takes the second item
	.Items.CellEditorVisible(h, 1) = False	' Hides the default cell's editor ( that the column's editor instead )
	.Items.CellValue(h, 1) = "Just a text"	' Displays a new caption
End With
The
Editor object exports the
FindItem property that helps you to get the value of an item giving its
caption, or finding the item's caption giving its value. If the FindItem
property retrieves an empty value ( vt = VT_EMPTY ), if it cannot find the
item's value or item's caption. If the value passed to FindItem is of string
type, the control looks for the item's value with the giving caption, else it
looks for the item's caption giving its value.
The
Tooltip property of
Column object specifies the tooltip's description that shows up when
the cursor is over the column's caption. If the Tooltip property is empty, no
tooltip is displayed. By default, the title for the tooltip window is the
column's caption.
The
ColumnFromPoint property gets the index of the column from the cursor.
The ColumnFromPoint property retrieves -1, if no column was found over the
cursor. The following sample displays the column's caption using the
MouseMove event:
Private Sub Grid1_MouseMove(Button As Integer, Shift As Integer, X As Single, Y As Single)
    With Grid1
        Dim i As Long
        i = .ColumnFromPoint(X / Screen.TwipsPerPixelX, Y / Screen.TwipsPerPixelY)
        If (i >= 0) Then
            Debug.Print .Columns(i).Caption
        End If
    End With
End Sub
The Key
property of the
Column object helps you to assign a key to a column. Using this key you
can access the column using the
Item property of the
Columns object.
The control's
ExpandOnDblClick property whether the item is expanded or collapsed
when the user dbl clicks an item. By default, the ExpandOnDblClick is True, so
you need to set the ExpandOnDblClick property on False, and to use a handler
like follows:
Private Sub Grid1_DblClick(Shift As Integer, X As Single, Y As Single)
    With Grid1
    Dim c As Long, h As HITEM, hit as Long
    h = .ItemFromPoint(X / Screen.TwipsPerPixelX, Y / Screen.TwipsPerPixelY, c, hit)
    If Not (h = 0) Then
        With .Items
            Debug.Print .CellValue(h, c)
        End With
    End If
    End With
End Sub
The following sample displays a new caption in the control's filter bar when user changes the filter.
Private Sub Grid1_FilterChange()
    With Grid1
        .FilterBarCaption = "Click the left button to remove the current filter."
    End With
End Sub
If you need to change the function names like
IsBlank, not IsBlank
used by the default filter bar caption, you have to use the
Description property like follows:
The
CellImage property assign a single icon to the cell. Instead if
multiple icons need to be assigned to a single cell you have to use the
CellImages property. The CellImages property takes a list of additional
icons and display them in the cell. The list is separated by ',' and
should contain numbers that represent indexes to Images list collection. The
following sample assign first and third icon to the cell:
With Grid1.Items
        .CellImages(.ItemByIndex(0), 1) = "1,3"
End With
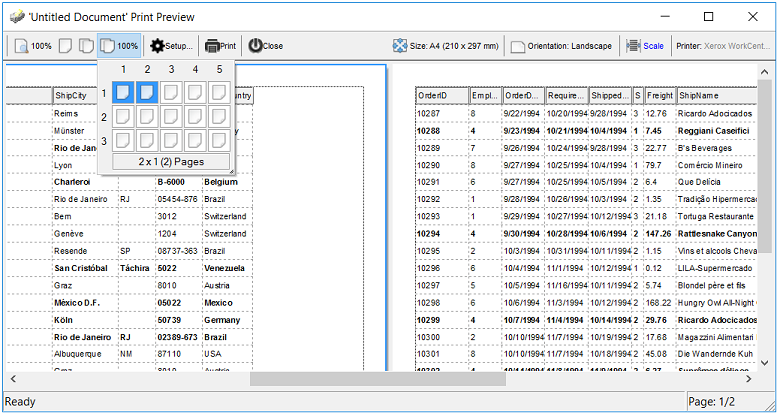
Yes, the Exontrol ExPrint component ( exprint.dll ) provides Print and Print
Preview capabilities for the ExGrid component. Once that you can have the
exPrint component in your Components list, insert a new instance of
"ExPrint
1.0 Control Library" to your form and add the following VB code:
Private Sub Command1_Click()
    With Print1
        Set .PrintExt = Grid1.Object
        .Preview
    End With
End Sub
The following sample shows how to call Preview method in C#:
The Exontrol ExPrint component ( exprint.dll ) provides Print and Print
Preview capabilities for the Exontrol ExList component.
The requirements for the FitToPage option:
Exontrol.ExPrint version 5.2 ( or greater )
Exontrol.ExGrid version 6.3 ( or greater )
If these are not meet, the Options("FitToPage") property has NO
effect.
The FitToPage option could be one of the following:
On, (Fit-To-Page) the control's content is printed to a single page
( version 6.3 )
p%, (Adjust-To) where p is a positive number that indicates the
percent from normal size to adjust to. For instance, the "FitToPage =
50%" adjusts the control's content to 50% from normal size. ( version
10.1 )
w x, (Fit-To Wide) where w is a positive number that indicates that the control's content fits w pages wide by
how many pages tall are required. For instance,
"FitToPage = 3 x" fits the control's content to 3 pages wide by
how many pages tall is are required. ( version 10.1 )
x t, (Fit-To Tall) where t is a positive number that specifies
that the control's content fits t pages tall by how many pages wide are
required. For instance,
"FitToPage = x 2" fits the control's content to 2 pages tall by
how many pages wide are required. ( version 10.1 )
w x t, (Fit-To) where w and t are positive numbers that specifies
that the control's content fits w pages wide by t pages tall. For instance,
"FitToPage = 3 x 2" fits the control's content to 3 pages wide by
2 pages tall. ( version 10.1 )
The following VB6 sample shows how to show the ExGrid/COM's content to one page
when print or print preview the component:
Private Sub Command1_Click()
    With Print1
        .Options = "FitToPage = On"
        Set .PrintExt = Grid1.Object
        .Preview
    End With
End Sub
The following VB/NET sample shows how to show the ExGrid/NET or /WPF's content to one page
when print or print preview the component:
Private Sub Button1_Click(ByVal sender As System.Object, ByVal e As System.EventArgs) Handles Button1.Click
    With Exprint1
        .Options = "FitToPage = On"
        .PrintExt = Exgrid1
        .Preview()
    End With
End Sub
The most probably thing is that your recordset ( rs ) is a DAO
recordset, and
the GetRows with no argument retrieves only a single record. Instead you can
use the rs.GetRows( rs.RecordCount).
The
BackColorHeader property changes the background color of columns
header. The
BackColor property changes the background color for the entire control.
If you need to change the background color for a particular column, you can use
the
HTMLCaption property of the
Column object like in the following code:
With Grid1.Columns(0)
	.HTMLCaption = "<bgcolor=FF0000>new caption</bgcolor>"
End With
The editor can be applied to a column or to a cell. It depends on how do you
indent to use the control.
So, for instance if you need an editor for all cells in the column, the
Editor property of the
Column should be used like in the following sample:
With Grid1.Columns(0)
        With .Editor
            .EditType = DropDownListType
            .AddItem 1, "1. One", 1
            .AddItem 2, "2. Two", 2
            .AddItem 3, "3. Three", 3
        End With
End With
The sample assigns to the first column an editor of drop down type with
three values.
Now if you need a particular editor for a particular cell you need to use the
CellEditor property of
Items object like in the following sample:
With Grid1.Items.CellEditor(Grid1.Items.ItemByIndex(0), 0)
        .EditType = DropDownListType
        .AddItem 1, "1. One", 1
        .AddItem 2, "2. Two", 2
        .AddItem 3, "3. Three", 3
        .AddItem 4, "4. Four", 4
End With
If you need to hide the cell's editor you have to use the
CellEditorVisible property like follows ( if the cell's editor is
hidden the default cell's value is shown ).:
Yes. The ColorListType value of
EditTypeEnum specifies a color picker editor, that allows you to
specify a predefined list of colors. By default, an editor of ColorListType
editor adds the following colors: Black, White, Dark Red, Dark Green, Dark
Yellow, Dark Blue, Dark Magenta, Dark Cyan, Light Grey, Dark Grey, Red, Green,
Yellow, Blue, Magenta, Cyan.
The following sample declares your own colors for a single cell:
With Grid1
        .Columns.Add ("Caption")
        With .Items
            Dim h As HITEM
            h = .AddItem(vbWhite)
            With .CellEditor(h, 0)
                .EditType = ColorListType
                .DropDownAutoWidth = False
                .ClearItems
                .AddItem vbBlack, "Black"
                .AddItem vbWhite, "White"
            End With
        End With
End With
The following sample declares your own colors for a column:
With Grid1
        Dim c As Column
        Set c = .Columns.Add("Colors")
        With c.Editor
            .EditType = ColorListType
            .DropDownAutoWidth = False
            .ClearItems
            .AddItem vbBlack, "Black"
            .AddItem vbWhite, "White"
        End With
        With .Items
            .AddItem vbBlack
            .AddItem vbWhite
        End With

End With
If the
Editor.Option( exColorListShowName ) is True, the control displays the
color's name. By default, the Editor.Option( exColorListShowName ) is
False, and the control doesn't display the color's name. The following sample
shows how to add a list of predefined colors:
With Grid1
        .MarkSearchColumn = False
        With .Columns.Add("ColorList").Editor
            .EditType = ColorListType
            .Option(exColorListShowName) = True
            .ClearItems
            .AddItem vbBlack, "Black"
            .AddItem vbWhite, "White"
        End With

        With .Items
            .AddItem vbBlack
            .AddItem vbWhite
        End With
End With
The system colors list into a ColorList editor is visible only if the
Editor.Option( exColorShowSystem ) is True. Use the
Editor.Option(
exColorShowSystem ) = False to hide the system colors list into a ColorList
editor. The following sample displays only the palette colors list:
With Grid1
        .MarkSearchColumn = False
        With .Columns.Add("Color").Editor
            .EditType = ColorType
            .Option(exColorShowSystem) = False
        End With

        With .Items
            .AddItem vbBlack
            .AddItem vbWhite
        End With
End With
Use the Editor.Option( exColorShowPalette ) = False to hide the palette colors list into a ColorType editor.
The following sample adds an item that hosts a read-only Word Document:
With Grid1
        .BeginUpdate
        If .Columns.Count > 0 Then
            Dim hx As HITEM
            hx = .Items.InsertControlItem(, "D:\Program Files\Microsoft Visual Studio .NET\Vc7\migration_guide.doc")
            With .Items.ItemObject(hx)
                .Document.Protect 2
            End With
        End If
        .EndUpdate
End With
The whole idea is to call Protect method of object returned by the Document
property.
Here's few hints that should be followed in order to get information about
returned object (
ItemObject property ).
We would suggest using the following snippet of code ( the sample requires an
Exontrol
ExPropertiesList control on the form ).
where XXX is the handle of the item that hosts an ActiveX control.
PropertiesList1 is the name of the ExPropertiesList control into your form. The
above snippet displays the list of interfaces implemented by the object passed
to Interfaces property of the ExPropertiesList control. Once that we got the
interfaces list, we should look for any interface that object implements. For
instance, if we are using a WebBrowser control the result of Interfaces
property will include interfaces like: IWebBrowser and
IWebBrowser2. Of course, you need to read more about each implemented
interface depends on what are you trying to do with the hosted object. In our
case, we have a Microsoft Web Browser control that hosts a Word document.
Calling any property of IWebBrowser2 will affect only the WebBrowser control
without affecting the inside document, so we need to go forward by looking at
what Document property exposes using the following snippet of code:
In this case the result is the list of interfaces exported by Document object.
We will observe that it includes the _Document interface ( the main interface
for Word automation ). Now how can I see the properties and methods that
_Document interface exposes? There are plenty of tools that can browses the COM
objects type libraries, we prefer using the OLE/COM Object Viewer (
OLEVIEW.EXE ) tools. Usually it is located in the C:\Program Files\Microsoft
Visual Studio\Common\Tools folder, it depends how you installed the
MSDEV. So,
in order to find out properties and methods that an IDispatch interface exposes
you have to open the "Interfaces" item, and to look for the interface name.
Once that we locate the interface we have to display its type library ( right
click\View\View Type Info).
The control provides partial check feature for each column. The
Column object exports the
PartialCheck property that enables or disables the partial check
feature on the column. The
CellHasCheckBox property assigns a checkbox to a cell. Use the
Def property to assign check boxes to all cells in the column.
The following sample assigns check boxes to all cells in the first column:
With Grid1
    .Columns(0).Def(exCellHasCheckBox) = True
End With
The following sample shows how to add checkboxes to the first column by
enumerating the cells in the column:
With Grid1
        Dim i As Variant
        For Each i In .Items
            .Items.CellHasCheckBox(i, 0) = True
        Next
End With
Another option to turn on the cell's check box is using the
AddItem event like in the following sample:
Private Sub Grid1_AddItem(ByVal Item As EXGRIDLibCtl.HITEM)
    Grid1.Items.CellHasCheckBox(Item, 0) = True
End Sub
If a cell is checked, the
CellState property gets 1, if the cell is unchecked, the CellState
property gets 0. If a cell is partially checked, the CellState gets 2. The
CellStateChanged event is fired when user clicks the cell's checkbox.
The following sample enumerates all visible items as they are displayed:
Private Sub enumVisibleItems(ByVal grid As EXGRIDLibCtl.grid)
    With grid.Items
        Dim h As HITEM
        h = .RootItem(0)
        While h <> 0
            Debug.Print .CellValue(h, 0)
            h = .NextVisibleItem(h)
        Wend
    End With
End Sub
The exgrid control fires the
ItemOleEvent event when an inside ActiveX control fires an event. The
following sample shows how to handle events from contained components:
Private Sub Grid1_ItemOleEvent(ByVal Item As EXGRIDLibCtl.HITEM, ByVal Ev As EXGRIDLibCtl.IOleEvent)
On Error Resume Next
    With Ev
        Debug.Print .Name
        Dim i As Long
        For i = 0 To .CountParam - 1
            Debug.Print .Param(i).Name & " = " & .Param(i).Value
        Next
    End With
End Sub
If you need to retrieve the object that fires the event you can use the
following statement:
There is no public property to set the default so that all items appear
initially expanded, but we would suggest you an alternative using the
AddItem event like follows:
Private Sub Grid1_AddItem(ByVal Item As EXGRIDLibCtl.HITEM)
    With Grid1
        .BeginUpdate
        With .Items
            Dim h As HITEM
            h = .ItemParent(Item)
            While h <> 0
                .ExpandItem(h) = True
                h = .ItemParent(h)
            Wend
        End With
        .EndUpdate
    End With
End Sub
The
Items.ItemHasChildren property adds an expand button to the left side
of the cell, no matter if the item contains child items. It is useful to build
your virtual tree.
The component exports the
IUnboundHandler interface that provides unbound mode support. The
IUnboundHandler.ItemsCount method specifies the number of items that will be
loaded to the control. The IUnboundHandler.ReadItem method is called each time
when component requires data for an item. The control requires data only for
visible items. The ReadItem method is called only once for a single item.
The UnboundMode property specifies an object that implements the
IUnboundHandler interface. If large number of records must be loaded in the
control, we will recommend using the control in virtual mode
The following sample uses the unbound mode to read data from an array. In
the following sample the Form is the object that implements IUnboundHandler
interface. Of course you can create your own class that implements
IUnboundHandler in case you have multiple controls in the same form.
Dim a(100) As String
Implements IUnboundHandler

Private Sub Form_Load()
    a(0) = "First"
    a(100) = "Last"
    With Grid1
        .BeginUpdate
            .HeaderVisible = False
            .MarkSearchColumn = False
            With .Columns
                .Add "Index"
                .Add "Value"
            End With

            Set .UnboundHandler = Me
        .EndUpdate
    End With
End Sub

Private Property Get IUnboundHandler_ItemsCount() As Long
    IUnboundHandler_ItemsCount = UBound(a) - LBound(a) + 1
End Property

Private Sub IUnboundHandler_ReadItem(ByVal Index As Long, ByVal Source As Object, ByVal ItemHandle As Long)
    With Source.Items
        .CellValue(ItemHandle, 0) = Index
        .CellValue(ItemHandle, 1) = a(Index)
        .ItemBold(ItemHandle) = Index Mod 2 = 0
    End With
End Sub
The following sample shows how to get the count of visible items when a filter was applied:
Private Declare Function GetScrollRange Lib "user32" (ByVal hwnd As Long, ByVal nBar As Long, lpMinPos As Long, lpMaxPos As Long) As Long
Private Const SB_VERT = 1

Private Sub Command1_Click()
    Dim l As Long, r As Long
    GetScrollRange Grid1.hwnd, SB_VERT, l, r
    Debug.Print r - l + 1
End Sub
The
Items.InsertControlItem method inserts and hosts an ActiveX control.
The
Items.ItemAppearance doesn't change the border style of the ActiveX
window. For instance, the following sample removes the WS_EX_CLIENTEDGE style
of a "Shell.Explorer" control.
The sample requires the following declarations:
Private Declare Function GetWindowLong Lib "user32" Alias "GetWindowLongA" (ByVal hwnd As Long, ByVal nIndex As Long) As Long
Private Declare Function SetWindowLong Lib "user32" Alias "SetWindowLongA" (ByVal hwnd As Long, ByVal nIndex As Long, ByVal dwNewLong As Long) As Long
Private Declare Function GetWindow Lib "user32" (ByVal hwnd As Long, ByVal wCmd As Long) As Long
Private Const GW_CHILD = 5
Private Const GWL_EXSTYLE = (-20)
Private Const WS_EX_CLIENTEDGE = &H200
Here's the sample:
With Grid1.Items
        Dim h As Long, hx As HITEM

        hx = .InsertControlItem(, "Shell.Explorer")
        With .ItemObject(hx)
            .Navigate2 "c:\"
        End With
        h = .ItemWindowHost(hx)
        h = GetWindow(GetWindow(GetWindow(GetWindow(GetWindow(h, GW_CHILD), GW_CHILD), GW_CHILD), GW_CHILD), GW_CHILD)
        SetWindowLong h, GWL_EXSTYLE, GetWindowLong(h, GWL_EXSTYLE) And Not WS_EX_CLIENTEDGE
End With
Another alternative is like follows:
With Grid1.Items
            Dim hx As HITEM, h As Long
            hx = .InsertControlItem(, "C:\")
            h = getLastChild(getLastChild(.ItemWindowHost(hx)))
            SetWindowLong h, GWL_EXSTYLE, GetWindowLong(h, GWL_EXSTYLE) And Not WS_EX_CLIENTEDGE
End With
Private Function getLastChild(ByVal h As Long) As Long
    While GetWindow(h, GW_CHILD) <> 0
        h = GetWindow(h, GW_CHILD)
    Wend
    getLastChild = h
End Function
Both samples require a Column being added before adding new items, so you can
use the control's template editor to add a column or the following snippet as
well:
The control provides an Images panel that holds the icons of the control. The
ShowImageList property specifies whether the Images panel is visible or
hidden at design mode. In C++, the Images panel is behind the environment
window. In order to insert new icons to the control, you need to locate the
Images panel by minimizing the top windows. By dragging icon,
dll, or exe files
to the Images panel, you can insert new icons to the control. After you add
icons to Images panel, you have to resize the control and to save the project.
Actually there are two options to load icons from the project's resources like follows:
Passing a HIMAGELIST variable to the
Images
method of the ExGrid control.
Inserting new icons using the
ReplaceIcon method of the ExGrid control .
1. Save the Images list to a file using the ImageList_Write API. Use the
CreateStreamOnHGlobal API to create a stream. Insert the file to the project's
resources. Use the FindResource and LoadResource APIs to find and load a
resource. Use the CreateStreamOnHGlobal API to create a stream. Use the
ImageList_Create API to create a new Images list, use the ImageList_Read API to
load images from a stream. Pass the HIMAGELIST to the Images method of the
control.
2. Use the LoadIcon or LoadImage APIs to load an icon from project's
resources.
The following sample shows how to load new icons from the project's resources
The
Column.Alignment property aligns the whole column. The problem you have
encountered is that the column that paints the hierarchy ( the
TreeColumnIndex property specifies the index of the column where the
hierarchy is painted ) can't be centered, so you need to call:
With Grid1
        .TreeColumnIndex = -1
End With
in case you are using the control to load a flat table. By default, the
TreeColumnIndex is 0, and it points to the first column of the
control. Use the
Column.HeaderAlignment property to align the column's header.
By default, the
Column.Caption property describes the title of the cell's
tooltip. If
you don't need to show the column's name in the cell's
tooltip, you have to set
the Caption property to an empty string, and to use the
HTMLCaption property to assign the column's caption. This way, the
cell's tooltip will not include the column's name.
Yes, the ExGrid control supports such of feature ( starting with the version
1.0.4.9 ). The
EditTypeEnum.MemoDropDownType (18 ) specifies a multiple lines drop
down edit control. The following sample shows how to assign to a cell a
multiple lines drop down editor:
With Grid1.Items
        Dim h As HITEM
        h = .AddItem("This is a bit of text that should appear on a MemoDropDownType editor.")
        With .CellEditor(h, 0)
            .EditType = MemoDropDownType
            .Option(exMemoDropDownWidth) = 196
            .Option(exMemoDropDownHeight) = 64
            .Option(exMemoVScrollBar) = True
        End With
End With
Important notes about MemoDropDownType.
The
Editor.Option( exMemoDropDownWidth ) specifies the width ( in
pixels ) of the MemoDropDownType editor when it is dropped.
The Editor.Option( exMemoDropDownHeight ) specifies the height ( in pixels ) of
the MemoDropDownType editor when it is dropped.
The Editor.Option( exMemoDropDownAcceptReturn ) specifies whether the user
closes the MemoDropDownType editor by pressing the ENTER key. If the
Editor.Option( exMemoDropDownAcceptReturn ) is True, the user inserts new lines
by pressing the ENTER key. The user can close the editor by pressing the CTRL +
ENTER key. If the Editor.Option( exMemoDropDownAcceptReturn ) is False, the
user inserts new lines by pressing the CTRL + ENTER key. The user can close the
editor by pressing the ENTER key.
The Editor.Option( exMemoHScrollBar ) adds the horizontal scroll bar to a
MemoType or MemoDropDownType editor.
The Editor.Option( exMemoVScrollBar ) adds the vertical scroll bar to a
MemoType or MemoDropDownType editor
Use the
Items.CellSingleLine property to specify whether the cell displays
multiple lines.
Private Sub Form_Load()
    ' Specifies an EditType editor for the "Numeric" column,
    ' and let FormatColumn event being fired for it.
    With Grid1.Columns("Numeric")
        .Alignment = RightAlignment
        .FireFormatColumn = True
        With .Editor
            .EditType = EditType
        End With
    End With
End Sub

Private Sub Grid1_FormatColumn(ByVal Item As EXGRIDLibCtl.HITEM, ByVal ColIndex As Long, Value As Variant)
On Error GoTo Error
    ' If the FormatNumber VB function fails to convert the value, resets the Value parameter
    Value = FormatNumber(Value, 2)
    Exit Sub
Error:
    Grid1.Items.CellValue(Item, ColIndex) = "0"
End Sub

Private Sub Grid1_KeyPress(KeyAscii As Integer)
    ' Moves the selected line to next visible line, when user presses the ENTER key
    If Grid1.FocusColumnIndex = Grid1.Columns("Numeric").Index Then
        If KeyAscii = vbKeyReturn Then
            With Grid1
                With .Items
                    If .SelectCount() > 0 Then
                        Dim h As HITEM
                        h = .NextVisibleItem(.SelectedItem(h))
                        If h <> 0 Then
                            .SelectItem(h) = True
                            .EnsureVisibleItem h
                        End If
                    End If
                End With
            End With
            Else
                ' Allows only numeric characters
                Dim strAllowChars As String
                strAllowChars = "0123456789." & Chr(8)
                If Not (InStr(1, strAllowChars, Chr(KeyAscii), vbTextCompare) > 0) Then
                    KeyAscii = 0
                End If
        End If
    End If
End Sub
Also, the sample shows how to move the selected line to next visible line when user presses the ENTER key.
Call the
Edit method like in the following sample:
thisform.Olecontrol1.Object.Edit()
The Object property provides access to the Automation server properties and
methods for an OLE object. ( The Object property is provided by wrapper object
in VFP, and it is not provided by the ExGrid control ).
Moves the focused item to next visible item if the
SingleSel property is False.
UP ARROW
Selects the previously visible item.
CTRL + UP ARROW
Moves the focused item to the previously visible item,
if SingleSel property is False.
RIGHT ARROW
Expands the item if it is collapsed. Moves the focused
cell to next visible column. Selects the next visible item if the item is
expanded or item has no editor inside.
CTRL + RIGHT ARROW
Moves the focused cell to next visible column.
LEFT ARROW
Collapses the item if it is expanded. Moves the focused
cell to previously visible column. Selects the item to previously visible item
if the item is collapsed or item has no editor inside.
CTRL + LEFT ARROW
Moves the focused cell to previously visible column.
PAGE DOWN
Scrolls down one screen in the current view, and
selects the last visible item in the view.
CTRL + PAGE DOWN
Scrolls down one screen in the current view, and moves
the focused item to the last visible item in the view, if the SingleSel
property is FALSE
PAGE UP
Scrolls up one screen in the current view, and selects
the first visible item in the view.
CTRL + PAGE UP
Scrolls up one screen in the current view, and moves
the focused item to the first visible item in the view, if the SingleSel
property is False.
HOME
Scrolls the control's content to the top of the control
and selects the first visible item in the control.
CTRL + HOME
Scrolls the control's content to the top of the control
and moves the focused item to the first visible item in the control.
END
Scrolls the control's content to the end of the control
and selects the last visible item in the control.
CTRL + END
Scrolls the control's content to the end of the control
and moves the focused item to the last visible item in the control.
ADD
Expands the item.
SUBTRACT
Collapses the item.
MULTIPLY
Expands recursively the focused ( selected ) item.
CTRL + MULTIPLY
Expands recursively all items.
CTRL + SPACE
Selects or unselects an item if control support
multiple selection.
SPACE
Checks the next cell in the same radio group.
BACKSPACE
Removes the last character when user searches for an
item. The BACKSPACE key is handled only if the AutoSearch property is TRUE.
F2
Unselects the text inside an edit control if the text
is selected. Selects the text inside an edit control if no text is selected.
F3
Selects the next matching item. The F3 key is handled
only if the AutoSearch property is TRUE.
F4
Opens the editor of the cell. The F4 key has no effect
if the cell has no editor attached.
TAB
Moves the searching column to next visible column. The
TAB key is handled only if the UseTabKey property is TRUE.
SHIFT + TAB
Moves the searching column to previously visible
column. The SHIFT + TAB key is handled only if the UseTabKey property is TRUE.
The
Change event notifies your application that a change occurs. You can
handle the Change event like in the following sample:
Private Sub Grid1_Change(ByVal Item As EXGRIDLibCtl.HITEM, ByVal ColIndex As Long, NewValue As Variant)
    If Not MsgBox("Change", vbYesNo) = vbYes Then
        NewValue = Grid1.Items.CellValue(Item, ColIndex)
    End If
End Sub
If your application changes a value in the grid and there is no necessary user
confirmation you can have the Change event like follows:
Private Sub Grid1_Change(ByVal Item As EXGRIDLibCtl.HITEM, ByVal ColIndex As Long, NewValue As Variant)
    If m_nConfirmation = 0 Then
        If Not MsgBox("Change", vbYesNo) = vbYes Then
            NewValue = Grid1.Items.CellValue(Item, ColIndex)
        End If
    End If
End Sub
The code that changes a value in the grid should look like:
m_nConfirmation = m_nConfirmation + 1
    With Grid1
    ' DO the change here
    End With
m_nConfirmation = m_nConfirmation - 1
The control fires the
ToolTip event before a tooltip shows up. The following samples moves
the tooltip window if it is displayed off the screen:
Private Sub Grid1_ToolTip(ByVal Item As EXGRIDLibCtl.HITEM, ByVal ColIndex As Long, Visible As Boolean, _
			  X As Long, Y As Long, ByVal CX As Long, ByVal CY As Long)
    With Screen
        If (X + CX > .Width / .TwipsPerPixelX) Then
            X = .Width / .TwipsPerPixelX - CX
        End If
        If (Y + CY > .Height / .TwipsPerPixelY) Then
            Y = .Height / .TwipsPerPixelY - CY
        End If
    End With
End Sub
The
EnsureVisibleItem method of the Items collection ensures that an item
is in the control's client area. By default, the EnsureVisibleItem method
cannot specify the position where the item should be displayed. Instead, the
following EnsureVisibleItem procedure ensures that an item is displayed at a
given position. The function requires declarations for the SendMessage API like
follows:
Private Declare Function SendMessage Lib "user32" Alias "SendMessageA" _
        (ByVal hwnd As Long, ByVal wMsg As Long, ByVal wParam As Long, lParam As Any) As Long
Private Const WM_VSCROLL = &H115
Private Const SB_VERT = 1
Private Const SB_LINEDOWN = 1
Private Const SB_LINEUP = 0
The EnsureVisibleItem procedure looks like following:
Private Sub EnsureVisibleItem(ByVal g As EXGRIDLibCtl.Grid, ByVal h As HITEM, ByVal p As Long)
    With g
        .BeginUpdate
            With .Items
                .SelectItem(h) = True
                .EnsureVisibleItem h

                Dim i As HITEM, pi As Long
                pi = 0
                i = .FirstVisibleItem
                While Not (i = h)
                    i = .NextVisibleItem(i)
                    pi = pi + 1
                Wend

                Dim b As Boolean
                b = pi < p
                For i = IIf(b, pi, p) To IIf(b, p, pi) - 1
                    SendMessage g.hwnd, WM_VSCROLL, IIf(Not b, SB_LINEDOWN, SB_LINEUP), 0
                Next
            End With
        .EndUpdate
    End With
End Sub
You can call the EnsureVisibleItem function like following:
EnsureVisibleItem Grid1, hItem, nPosition
where hItem is the handle of the item being positioned, and the nPosition is the
position where the hItem should be displayed. If nPosition is 0, the hItem
should be displayed as first visible item.
You can use index, pos, apos, rpos, opos, and so on, of FormatColumn property.
Also, you can display the item's index using the FormatColumn event like in the following sample:
Private Sub Grid1_FormatColumn(ByVal Item As EXGRIDLibCtl.HITEM, ByVal ColIndex As Long, Value As Variant)
    Value = Grid1.Items.ItemToIndex(Item)
End Sub
The
EditType.CheckValueType value specifies whether the editor displays a
check box to represent the cell's value. For instance, if you have a column of
boolean values, you can use the following code to assign check boxes to each
cell in the column:
With Grid1.Columns("Check").Editor
        .EditType = CheckValueType
End With
In this case, the
Items.CellValue property for each cell in the column specifies the
state of the check box as follows:
0 ( unchecked state ). The control displays the unchecked
state check box.
1 ( checked state ). The control displays the checked state
check box.
2 ( partial checked state ). The control displays the partial
checked state check box.
The
CheckImage property specifies the icon being displayed for different
check box states.
If the values in the column differs than 0, 1, or 2 you can call the
Editor.Option property to specify the check box states being displayed.
For instance, if your column contains boolean values, True ( -1 ) and False ( 0
), you can use the following sample to get displayed the checked states instead
partial checked states.
With Grid1.Columns("Check").Editor
        .EditType = CheckValueType
        .Option(exCheckValue2) = 1
End With
For instance, use the
CellEditorVisible property to hide the cell's editor, in case you need
to represent a null check box state.
Generally, the user needs to run the control in virtual mode, if a
table with large number of records needs to be loaded. In virtual mode, the
control handles maximum 2,147,483,647 records. The control is running in
virtual mode, only if
VirtualMode property is True, and the
UnboundHandler property refers an object that implements the
IUnboundHandler interface. Implementing the IUnboundHandler interface is easy
because it has only two methods. The first one, ItemsCount specifies the number
of records that user needs to display in the control. The second method is
ReadItem and it provides data for a specific record. When control is running in
the virtual mode, the control loads only the items that need to be
displayed. If the control is running in the unbound mode ( the VirtualMode
property is False ), the control allocates memory for all records that need to
be loaded. The data for each record is loaded only when it is required. The
virtual mode has few disadvantages like: the sorting is not available ( the
user needs to provide sorting data ), the control's filtering items is not
available, the data cannot be viewed as a hierarchy, the user cannot add items
manually, and so on. The main advantage of the virtual mode is that the control
can handle large number of records. The unbound mode requires a lot of memory,
depending on number of loaded records, but it allows almost all features of the
control, including sorting, filtering and so on. Use the
Items.ItemToVirtual property to convert the handle the item to the
index of the virtual item. Use the
Items.VirtualToItem property to get the handle of the item giving the
index of the virtual item. It is important to know, that the
Items.VirtualToItem property ensures that the virtual item fits the control's
client area, so calling the Items.EnsureVisibleItem method is not required in
this case.
When you need to display large number of records, you need to provide an object
that implements the IUnboundHandler interface. The object provides the number
of records that needs to be displayed, and data for each record. The
VirtualMode property needs to be set on true, and the object you have
written needs to be passed to the
UnboundHandler property.
The following sample adds a column, and 100 records. The index of each item is
displayed.
Create a new project (Project1)
Add a control to the form ( Grid1 )
Create a new class module ( Class1 ) and add it to the project
Open the code of the class, and type "Implements IUnboundHandler"
Add the handler for the IUnboundHandler_ItemsCount property like follows:
Private Property Get IUnboundHandler_ItemsCount(ByVal Source As Object) As Long
    IUnboundHandler_ItemsCount = 100
End Property
The control calls the IUnboundHandler_ItemsCount property when the
UnboundHandler property is set, to update the vertical scroll range.
Add the handler for the IUnboundHandler_ReadItem method like follows:
Private Sub IUnboundHandler_ReadItem(ByVal Index As Long, ByVal Source As Object, ByVal ItemHandle As Long)
    With Source.Items
        .CellValue(ItemHandle, 0) = Index + 1
    End With
End Sub
The control calls the IUnboundHandler_ReadItem method each time when a
virtual item becomes visible.
Open the form's code and add handler for the Form_Load event like follows:
Private Sub Form_Load()
    With Grid1
        .BeginUpdate
            .Columns.Add "Column 1"

            .VirtualMode = True
            Set .UnboundHandler = New Class1
        .EndUpdate
    End With
End Sub
Save the project
Run the project
The sample runs the control in the virtual mode. The control calls the
IUnboundHandler_ItemsCount property when UnboundHandler property is set. The
IUnboundHandler_ReadItem method is invoked when a record needs to be
displayed.
Now, that you got the idea of the virtual mode, let's start to complicate the
things. Let's suppose that we have a table and we need to display its records
in the control.
Create a new project (Project1)
Add a control to the form ( Grid1 )
Create a new class module ( Class1 ) and add it to the project
Add a new variable rs, of Object type like: Public rs as Object. In the following sample, the rs variable holds a
reference to an ADO.Recordset object
Add a new procedure AttachTable like follows:
Public Sub AttachTable(ByVal strTable As String, ByVal strPath As String, ByVal g As EXGRIDLibCtl.Grid)
    Set rs = CreateObject("ADODB.Recordset")
    rs.Open strTable, "Provider=Microsoft.Jet.OLEDB.4.0;Data Source= " & strPath, 3, 3
    With g
        .BeginUpdate
            With .Columns
                Dim f As Variant
                For Each f In rs.Fields
                    .Add f.Name
                Next
            End With
        .EndUpdate
    End With
End Sub
The AttachTable subroutine opens a
table using ADO, and insert in the control's Columns collection a new column
for each field found in the table.
Type "Implements IUnboundHandler" at the
beginning of the class
Implement the IUnboundHandler_ItemsCount property like follows:
Private Property Get IUnboundHandler_ItemsCount(ByVal Source As Object) As Long
    IUnboundHandler_ItemsCount = rs.RecordCount
End Property
In this case the
IUnboundHandler_ItemsCount property the number of records in the table.
Implement the IUnboundHandler_ReadItem method like follows:
Private Sub IUnboundHandler_ReadItem(ByVal Index As Long, ByVal Source As Object, ByVal ItemHandle As Long)
    rs.Move Index, 1
    Dim i As Long
    i = 0
    With Source.Items
        Dim f As Variant
        For Each f In rs.Fields
            .CellValue(ItemHandle, i) = f.Value
            i = i + 1
        Next
    End With
End Sub
The IUnboundHandler_ReadItem method moves the current record using the
rs.Move method, at the record with the specified index, and loads values for
each cell n the item. If you need to apply colors, font attributes, ... to the
items in the control, your handler may change the
CellBold, CellForeColor, ...
properties like follows:
Open the form's code, and add a new variable n like: Dim n As
New Class1
Add a handler for the Form_Load event like follows:
Private Sub Form_Load()
    With Grid1
        .BeginUpdate

            n.AttachTable "Select * from Orders", "D:\Exontrol\ExGrid\sample\sample.mdb", Grid1

            .VirtualMode = True
            Set .UnboundHandler = n

        .EndUpdate
    End With
End Sub
The AttachTable method opens the table, and fills the control's Columns
collection. The AttachTable method needs to be called before putting the
control on virtual mode, because properties of the rs object are called in the
ItemsCount and ReadItem methods.
In this case, we assume that you are already familiar with the "Displaying
a table, using the virtual mode". So, beside the steps that need to be
followed in "displaying a table, using virtual mode", the following steps need
to be follow as well:
Add editors for each column that require being editable like follows:
With .Columns("OrderDate")
    With .Editor
        .EditType = DateType
    End With
End With
The Form_Load event should look like follows:
Private Sub Form_Load()
    With Grid1
        .BeginUpdate

            n.AttachTable "Select * from Orders", "D:\Exontrol\ExGrid\sample\sample.mdb", Grid1

            .VirtualMode = True
            Set .UnboundHandler = n

            With .Columns("OrderDate")
                With .Editor
                    .EditType = DateType
                End With
            End With

        .EndUpdate
    End With
End Sub
Important to notice is that setting editors is called after setting the
UnboundHandler property. Also, the "OrderDate" field needs to be changed if
another table or database is used. Until now, the sample is able to display the
table, and it provides editors for the columns. Until now, the user can
change the values in the control but the data is not saved to the table so
please follow the steps:
Handle the control's Change event like follows:
Private Sub Grid1_Change(ByVal Item As EXGRIDLibCtl.HITEM, ByVal ColIndex As Long, newValue As Variant)
    With Grid1.Items
        n.Change .ItemToVirtual(Item), ColIndex, newValue
    End With
End Sub
The Change event passes the NewValue to the object that implements the
IUnboundHandler interface, so we can make the change to the original place, in
our case the recordset.
The Change event is fired when user changes a value in the control. The Change
event is called even is the user changes the cell's value using the CellValue
property, so the IUnboundHandler_ReadItem needs a change like follows:
Private Sub IUnboundHandler_ReadItem(ByVal Index As Long, ByVal Source As Object, ByVal ItemHandle As Long)
    nReading = nReading + 1
    rs.Move Index, 1
    Dim i As Long
    i = 0
    With Source.Items
        Dim f As Variant
        For Each f In rs.Fields
            .CellValue(ItemHandle, i) = f.Value
            i = i + 1
        Next
    End With
    nReading = nReading - 1
End Sub
Where is the change? The change is that we have added a counter nReading that is
increases when the IUnboundHandler_ReadItem method starts and it is decreased
when the function ends. Why such of counter? We have added the nReading counter
because, during the IUnboundHandler_ReadItem method the user calls
CellValue,
so the Change event is fired and things get recursively as we do not want...
Add a new method to the Class1 object like follows ( Change ):
Public Sub Change(ByVal Index As Long, ByVal ColIndex As Long, ByVal newValue As Variant)
    If nReading = 0 Then
        rs.Move Index, 1
        rs(ColIndex) = newValue
    End If
End Sub
Checking the nReading counter is required because the Change event is called
even if the user changes the cell's value using CellValue property. If such of
checking is omitted, a recursive call occurs. The nReading counter is increased
when the IUnboundHandler_ReadItem method starts, and the nReading counter is
decreased when the IUnboundHandler_ReadItem method ends.
The last thing that we need to add is to declare the variable (counter )
nReading as Long: Dim nReading As Long, and to
initialize it in the Class1 constructor like follows:
Private Sub Class_Initialize()
    nReading = 0
End Sub
We assume that you are familiar with: "Displaying a table, using the
VirtualMode", "Editing a table, using the VirtualMode",
Let's suppose that we want to display a column with the current position for
each record in the table.In this case, we need to add a new column, and we need
to change the ReadItem method like follows:
The Form_Load event should look like:
Private Sub Form_Load()
    With Grid1
        .BeginUpdate

            n.AttachTable "Select * from Orders", "D:\Exontrol\ExGrid\sample\sample.mdb", Grid1

            .VirtualMode = True
            Set .UnboundHandler = n

            With .Columns("OrderDate")
                With .Editor
                    .EditType = DateType
                End With
            End With

            With .Columns.Add("Position")
                .Position = 0
            End With

        .EndUpdate
    End With
End Sub
The IUnboundHandler_ReadItem method looks like following:
Private Sub IUnboundHandler_ReadItem(ByVal Index As Long, ByVal Source As Object, ByVal ItemHandle As Long)
    nReading = nReading + 1
    rs.Move Index, 1
    Dim i As Long
    i = 0
    With Source.Items
        Dim f As Variant
        For Each f In rs.Fields
            .CellValue(ItemHandle, i) = f.Value
            i = i + 1
        Next
        .CellValue(ItemHandle, "Position") = Index + 1
    End With
   nReadingvirtual-col nReading - 1
End Sub
For instance, if you need to have a column that computes its value based on the
other columns, it can be done like this:
The following tutorial will show how to run the control in virtual mode. The
sample is a simple MFC dialog based application. Anyway, if your application is
different than a MFC dialog based, the base things you need are here, so please
find that the following information are useful.
Create a new project using MFC AppWizard ( exe ) ( ADOVirtual )
Select Dialog based, for the type of the application
Insert the control to the application's main dialog ( Insert ActiveX
Control )
Save the Project
Open the MFC Class Wizard, by pressing CTRL + W
Add a new member variable for IDC_GRID1 resource called
m_grid. In the
meanwhile, please notice that the wizard will ask you 'The ActiveX Control
"ExGrid ActiveX Control" has not been inserted into the project. Developer
Studio will do this now and generate a C++ wrapper class for it', and you need
to click ok, by following the steps that wizard will ask you to do in order to
insert the C++ wrapper classese. ( CGrid, CItems,
CColumn, CEditor, COleFont, CPicture, CColumns )
Save the Project
Open the Dialog Properties, and click the "Clip siblings" and "Clip children"
Add a new MFC based class, CUnboundHandler derived from the
CCmdTarget. We
define the CUnboundHandler class to implement the IUnboundHandler
interface.
Import the control's definition using the #import directive like follows:
#import "c:\winnt\system32\exgrid.dll"
The #import directive is used to incorporate information from a type library.
The content of the type library is converted into C++ classes, mostly
describing the COM interfaces. The path to the file need to be changed if the
dll is somewhere else. After building the project, the environment generates a
namespace EXGRIDLib. The generated namespace includes definition for
IUnboundHandler interface. It can be accessed using the declaration
EXGRIDLib::IUnboundHandler
By default, the destructor of the CUnboundHandler class is declared as
protected. The destructor needs to be declared as public ( Remove the
protected keyword before ~CUnboundHandler ).
Implementing the IUnboundHandler interface using the
DECLARE_INTERFACE_MAP,
BEGIN_INTERFACE_PART and END_INTERFACE_PART macros. The following snippet needs
to be inserted in the class definition like
The CUnboundHandler class implementation should look like:
IMPLEMENT_DYNCREATE(CUnboundHandler, CCmdTarget)
BEGIN_INTERFACE_MAP(CUnboundHandler, CCmdTarget)
	INTERFACE_PART(CUnboundHandler, __uuidof(EXGRIDLib::IUnboundHandler), Handler)
END_INTERFACE_MAP()
CUnboundHandler::CUnboundHandler()
{
}
CUnboundHandler::~CUnboundHandler()
{
}
STDMETHODIMP CUnboundHandler::XHandler::get_ItemsCount(long* pVal)
{
METHOD_PROLOGUE(CUnboundHandler, Handler);
if ( pVal )
{
*pVal = 25000;
return S_OK;;
}
return E_POINTER;
}
STDMETHODIMP CUnboundHandler::XHandler::raw_ReadItem(long Index, IDispatch * Source, long ItemHandle)
{
	METHOD_PROLOGUE(CUnboundHandler, Handler);

	// gets the source control
	EXGRIDLib::IGrid* pGrid = NULL;
	if ( SUCCEEDED( Source->QueryInterface( __uuidof(EXGRIDLib::IGrid), (LPVOID*)&pGrid ) ) )
	{
		// assigns the value for each cell.
		pGrid->Items->CellValue[ItemHandle][_variant_t( (long)0 )] = _variant_t( Index );
		pGrid->Release();
	}
	return S_OK;
}
STDMETHODIMP CUnboundHandler::XHandler::QueryInterface( REFIID riid, void** ppvObject)
{
	METHOD_PROLOGUE(CUnboundHandler, Handler);
	if ( ppvObject )
	{
		if ( IsEqualIID( __uuidof(IUnknown), riid ) )
		{
			*ppvObject = static_cast<IUnknown*>( this );
			AddRef();
			return S_OK;
		}
		if ( IsEqualIID( __uuidof( EXGRIDLib::IUnboundHandler), riid ) )
		{
			*ppvObject = static_cast<EXGRIDLib::IUnboundHandler*>( this );
			AddRef();
			return S_OK;
		}
		return E_NOINTERFACE;
	}
	return E_POINTER;
}

STDMETHODIMP_(ULONG) CUnboundHandler::XHandler::AddRef()
{
	METHOD_PROLOGUE(CUnboundHandler, Handler);
	return 1;
}

STDMETHODIMP_(ULONG) CUnboundHandler::XHandler::Release()
{
	METHOD_PROLOGUE(CUnboundHandler, Handler);
	return 0;
}
BEGIN_MESSAGE_MAP(CUnboundHandler, CCmdTarget)
//{{AFX_MSG_MAP(CUnboundHandler)
// NOTE - the ClassWizard will add and remove mapping macros here.
//}}AFX_MSG_MAP
END_MESSAGE_MAP()
After all these steps we have defined the class CUnboundHandler that implements
the IUnboundHandler interface. All that we need to do from now, is to add a
column to the control, and to set the VirtualMode and UnboundHanlder properties
like follows:
Open the definition of the application's main dialog ( CADOVirtualDlg )
Include the definition of the CUnboundHandler class to CADOVirtualDlg using:
#include "UnboundHandler.h"
Add a new member of CUnboundHandler type to the CADOVirtualDlg class like:
CUnboundHandler m_unboundHandler;
Open the implementation file for the application's main dialog ( CADOVirtualDlg
)
Add the definition for CColumns class ( a wrapper class for the control ) at
the beginning of the file
#include "Columns.h"
Locate the OnInitDialog() method and add the following code ( after the "//
TODO: Add extra initialization here" ):
The tutorial shows how to put the control on virtual mode. The sample loads the
numbers from 0 to 24999.
Now, that we got the idea how to implement the IUnboundHandler let's say that we
want to change the sample to load an edit an ADO
recordset. The following
tutorials shows how to display a table and how to add code in order to let user
edits the data.
Open the definition of the CUnboundHandler class
Import the Microsoft ADO Type Library to the CUnboundHandler class like
follows:
#import <msado15.dll> rename ( "EOF", "adoEOF" )
The #import directive generates the ADODB
namspace.
The ADODB namspace includes all definitions in the Microsoft ADO Type Library.
Include a member of ADODB::_RecordsetPtr called
m_spRecordset. The
m_spRecordset member will handle data in the ADO table.
ADODB::_RecordsetPtr m_spRecordset;
Add definition for AttachTable function like follows:
The AttachTable function is called before setting the UnboundHandler property.
The AttachTable function opens a recordset giving the SQL phrase and the
database. The AttachTable function loads also the control's Columns collection
from the Fields collection of the recordset.
Save, Compile and Run the project
After all these your control will be able to display a table using the virtual
mode. Now, we need to add some changes in order to let user edits data in the
control using the control's collection of editors.
Include the definition for the CColumns, CColumn,
CEditor, CItems classes in
the application's main dialog ( CAdoVirtualDlg )
The sample includes editors of DateType to "OrderDate",
"RequiredDate" and "ShippedDate" columns. If the editor requires adding items or requires more
changes, you could save the editor object to a variable like in the following
sample:
Open the definition file of the CUnboundHandler class ( UnboundHandler.h file )
Add a new member variable of long type as:
long m_nReading;
The Change event is called even if the user changes the cell's value using the
Cellvalue property. Because in the ReadItem method we are using the
Cellvalue,
we need to increase the m_nReading counter when ReadItem method starts, and
decreases it when the function ends. So, we will be able to avoid recursive
calls.
Add the definition of the Change function in the CUnboundHandler class:
virtual void Change( VARIANT* pvtNewValue, long Index, long ColIndex );
The CUnboundHandler class definition should look like:
#import "c:\winnt\system32\exgrid.dll"
#import <msado15.dll> rename ( "EOF", "adoEOF" )
class CUnboundHandler : public CCmdTarget
{
DECLARE_DYNCREATE(CUnboundHandler)
CUnboundHandler(); // protected constructor used by dynamic creation
DECLARE_INTERFACE_MAP()
public:
BEGIN_INTERFACE_PART(Handler, EXGRIDLib::IUnboundHandler)
STDMETHOD(get_ItemsCount)(long* pVal);
STDMETHOD(raw_ReadItem)(long Index, IDispatch * Source, long ItemHandle);
END_INTERFACE_PART(Handler)
virtual void AttachTable( EXGRIDLib::IGrid* pGrid, LPCTSTR szTable, LPCTSTR szDatabase );
virtual void Change( VARIANT* pvtNewValue, long Index, long ColIndex );
// Overrides
// ClassWizard generated virtual function overrides
//{{AFX_VIRTUAL(CUnboundHandler)
//}}AFX_VIRTUAL
// Implementation
virtual ~CUnboundHandler();
// Generated message map functions
//{{AFX_MSG(CUnboundHandler)
// NOTE - the ClassWizard will add and remove member functions here.
//}}AFX_MSG
DECLARE_MESSAGE_MAP()
ADODB::_RecordsetPtr m_spRecordset;
long m_nReading;
};
Init the counter in the CUnboundHandler class constructor like follows:
The Change function moves the position of the current record in the
recordset, and updates the table. The control automatically will reread the
record in order to update the date in the cells of the item, after Change event
is processed.
Finally, the implementation of the CUnboundHandler class looks like:
IMPLEMENT_DYNCREATE(CUnboundHandler, CCmdTarget)
BEGIN_INTERFACE_MAP(CUnboundHandler, CCmdTarget)
INTERFACE_PART(CUnboundHandler, __uuidof(EXGRIDLib::IUnboundHandler), Handler)
END_INTERFACE_MAP()
CUnboundHandler::CUnboundHandler()
{
m_nReading = 0;
}
CUnboundHandler::~CUnboundHandler()
{
}
STDMETHODIMP CUnboundHandler::XHandler::get_ItemsCount(long* pVal)
{
METHOD_PROLOGUE(CUnboundHandler, Handler);
if ( pVal )
{
*pVal = pThis->m_spRecordset->RecordCount;
return S_OK;;
}
return E_POINTER;
}
STDMETHODIMP CUnboundHandler::XHandler::raw_ReadItem(long Index, IDispatch * Source, long ItemHandle)
{
METHOD_PROLOGUE(CUnboundHandler, Handler);
pThis->m_nReading++;
pThis->m_spRecordset->Move( Index, _variant_t( (long)ADODB::adBookmarkFirst ) );
// gets the source control
EXGRIDLib::IGrid* pGrid = NULL;
if ( SUCCEEDED( Source->QueryInterface( __uuidof(EXGRIDLib::IGrid), (LPVOID*)&pGrid ) ) )
{
// assigns the value for each cell.
for ( long i = 0; i < pThis->m_spRecordset->Fields->GetCount(); i++ )
pGrid->Items->CellValue[ _variant_t( ItemHandle ) ][ _variant_t( i )] = pThis->m_spRecordset->Fields->GetItem( _variant_t( i ) )->Value;
pGrid->Release();
}
pThis->m_nReading--;
return S_OK;
}
void CUnboundHandler::AttachTable( EXGRIDLib::IGrid* pGrid, LPCTSTR szTable, LPCTSTR szDatabase )
{
	if ( SUCCEEDED( m_spRecordset.CreateInstance( "ADODB.Recordset") ) )
	{
		try
		{
			CString strConnection = "Provider=Microsoft.Jet.OLEDB.4.0;Data Source=";
			strConnection += szDatabase;
			if ( SUCCEEDED( m_spRecordset->Open(_variant_t( szTable ), _variant_t(strConnection), ADODB::adOpenStatic, ADODB::adLockPessimistic, NULL ) ) )
			{
				pGrid->BeginUpdate();
				for ( long i = 0; i < m_spRecordset->Fields->GetCount(); i++ )
					pGrid->GetColumns()->Add( m_spRecordset->Fields->GetItem( _variant_t( i ) )->Name );
				pGrid->EndUpdate();
			}
		}
		catch ( _com_error& e )
		{
			AfxMessageBox( e.Description() );
		}

	}
}
void CUnboundHandler::Change( VARIANT* pvtNewValue, long Index, long ColIndex )
{
	if ( m_nReading == 0 )
	{
		m_spRecordset->Move( Index, _variant_t( (long)ADODB::adBookmarkFirst ) );
		m_spRecordset->Fields->GetItem( _variant_t( ColIndex ) )->Value = *pvtNewValue;
		m_spRecordset->Update();
	}
}
STDMETHODIMP CUnboundHandler::XHandler::QueryInterface( REFIID riid, void** ppvObject)
{
METHOD_PROLOGUE(CUnboundHandler, Handler);
if ( ppvObject )
{
if ( IsEqualIID( __uuidof(IUnknown), riid ) )
{
*ppvObject = static_cast<IUnknown*>( this );
AddRef();
return S_OK;
}
if ( IsEqualIID( __uuidof( EXGRIDLib::IUnboundHandler), riid ) )
{
*ppvObject = static_cast<EXGRIDLib::IUnboundHandler*>( this );
AddRef();
return S_OK;
}
return E_NOINTERFACE;
}
return E_POINTER;
}
STDMETHODIMP_(ULONG) CUnboundHandler::XHandler::AddRef()
{
METHOD_PROLOGUE(CUnboundHandler, Handler);
return 1;
}
STDMETHODIMP_(ULONG) CUnboundHandler::XHandler::Release()
{
METHOD_PROLOGUE(CUnboundHandler, Handler);
return 0;
}
BEGIN_MESSAGE_MAP(CUnboundHandler, CCmdTarget)
//{{AFX_MSG_MAP(CUnboundHandler)
// NOTE - the ClassWizard will add and remove mapping macros here.
//}}AFX_MSG_MAP
END_MESSAGE_MAP()
If you need to apply colors, font attributes, ... for items or cells while the
control is running in the virtual mode, the changes should be done in the
raw_ReadItem method like follows:
STDMETHODIMP CUnboundHandler::XHandler::raw_ReadItem(long Index, IDispatch * Source, long ItemHandle)
{
	METHOD_PROLOGUE(CUnboundHandler, Handler);
	pThis->m_nReading++;
	pThis->m_spRecordset->Move( Index, _variant_t( (long)ADODB::adBookmarkFirst ) );

	// gets the source control
	EXGRIDLib::IGrid* pGrid = NULL;
	if ( SUCCEEDED( Source->QueryInterface( __uuidof(EXGRIDLib::IGrid), (LPVOID*)&pGrid ) ) )
	{
		// assigns the value for each cell.
		for ( long i = 0; i < pThis->m_spRecordset->Fields->GetCount(); i++ )
			pGrid->Items->CellValue[ _variant_t( ItemHandle ) ][ _variant_t( i )] = pThis->m_spRecordset->Fields->GetItem( _variant_t( i ) )->Value;

		if ( pGrid->Items->CellValue[ _variant_t( ItemHandle ) ][ _variant_t( _T("ShipRegion") )] == _variant_t( _T("RJ") ) )
			pGrid->Items->put_ItemForeColor( ItemHandle , RGB(0,0,255 ) );
		if ( pGrid->Items->CellValue[ _variant_t( ItemHandle ) ][ _variant_t( _T("ShipRegion") )] == _variant_t( _T("SP") ) )
			pGrid->Items->put_ItemBold( ItemHandle , TRUE );

		pGrid->Release();
	}
	pThis->m_nReading--;
	return S_OK;
}
While compiling the project the compiler displays warnings like: "warning C4146:
unary minus operator applied to unsigned type, result still unsigned". You have
to include the :
The
Editor.Option( exEditPassword ) property indicates whether an edit
control displays all characters as an asterisk (*) as they are typed (
passwords ). Use the Editor.Option( exEditPasswordChar ) property specifies the
password character. The following sample adds a cell with a password editor:
With Grid1.Items
    Dim h As HITEM
    h = .InsertItem(, , "password")
    With .CellEditor(h, 0)
        .EditType = EXGRIDLibCtl.EditType
        .Option(EXGRIDLibCtl.EditorOptionEnum.exEditPassword) = True
    End With
End With
The
SortOrder property of the
Column object specifies the column's sort order. The following function
retrieves the index of column that's sorted, or-1 if there is no sorted column:
Private Function getSortingColumn(ByVal g As EXGRIDLibCtl.Grid) As Long
    Dim c As EXGRIDLibCtl.Column
    For Each c In g.Columns
        If Not c.SortOrder = EXGRIDLibCtl.SortNone Then
            getSortingColumn = c.Index
            Exit Function
        End If
    Next
    getSortingColumn = -1
End Function
The
RootCount property specifies the number of root items in the control's
Items collection. The
RootItem property gives the root item by its position. The RootItem(0)
gives the first item in the control's Items collection. The
NextVisibleItem property gets the next visible item. In the sample we
have not used the property
FirstVisibleItem because it gives the first visible item, as it is
displayed in the control's client area. The RootItem(0) gives the first visible
item in the control no matter if the control contains a horizontal scroll bar
or not.
The following function selects all visible items:
Private Sub selVisibleItems(ByVal g As EXGRIDLibCtl.Grid)
    With g
        .BeginUpdate
            With .Items
                Dim h As HITEM
                If .RootCount > 0 Then
                    h = .RootItem(0)
                    While Not h = 0
                        .SelectItem(h) = True
                        h = .NextVisibleItem(h)
                    Wend
                End If
            End With
        .EndUpdate
    End With
End Sub
The above sample selects only visible items, so items that are not expanded will
not be selected. The following sample selects all items, even if they are
collapsed:
Private Sub selAllItems(ByVal g As EXGRIDLibCtl.Grid)
    With g
        .BeginUpdate
            With .Items
                Dim h As HITEM
                If .RootCount > 0 Then
                    h = .RootItem(0)
                    While Not h = 0
                        selRecItem g, h
                        h = .NextSiblingItem(h)
                    Wend
                End If
            End With
        .EndUpdate
    End With
End Sub

Sub selRecItem(ByVal g As EXGRIDLibCtl.Grid, ByVal h As HITEM)
    If Not (h = 0) Then
        With g.Items
            .SelectItem(h) = True
            Dim hChild As HITEM
            hChild = .ItemChild(h)
            While Not (hChild = 0)
                .SelectItem(hChild) = True
                selRecItem g, hChild
                hChild = .NextSiblingItem(hChild)
            Wend
        End With
    End If
End Sub
The
ItemChild property gives the first child of the item, if the item
contains child items. The
NextSiblingItem property retrieves the next sibling of the item in the
parent's child list.
The control automatically calls the
EnsureVisibleColumn method when the user clicks a cell. The following
sample shows how to avoid calling the EnsureVisibleColumn method when user
clicks a cell:
Private Sub Grid1_MouseDown(Button As Integer, Shift As Integer, X As Single, Y As Single)
    With Grid1
        Dim c As Long, hit as Long
        Dim h As HITEM
        h = .ItemFromPoint(X / Screen.TwipsPerPixelX, Y / Screen.TwipsPerPixelY, c, hit)
        If Not (h = 0) Then
            .SearchColumnIndex = c
        End If
    End With
End Sub
The control converts the value that user types into a valid value accepted by
the type of the editor. For instance, if you have a DateType editor, and user
types the string "qws" the NewValue parameter of the Change event will not
contain the string "qws", it will contain a valid date, in
this case the today date.
If your application still requires the string that user
typed in the text box, you can use the following:
Starting with the version 8.0.0.1 the
EditingText property retrieves the caption of the
editor while the control is in edit mode.
Starting with the version 1.0.6.8 the
Editing property retrieves the window's handle for the built-in editor
that's visible and focused, so all you need is to use
the GetWindowText API to retrieve the window's text as
follows:
The following VB code prints the text being
typed:
 Private Declare Function GetWindowText Lib "user32" Alias "GetWindowTextA" (ByVal hwnd As Long, ByVal lpString As String, ByVal cch As Long) As Long

Private Sub Grid1_Change(ByVal Item As EXGRIDLibCtl.HITEM, ByVal ColIndex As Long, NewValue As Variant)
    ' Finds the text inside the text box, in case that NewValue parameter is changed to a valid data
    Debug.Print getWndText(Grid1.Editing)
End Sub

Private Function getWndText(ByVal h As Long) As String
    Dim s As String
    s = Space(1024)
    GetWindowText h, s, 1024
    getWndText = To0(s)
End Function

Private Function To0(ByVal s As String) As String
    To0 = Left$(s, InStr(s, Chr$(0)) - 1)
End Function
The following C++ code prints the text being typed:
void OnChangeGrid1(long Item, long ColIndex, VARIANT FAR* NewValue)
{
	if ( m_grid.GetControlUnknown() != NULL )
		if ( long hEditing = m_grid.GetEditing() )
		{
			TCHAR szText[1024] = _T("");
			::GetWindowText( HWND(hEditing), szText, 1024 );
			OutputDebugString( szText );
		}
}
noteThe Editing
property is called during the Change event.
Prior to version 1.0.6.8, you can use the following
trick:
Private Sub Grid1_Change(ByVal Item As EXGRIDLibCtl.HITEM, ByVal ColIndex As Long, NewValue As Variant)
    ' Finds the text inside the text box, in case that NewValue parameter is changed to a valid data
    Debug.Print getWndText(getEditWnd(Grid1))
End Sub

Private Function getEditWnd(ByVal g As EXGRIDLibCtl.Grid) As Long
    Dim h As Long
    h = GetWindow(g.hwnd, GW_CHILD)
    While Not (h = 0)
        If (getWndClass(h) = "HolderBuiltIn") Then
                getEditWnd = GetWindow(h, GW_CHILD)
            Exit Function
        End If
        h = GetWindow(h, GW_HWNDNEXT)
    Wend
    getEditWnd = 0
End Function

Private Function getWndText(ByVal h As Long) As String
    Dim s As String
    s = Space(1024)
    GetWindowText h, s, 1024
    getWndText = To0(s)
End Function

Private Function getWndClass(ByVal h As Long) As String
    Dim s As String
    s = Space(1024)
    GetClassName h, s, 1024
    getWndClass = To0(s)
End Function

Private Function To0(ByVal s As String) As String
    To0 = Left$(s, InStr(s, Chr$(0)) - 1)
End Function
The sample requires the following API declarations:
Private Declare Function GetWindow Lib "user32" (ByVal hwnd As Long, ByVal wCmd As Long) As Long
Private Declare Function GetWindowText Lib "user32" Alias "GetWindowTextA" (ByVal hwnd As Long, ByVal lpString As String, ByVal cch As Long) As Long
Private Declare Function GetClassName Lib "user32" Alias "GetClassNameA" (ByVal hwnd As Long, ByVal lpClassName As String, ByVal nMaxCount As Long) As Long
Private Const GW_CHILD = 5
Private Const GW_HWNDNEXT = 2
The following C++ sample displays a message box with the caption that user types
inside the text box of an editor:
HWND getEditWnd( HWND h )
{
	TCHAR szName[1024] = _T("");
	h = GetWindow( h, GW_CHILD );
	while ( !( h == 0 ) )
	{
		GetClassName( h, szName, 1024 );
		if ( _tcscmp( _T("HolderBuiltIn"), szName ) == 0 )
			return GetWindow( h, GW_CHILD );
		h = GetWindow( h, GW_HWNDNEXT );
	}
	return 0;
}

void OnChangeGrid1(long Item, long ColIndex, VARIANT FAR* NewValue)
{
	HWND h = getEditWnd( m_grid.m_hWnd );
	if ( h )
	{
		TCHAR szText[1024] = _T("");
		::GetWindowText( h, szText, 1024 );
		::MessageBox( NULL, szText,NULL, NULL );
	}
}
The
EditClose method closes the current editor, if the control is running
in the edit mode. Use the
Editing property to determine whether the control runs in the edit
mode. The following sample closes the current editor if the user presses the
ENTER key:
Private Sub Grid1_KeyDown(KeyCode As Integer, Shift As Integer)
    With Grid1
        If not (.Editing = 0) Then
            If (KeyCode = 13) Then
                .EditClose
            End If
        End If
    End With
End Sub
The Form_Load event can look like follows
Private Sub Form_Load()
    nChanging = 0
    nChanging = nChanging + 1
    With Grid1
        .BeginUpdate
        With .Columns.Add("Column 1").Editor
            .EditType = EXGRIDLibCtl.EditType
        End With
        With .Items
            .AddItem 1
            .AddItem 2
        End With
        .EndUpdate
    End With
    nChanging = nChanging - 1
End Sub
In C++ the KeyDown handler looks like follows:
void OnKeyDownGrid1(short KeyCode, short Shift)
{
	if ( m_grid.GetEditing() )
		if ( KeyCode == VK_RETURN )
		{
			m_grid.EditClose();
		}
}
The
ColumnAutoResize property resizes the visible columns to fit the
control's client area. There are two options to avoid losing the columns
proportions:
Avoiding resizing the control under a specified width, like in the sample:
Private Sub Form_Resize()
On Error Resume Next
    If ScaleWidth / Screen.TwipsPerPixelX > 64 Then
        With Grid1
            .Left = 0
            .Top = 0
            .Width = ScaleWidth
            .Height = ScaleHeight
        End With
    End If
End Sub
Using the
LayoutChanged event to store the columns proportions manually, like in
the following sample:
Option Explicit
Dim nFit As Long
Private Declare Function PeekMessage Lib "user32" Alias "PeekMessageA" (lpMsg As MSG, ByVal hwnd As Long, ByVal wMsgFilterMin As Long, ByVal wMsgFilterMax As Long, ByVal wRemoveMsg As Long) As Long
Private Declare Function TranslateMessage Lib "user32" (lpMsg As MSG) As Long
Private Declare Function DispatchMessage Lib "user32" Alias "DispatchMessageA" (lpMsg As MSG) As Long
Private Const PM_REMOVE = &H1
Private Type POINTAPI
        x As Long
        y As Long
End Type
Private Type MSG
    hwnd As Long
    message As Long
    wParam As Long
    lParam As Long
    time As Long
    pt As POINTAPI
End Type

Private Sub Form_Load()
    nFit = 0

    onGridResize Grid1
End Sub

Private Sub Form_Resize()
On Error Resume Next
    nFit = nFit + 1
    With Grid1
        .Left = 0
        .Top = 0
        .Width = ScaleWidth
        .Height = ScaleHeight
    End With
    fit Grid1

    nFit = nFit - 1
End Sub

Private Sub Grid1_LayoutChanged()
    If (nFit = 0) Then
        onGridResize Grid1
    End If
End Sub

Private Sub fit(ByVal g As EXGRIDLibCtl.Grid)
    nFit = nFit + 1
    With g
        If (.ColumnAutoResize) Then
            .BeginUpdate
            .ColumnAutoResize = False
            Dim c As EXGRIDLibCtl.Column
            For Each c In .Columns
                c.Width = c.Data
            Next
            .ColumnAutoResize = True
            .EndUpdate
        End If
    End With
    waitToProcessMessages
    nFit = nFit - 1
End Sub

Private Sub onGridResize(ByVal g As EXGRIDLibCtl.Grid)
    Dim c As Object
    With g
        If (.ColumnAutoResize) Then
            For Each c In .Columns
                c.Data = c.Width
            Next
        End If
    End With
End Sub

Private Sub waitToProcessMessages()
    Dim m As MSG
    While PeekMessage(m, 0, 0, 0, PM_REMOVE)
        TranslateMessage m
        DispatchMessage m
    Wend
End Sub
The sample holds the columns proportions when LayoutChanged event
is fired. The sample ensures that the proportions are saved only when the user
resizes on of the control's columns, not when the user resizes the entire
control. The proportions are kept by the
Data property of the
Column object. The sample can be changed smoothly by using a simple
collection to hold the columns proportions instead using the Data property of
the Column object. By default, the control keeps the columns proportions in the
Width property of the Column object. This way the width of the column
is known every moment.
The Ev parameter of the
UserEditorOleEvent event holds a reference to an object that implements
the
IOleEvent interface. If the class wizard didn't generate any wrapper
class to handle the IOleEvent interface you can use the #import directive to
load the type library for the ExGrid control like follows:
#import "c:\winnt\system32\exgrid.dll"
In this case the EXGridLib namespace is generated, so you will be able to locate
the IOleEventPtr class declared as a smart pointer, so your handler could look
like:
The Object parameter holds a reference to the ActiveX control
created by
UserEditor method. The type the object depends on the identifier used.
The
UserEditorObject property gets the same value as Object parameter.
Private Sub Grid1_MouseDown(Button As Integer, Shift As Integer, X As Single, Y As Single)
    With Grid1
        Dim c As Long, hit As HitTestInfoEnum
        i = .ItemFromPoint(-1, -1, c, hit)
        If (i <> 0) Then
            .Items.SelectItem(i) = True
        End If
    End With
End Sub
Change the
OleDropMode property to exOleDropManual and handle the
OLEDragDrop event. For instance, the following sample displays the
files that user drags to the control.
Private Sub Grid1_OLEDragDrop(ByVal Data As EXGRIDLibCtl.IExDataObject, Effect As Long, ByVal Button As Integer, ByVal Shift As Integer, ByVal X As Single, ByVal Y As Single)
    If (Data.GetFormat(exCFFiles)) Then
        With Data
            For Each f In .Files
                Debug.Print f
            Next
        End With
    End If
End Sub
In case the user drags anything else than files, you have to use the
GetFormat and
GetData properties. For instance, if you the user drags a text you can
get the text by using the following sample:
Private Sub Grid1_OLEDragDrop(ByVal Data As EXGRIDLibCtl.IExDataObject, Effect As Long, ByVal Button As Integer, ByVal Shift As Integer, ByVal X As Single, ByVal Y As Single)
    If (Data.GetFormat(exCFText)) Then
        With Data
            Debug.Print .GetData(exCFText)
        End With
    End If
End Sub
In VB, if you need to access directly the IDataObject interface you can use the
following sample:
Private Sub Grid1_OLEDragDrop(ByVal Data As EXGRIDLibCtl.IExDataObject, Effect As Long, ByVal Button As Integer, ByVal Shift As Integer, ByVal X As Single, ByVal Y As Single)
    Dim i As IDataObject
    Set i = Data
    ' Call here IDataObject members
End Sub
In C++, if you need to access directly the IDataObject interface you can use
the following sample:
void CPPDlg::OnOLEDragDropGrid1(LPDISPATCH Data, long FAR* Effect, short Button, short Shift, long X, long Y)
{
	IDataObject* pDataObject = NULL;
	if ( SUCCEEDED( Data->QueryInterface( IID_IDataObject, (LPVOID*)&pDataObject ) ) )
	{
		// Call here the pDataObject memebers.
		pDataObject->Release();
	}

}
Yes. Set the
DisplayFilterPattern and
DisplayFilterDate properties on True. The drop down filter window
displays a date selector button right to the "Date" field that helps users to
include dates in the interval.
The following sample uses the ItemOleEvent event, to focus the
external control when the internal component fires KeyDown events. Also, the
sample changes the focus to the internal component as soon as the selection is
changed, using the SelectionChanged event. In order to run the following
sample, we would suggest to set the Template property for your component (
using Properties\Template page, in design mode ), to have some columns loaded.
Private Declare Function PutFocus Lib "user32" Alias "SetFocus" (ByVal hwnd As Long) As Long

Private Sub Form_Load()
    With Grid1
        .BeginUpdate
        .HideSelection = True
        With .Items
            With .ItemObject(.InsertControlItem(, "Exontrol.Grid"))
                .Template = Grid1.Template
                .HideSelection = True
            End With
        End With
        .EndUpdate
    End With
End Sub

Private Sub Grid1_ItemOleEvent(ByVal Item As EXGRIDLibCtl.HITEM, ByVal Ev As EXGRIDLibCtl.IOleEvent)
    If (Ev.Name = "KeyDown") Then
        Dim bOut As Boolean
        bOut = False
        Dim i As Long
        i = Ev.Param("KeyCode").Value
        Select Case i
            Case vbKeyUp
                If (Ev.Param("Shift").Value = 2) Then
                    bOut = True
                End If
            Case vbKeyDown
                If (Ev.Param("Shift").Value = 2) Then
                    bOut = True
                End If
        End Select
        If bOut Then
            Ev.Param("KeyCode").Value = 0
            PutFocus Grid1.hwnd
        End If
    End If
End Sub

Private Sub Grid1_SelectionChanged()
    With Grid1.Items
        If (.SelectCount = 1) Then
            Dim o As Object
            Set o = .ItemObject(.SelectedItem(0))
            If Not o Is Nothing Then
                PutFocus o.hwnd
            End If
        End If
    End With
End Sub
The user can change the focus to the external control when internal component is
focused by pressing the CTRL + KeyUp or CTRL+KeyDown keys. The idea is like
follows. The sample changes the focus to the main window of an ActiveX control
when the selected item hosts an ActiveX control, and changes the focus to the
outside component when inside ActiveX control fires KeyDown event.
The following sample uses the
KeyDown event to send Key Down when the user hits ENTER key:.
Private Sub Grid1_KeyDown(KeyCode As Integer, Shift As Integer)
    If (KeyCode = 13) Then
        KeyCode = vbKeyDown
    End If
End Sub
or:
Private Sub Grid1_KeyDown(KeyCode As Integer, Shift As Integer)
    If (KeyCode = 13) Then
        KeyCode = 40    ' vbKeyDown
    End If
End Sub
or:
Private Sub Grid1_KeyDown(KeyCode As Integer, Shift As Integer)
    If (KeyCode = 13) Then
        Grid1.EventParam(0) = 40    ' KeyCode = vbKeyDown
    End If
End Sub
or:
Private Sub Grid1_KeyDown(KeyCode As Integer, Shift As Integer)
    If (KeyCode = 13) Then
        Grid1.ExecuteTemplate ("EventParam(0) = 40")
    End If
End Sub
Another option is to advance to the next line when user hits the enter key like
follows:
Private Sub Grid1_KeyDown(KeyCode As Integer, ByVal Shift As Integer)
    If (KeyCode = 13) Then
        With Grid1.Items
            Dim h As HITEM
            h = .NextVisibleItem(.FocusItem)
            If Not (h = 0) Then
                .SelectItem(h) = True
                .EnsureVisibleItem h
                Grid1.Edit
            End If
        End With
    End If
End Sub
Automatically, if the
AutoEdit property is True, the next visible line is edited.
A) The following sample shows how you can advance to the next
column/first column /next line, once
the user presses the Enter key. The sample defines the
RETURN key to behave as TAB key, and sends DOWN key if reaches
the last column.
Private Sub Form_Load()
    With Grid1
        .BeginUpdate
            .UseTabKey = True
            .FullRowSelect = exColumnSel
            .Columns.Add("A").Editor.EditType = EditType
            .Columns.Add ("B")
            .Columns.Add("C").Editor.EditType = EditType
            .Items.SelectItem(.Items.AddItem(Array(1, 2, 3))) = True
            .Items.AddItem Array(4, 5, 6)
            .Items.AddItem Array(7, 8, 9)
        .EndUpdate
    End With
End Sub

Private Sub Grid1_KeyDown(KeyCode As Integer, Shift As Integer)
    If KeyCode = 13 Then    ' Enter
        KeyCode = 9         ' Tab
        With Grid1
            If (.FocusColumnIndex = .Columns.Count - 1) Then
                CreateObject("WScript.Shell").SendKeys "{DOWN}" ' Down
            End If
        End With
    End If
End Sub
B) The following sample shows how you can advance to the next
column/first column /next line, once
the user presses the Enter key, if columns are read-only (
no editor is assigned to any column ). The sample defines the
RETURN key to behave as TAB key.
Private Sub Form_Load()
    With Grid1
        .BeginUpdate
            .UseTabKey = True
            .FullRowSelect = exColumnSel
            .Columns.Add "A"
            .Columns.Add "B"
            .Columns.Add "C"
            .Items.SelectItem(.Items.AddItem(Array(1, 2, 3))) = True
            .Items.AddItem Array(4, 5, 6)
            .Items.AddItem Array(7, 8, 9)
        .EndUpdate
    End With
End Sub

Private Sub Grid1_KeyDown(KeyCode As Integer, Shift As Integer)
    If KeyCode = 13 Then    ' Enter
        KeyCode = 9         ' Tab
        With Grid1
            If (.FocusColumnIndex = .Columns.Count - 1) Then
                With .Items
                    Dim hNext As Long
                    hNext = .NextVisibleItem(.FocusItem) ' Advances to the next line, in case we reach the last column
                    If (hNext = 0) Then
                        hNext = .RootItem(0)
                    End If
                    If Not (hNext = 0) Then
                        .EnsureVisibleItem hNext
                        .SelectItem(hNext) = True
                    End If
                End With
            End If
        End With
    End If
End Sub
C) The following sample shows how you can advance to the next
editable column/first editable column /next line, once
the user presses the Enter key, if columns contains visible
editors. The sample defines the RETURN key to behave as RIGHT
key.
Private Sub Form_Load()
    With Grid1
        .BeginUpdate
            .UseTabKey = True
            .FullRowSelect = exColumnSel
            .Columns.Add("A").Editor.EditType = EditType
            .Columns.Add("B").Editor.EditType = EditType
            .Columns.Add("C").Editor.EditType = EditType
            .Items.SelectItem(.Items.AddItem(Array(1, 2, 3))) = True
            .Items.AddItem Array(4, 5, 6)
            .Items.AddItem Array(7, 8, 9)
        .EndUpdate
    End With
End Sub

Private Sub Grid1_KeyDown(KeyCode As Integer, Shift As Integer)
    If KeyCode = 13 Then        ' Enter
        KeyCode = vbKeyRight    ' Right
    End If
End Sub
Yes. The
Editor.Option(exAutoDropDownList) property should be 1. By default, the
Editor.Option(exAutoDropDownList) property is 0. The following sample adds such
of a drop down list editor to the focused cell:
With Grid1.Items
    With .CellEditor(.FocusItem, Grid1.FocusColumnIndex)
        .EditType = DropDownListType
        .Option(exAutoDropDownList) = 1
        .DropDownAutoWidth = False
        .AddItem 1, "Root", 1
        .InsertItem 2, "Child 1", 2, 1
        .InsertItem 3, "Child 2", 3, 1
        .ExpandAll
    End With
End With
Yes. The version 1.0.7.4 adds a new property called ExpandOnSearch property. By default, the ExpandOnSearch property is
False. If the ExpandOnSearch property is True the control expands items while
user types characters in the control. Use the AutoSearch property to enable incremental searching feature.
The control supports OLE drag and drop, by setting the
OLEDropMode
property on exOLEDropManual. The
ItemPosition
property specifies the position of the item in the sibling
items collection. In order to let user moves the items in your control by drag
and drop please follow the steps:
Change the control's OLEDropMode property to exOLEDropMode type
Private Sub Grid1_OLEStartDrag(ByVal Data As EXGRIDLibCtl.IExDataObject, AllowedEffects As Long)
    With Grid1.Items
        If Not (.FocusItem = 0) Then
            AllowedEffects = 2
            Data.SetData .FocusItem, exCFText
        End If
    End With
End Sub
Private Sub Grid1_OLEDragDrop(ByVal Data As EXGRIDLibCtl.IExDataObject, Effect As Long, ByVal Button As Integer, ByVal Shift As Integer, ByVal X As Single, ByVal Y As Single)
    If (Data.GetFormat(exCFText)) Then
        With Grid1
            Dim hNew As HITEM, c As Long, h As HITEM
            hNew = .ItemFromPoint(X / Screen.TwipsPerPixelX, Y / Screen.TwipsPerPixelY, c)
            If Not hNew = 0 Then
                h = Data.GetData(exCFText)
                With .Items
                    If .ItemParent(h) = .ItemParent(hNew) Then
                        ' Moves the item in the sibling items collection only
                        .ItemPosition(h) = .ItemPosition(hNew)
                    End If
                End With
            End If
        End With
    End If
End Sub
If you need to change the cursor during drag and drop operation you
have to handle the
OLEGiveFeedback
event and
OLECompleteDrag
event like follows:
Private Sub Grid1_OLECompleteDrag(ByVal Effect As Long)
    Screen.MousePointer = 0
End Sub
Private Sub Grid1_OLEGiveFeedback(ByVal Effect As Long, DefaultCursors As Boolean)
    DefaultCursors = False
    Screen.MousePointer = vbSizeNS
End Sub
Use the
ItemFromPoint property to determine the item/cell over the cursor.
Also, the ItemFromPoint property returns the hit test code within the cell. The
following sample displays the cell's caption only when the mouse hovers the +/-
buttons:
Private Sub Grid1_MouseMove(Button As Integer, Shift As Integer, X As Single, Y As Single)
    ' Prints the cell over the cursor
    With Grid1
        Dim c As Long
        Dim h As HITEM
        Dim hit As EXGRIDLibCtl.HitTestInfoEnum
        h = .ItemFromPoint(X / Screen.TwipsPerPixelX, Y / Screen.TwipsPerPixelY, c, hit)
        If Not (h = 0) Then
            If (hit = exHTExpandButton) Then
                Debug.Print .Items.CellCaption(h, c)
            End If
        End If
        End With
End Sub
The
SliderType editor includes a spin control and filters numbers between a
range, so the idea is to get a slider, and to hide the spin control inside. The
sample uses also the
Numeric property to let users enter only integer numbers. Use the
Option property of the
Editor object to enable or disable a specific option.
You can have a sample like follows ( the sample assumes that the control has
already a column )
With Grid1.Items
    Dim h As EXGRIDLibCtl.HITEM
    h = .AddItem(10)
    With .CellEditor(h, 0)
        .EditType = EXGRIDLibCtl.EditTypeEnum.SliderType
        .Numeric = exInteger
        .Option(EXGRIDLibCtl.EditorOptionEnum.exSliderWidth) = 0
        .Option(EXGRIDLibCtl.EditorOptionEnum.exSliderMin) = 1
        .Option(EXGRIDLibCtl.EditorOptionEnum.exSliderMax) = 200
    End With
End With
In case you require a simple edit box to filter numbers between a range, you can
hide the spin control too using the
exSpinStep option like in the following sample:
With Grid1.Items
    Dim h As EXGRIDLibCtl.HITEM
    h = .AddItem(10)
    With .CellEditor(h, 0)
        .EditType = EXGRIDLibCtl.EditTypeEnum.SliderType
        .Numeric = exInteger
        .Option(EXGRIDLibCtl.EditorOptionEnum.exSliderWidth) = 0
        .Option(EXGRIDLibCtl.EditorOptionEnum.exSliderMin) = 1
        .Option(EXGRIDLibCtl.EditorOptionEnum.exSliderMax) = 200
        .Option(EXGRIDLibCtl.EditorOptionEnum.exSpinStep) = 0
    End With
End With
The
CellOwnerDraw property specifies an object that implements the
IOwnerDrawHandler interface ( that's provided by the control ). The
IOwnerDrawHandler interface exports a single method that needs to be
implemented like in the following sample.
Implements IOwnerDrawHandler

Private Declare Function MoveToEx Lib "gdi32" (ByVal hdc As Long, ByVal x As Long, ByVal y As Long, lpPoint As POINTAPI) As Long
Private Declare Function LineTo Lib "gdi32" (ByVal hdc As Long, ByVal x As Long, ByVal y As Long) As Long

Private Type POINTAPI
        x As Long
        y As Long
End Type

Private Sub Form_Load()
    With Grid1.Items
        Set .CellOwnerDraw(.FindItem("Root 2"), 0) = Me
    End With
End Sub

Private Sub IOwnerDrawHandler_DrawCell(ByVal hdc As Long, ByVal left As Long, ByVal top As Long, ByVal right As Long, ByVal bottom As Long, ByVal Item As Long, ByVal Column As Long, ByVal Source As Object)
    Dim p As POINTAPI
    MoveToEx hdc, left, top, p
    LineTo hdc, right, bottom
End Sub
The sample draws a line from left-top corner to right-bottom corner
of a single cell ( "Root 2" ), using few Windows API functions. The sample uses
the Form itself to implement the IOwnerDrawHandler interface, but you can
create multiple objects ( classes) that implement the IOwnerDrawHandler
interface.
Use the
InsertControlItem method to insert items that host ActiveX controls.
Use the
ItemObject property to access the object being created by the
InsertControlItem method.
The following C++ sample inserts a new ExGrid control inside, and access the
inside object:
The sample uses the #import directive to include the definitions of the
ExGrid component inside your project. It generates the EXGRIDLib namespace
where you will be able to find all the types that control defines. The
ItemObject property gets an IDispatch object, and you can get the grid inside
by simple passing its value to a variable of IGridPtr type ( smart pointer ).
Private Declare Function FindWindow Lib "user32" Alias "FindWindowA" (ByVal lpClassName As String, ByVal lpWindowName As String) As Long

Private Function isDropped()
    ' Specifies whether the control's drop down portion is visible or not
    isDropped = Not FindWindow("HostPopupWindow", "") = 0
End Function
The following sample advance to the next line when the ENTER key is pressed, and does the default action when an editor of drop down type is opened:
Private Sub Grid1_KeyDown(KeyCode As Integer, Shift As Integer)
    If (KeyCode = 13) Then
        If Not isDropped() Then
            KeyCode = vbKeyDown
        End If
    End If
End Sub
By default, the cell's tooltip displays the column's caption on its title. Use
the
HTMLCaption property to specify the column's caption and set the
Caption property on empty string. This way the cell's tooltip will not
display the column's caption.
User can left-click to select, and can use shift and ctrl-click to select
multiple items
A single right-click on an unselected item deselect all, selects the clicked
item and displays a pop-up menu
A right-click on a selected item does not deselect all, moves the focus to
the clicked item and displays a pop-up m
Use the
SingleSel property to allow multiple selection in the control. The
following VB sample uses the
ItemFromPoint property to determine the item from point, and
MouseDown event to notify the application that the user right clicks
the control ( the sample uses the
exPopupMenu control to display a context menu ):
Private Sub Grid1_MouseDown(Button As Integer, Shift As Integer, X As Single, Y As Single)
    If Button = vbRightButton Then
        With Grid1
            Dim i As HITEM, c As Long, h As HitTestInfoEnum
            i = .ItemFromPoint(X / Screen.TwipsPerPixelX, Y / Screen.TwipsPerPixelY, c, h)
            If Not (i = 0) Then
                ' Unselect the rest of items if the user clicks a non selected item, and select the item
                .BeginUpdate
                With .Items
                    If .SelectItem(i) Then
                    Else
                        Dim j As Long
                        While .SelectCount > 0
                            .SelectItem(.SelectedItem(0)) = False
                        Wend
                    End If
                    .SelectItem(i) = True
                End With
                .EndUpdate
                ' Displays a context menu
                With PopupMenu1
                    .HAlign = EXPOPUPMENULibCtl.exLeft
                    With .Items
                        .Clear
                        .Add Grid1.Items.CellValue(i, c)
                        .Add "..."
                    End With
                    Debug.Print "You have selected " & .ShowAtCursor()
                End With
            End If
        End With
    End If
End Sub
Starting with the version 1.0.8.3, you can filter items given numeric rules. If
the
FilterType property is exNumeric, the
Filter property may include operators like <, <=, =, <>,
>= or > and numbers to define rules to include numbers in the control's
list. The Filter property should be of the following format "operator number
[operator number ...]". For instance, the "> 10" indicates all
numbers greater than 10. The "<>10 <> 20" filter indicates all
numbers except 10 and 20. The "> 10 < 100" filter indicates all numbers
greater than 10 and less than 100. The ">= 10 <= 100 <> 50" filter
includes all numbers from 10 to 100 excepts 50. The "10" filter includes only
10 in the list. The "=10 =20" includes no items in the list because after
control filters only 10 items, the second rule specifies only 20, and so we
have no items. The Filter property may include unlimited rules. A rule is
composed by an operator and a number. The rules are separated by space
characters.
You can get the client coordinates of the cell using the following VB sample:
Private Sub getCellPos(ByVal g As EXGRIDLibCtl.Grid, ByVal hItem As EXGRIDLibCtl.hItem, ByVal nColumn As Long, X As Long, Y As Long)
    X = -g.ScrollPos(False)
    With g
        Dim c As EXGRIDLibCtl.Column
        For Each c In .Columns
            If (c.Visible) Then
                If (c.Position < .Columns(nColumn).Position) Then
                    X = X + c.Width
                End If
            End If
        Next
        Y = 0
        If (.HeaderVisible) Then
            Y = Y + .HeaderHeight
        End If
        With .Items
            Dim i As EXGRIDLibCtl.hItem
            i = .FirstVisibleItem()
            While Not (i = hItem) And Not (i = 0)
                Y = Y + .ItemHeight(i)
                i = .NextVisibleItem(i)
            Wend
        End With
    End With
End Sub
The getCellPos method gets the x, y client coordinates of the cell (
hItem,
nColumn ). The hItem indicates the handle of the item, and the nColumn
indicates the index of the column. Use the ClientToScreen API function to
convert the client coordinates to screen coordinates like bellow:
Private Type POINTAPI
        x As Long
        y As Long
End Type
Private Declare Function ClientToScreen Lib "user32" (ByVal hwnd As Long, lpPoint As POINTAPI) As Long
In the following
MouseDown handler the
ItemFromPoint method determines the cell from the cursor. The sample
displays an exPopupMenu control
at the beginning of the cell, when user right clicks the cell:
Private Sub Grid1_MouseDown(Button As Integer, Shift As Integer, X As Single, Y As Single)
    If Button = 2 Then
        With Grid1
            Dim h As EXGRIDLibCtl.hItem, c As Long, hit As EXGRIDLibCtl.HitTestInfoEnum
            h = .ItemFromPoint(X / Screen.TwipsPerPixelX, Y / Screen.TwipsPerPixelY, c, hit)
            If Not (h = 0) Then
                ' Selects the item when user does a right click
                Grid1.Items.SelectItem(h) = True
                ' Gets the client coordinates of the cell
                Dim xCell As Long, yCell As Long
                getCellPos Grid1, h, c, xCell, yCell
                ' Converts the client coordinates to the screen coordinates
                Dim p As POINTAPI
                p.X = xCell
                p.Y = yCell
                ClientToScreen Grid1.hwnd, p
                ' Displays the exPopupMenu control at specified position
                PopupMenu1.HAlign = EXPOPUPMENULibCtl.exLeft
                Debug.Print "You have selected " & PopupMenu1.Show(p.X, p.Y)
            End If
        End With
    End If
End Sub
In MS Access, the EXGRIDLibCtl should be renamed to
EXGRIDCtl. The getCellPos
function should look like:
Private Sub getCellPos(ByVal g As Grid, ByVal hItem As EXGRIDLib.hItem,ByVal nColumn As Long, X As Long, Y As Long)
instead
Private Sub getCellPos(ByVal g As EXGRIDLibCtl.Grid, ByVal hItem As EXGRIDLibCtl.hItem, ByVal nColumn As Long, X As Long, Y As Long)
Thanks to Aileen Cariaso, IHG, who submitted the MS Access note.
Using the
ExpandOnKeys
property. Specifies a value that indicates whether the control expands or
collapses a node when user presses arrow keys. If the ExpandOnKeys property is
False, the '*' on numeric keypad has no effect. In the same time, left arrow
key, '-' on the numeric keypad, right arrow key, '+' on the numeric keypad will
not expand or collapse the focused item.
Private Sub Grid1_KeyDown(KeyCode As Integer, Shift As Integer)
    If KeyCode = vbKeyMultiply Then
        If (Shift = 0) Then
            KeyCode = 0
        End If
    End If
End Sub
The code still allows you to use the CTRL + '*' on the numeric keypad to expand
nodes. In order to disable completely the '*' feature you have to comment the
'Shift = 0' statement.
Yes. Starting with the version 2.0.0.2 the control supports merging cells. Use
the
MergeCells method to combine two or more cells in a single cell. Use
the
UnmergeCells method to unmerge the merged cells. Use the
CellMerge property to merge two or more cells in a single cell. The
current implementation supports only horizontal merging. Use the
SplitCell property to split a cell in two cells.
Yes. Starting with the version 2.0.0.3 the control
supports splitting cells. Use the
SplitCell property to split a cell in two cells. The SplitCell property
retrieves the handle of the inner cell that's created. Use the
UnsplitCell method to remove the inner cell if it exists.Use the
MergeCells method to combine two or more cells in a single cell. Use
the
CellMerge property to merge two or more cells in a single cell. Use the
UnmergeCells method to unmerge the merged cells.
By default, the text gets selected when the user edits a cell. The following
sample sends an EM_SETSEL message to the cell's edit control when the
EditOpen event is fired.
Private Function getEditWnd(ByVal g As EXGRIDLibCtl.Grid) As Long
    Dim h As Long
    h = GetWindow(g.hwnd, GW_CHILD)
    While Not (h = 0)
        If (getWndClass(h) = "HolderBuiltIn") Then
                getEditWnd = GetWindow(h, GW_CHILD)
            Exit Function
        End If
        h = GetWindow(h, GW_HWNDNEXT)
    Wend
    getEditWnd = 0
End Function

Private Function getWndClass(ByVal h As Long) As String
    Dim s As String
    s = Space(1024)
    GetClassName h, s, 1024
    getWndClass = To0(s)
End Function

Private Function To0(ByVal s As String) As String
    To0 = Left$(s, InStr(s, Chr$(0)) - 1)
End Function

Private Sub Grid1_EditOpen()
    PostMessage getEditWnd(Grid1), EM_SETSEL, 0, 0
End Sub
The sample requires the following declarations:
Private Declare Function PostMessage Lib "user32" Alias "PostMessageA" (ByVal hwnd As Long, ByVal wMsg As Long, ByVal wParam As Long, ByVal lParam As Long) As Long
Private Declare Function GetWindow Lib "user32" (ByVal hwnd As Long, ByVal wCmd As Long) As Long
Private Declare Function GetWindowText Lib "user32" Alias "GetWindowTextA" (ByVal hwnd As Long, ByVal lpString As String, ByVal cch As Long) As Long
Private Declare Function GetClassName Lib "user32" Alias "GetClassNameA" (ByVal hwnd As Long, ByVal lpClassName As String, ByVal nMaxCount As Long) As Long
Private Const GW_CHILD = 5
Private Const GW_HWNDNEXT = 2
Private Const EM_SETSEL = &HB1
The DataSource
takes an ADO recordset and fetches data from the recordset
to the control. The DataSource property may fail if the
recordset doesn't support bookmarks and notifiers. In order to check if your recordset supports bookmarks and notifiers use the Supports property of the recordset like in the following
VB sample:
where the rs is an ADO object. If one of the
Supports(adBookmark) or Supports(adNotify) value is False,
the DataSource property fails. The control requires a
bookmarkable recordset to identify a record when the user
changes a value in the grid. The control requires the Notify
support to update the control once that an ouside source
changes the recordset. Additional, if the control's property
DetectDelete or DetectNew is True, the CursorLocation
property of the recordset must be adUseClient.
The following sample creates an ADO recordset in memory
and load it to the control:
Dim rs As New ADODB.Recordset

Private Sub Form_Load()

    rs.CursorLocation = adUseClient
    rs.Fields.Append "String", adBSTR
    rs.Fields.Append "Boolean", adBoolean
    rs.Open

    rs.AddNew
    rs(0) = "item 1"
    rs(1) = True
    rs.Update

    rs.AddNew
    rs(0) = "item 2"
    rs(1) = False
    rs.Update

    Set Grid1.DataSource = rs

End Sub
Yes. For instance, you need to type 0176(for °), 0178(for ²), 0179(for ³) from the numeric keypad while keeping the ALT key down;. You may include strings like [m²], [m³], [180°] and so on.
The component supports skinning parts of the control,
including the selected item. Please check the control's help
file for the Add method of the Appearance object. There you
will find almost everything you need to change the visual
appearance for most of the UI parts of the control. Shortly,
the idea is that identifier of the skin being added to the
Appearance collection is stored in the first significant
byte of property of the color type. In our case, we know
that the SelBackColor property changes the background color
for the selected item. This is what we need to change. In
other words, we need to
change the visual appearance for the selected item, and that
means changing the background color of the selected item.
So, the following code ( blue code ) changes the appearance
for the selected item:
With Grid1
    .VisualAppearance.Add &H34, App.Path + "\aqua.ebn"
    .SelBackColor = &H34000000
End With
Please notice that the 34 hexa value is arbitrary chosen,
it is not a predefined value. Shortly, we have added a skin
with the identifier 34, and we specified that the SelBackColor
property should use that skin, in order to change the visual
appearance for the selected item. Also, please notice that
the 34 value is stored in the first significant byte, not in other position. For instance, the following sample
doesn't use any skin when displaying the selected item:
With Grid1
.VisualAppearance.Add &H34, App.Path + "\aqua.ebn"
.SelBackColor = &H34
End With
This code ( red code ) DOESN'T use any skin, because the
34 value is not stored in the higher byte of the color
value. The sample just changes the background color for the
selected item to some black color ( RGB(0,0,34 ) ). So,
please pay attention when you want to use a skin and when to
use a color. Simple, if you are calling &H34000000,
you have 34 followed by 6 ( six ) zeros, and that means the
first significant byte of the color expression. Now, back to
the problem. The next step is how we are creating skins? or
EBN files? The exbutton
component includes a builder tool that saves skins to EBN
files. So, if you want to create new skin files, you need to
download and install the exbutton component from our web
site. Once that the exbutton component is installed, please
follow the steps.
Let's say that we have a BMP file, that we want to
stretch on the selected item's background.
Open the VB\Builder or VC\Builder sample
Click the New File button ( on the left side in
the toolbar ), an empty skin is created.
Locate the Background tool window and select
the Picture\Add New item in the menu, the Open
file dialog is opened.
Select the picture file ( GIF, BMP, JPG, JPEG ). You
will notice that the visual appearance of the focused
object in the skin is changed, actually the picture you
have selected is tiled on the object's background.
Select the None item, in the Background tool
window, so the focused object in the skin is not
displaying anymore the picture being added.
Select the Root item in the skin builder window
( in the left side you can find the hierarchy of the
objects that composes the skin ), so the Root item is
selected, and so focused.
Select the picture file you have added at the step 4,
so the Root object is filled with the picture you have
chosen.
Resize the picture in the Background tool
window, until you reach the view you want to have, no
black area, or change the CX and CY fields in the
Background tool window, so no black area is displayed.
Select Stretch button in the Background tool
window, so the Root object stretches the picture you
have selected.
Click the Save a file button, and select a name
for the new skin, click the Save button after you typed
the name of the skin file. Add the .ebn extension.
Close the builder
You can always open the skin with the builder and change
it later, in case you want to change it.
Now, create a new project, and insert the component where
you want to use the skin, and add the skin file to the
Appearance collection of the object, using blue code, by
changing the name of the file or the path where you have
selected the skin. Once that you have added the skin file to the
Appearance collection,
you can change the visual appearance for parts of the
controls that supports skinning.
Generally the properties
that changes the background color for a part of the control
supports skinning as well.
Please run the following sample and find out on your machine
how fast it can be. The sample adds 1000 columns, and
displays 2,000,000,000 items. On the machine we tested (
Pentium III, 1.8 GHz, 512 Mb ), it run in 94 mili seconds.
Option Explicit
Implements IUnboundHandler
Private Declare Function GetTickCount Lib "kernel32" () As Long
Dim its As EXGRIDLibCtl.Items
Private Sub Form_Load()
Dim h As Long
h = GetTickCount()
With Grid1
Dim i As Long
.BeginUpdate
.ColumnAutoResize = False
With .Columns
For i = 0 To 1000
.Add i
Next
End With
.VirtualMode = True
Set its = .Items
Set .UnboundHandler = Me
.EndUpdate
End With
MsgBox GetTickCount - h
End Sub
Private Property Get IUnboundHandler_ItemsCount(ByVal Source As Object) As Long
IUnboundHandler_ItemsCount = 2000000000
End Property
Private Sub IUnboundHandler_ReadItem(ByVal Index As Long, ByVal Source As Object, ByVal ItemHandle As Long)
With its
Dim i As Long
For i = 0 To Source.Columns.Count - 1
.CellValue(ItemHandle, i) = Index & " " & i
Next
End With
End Sub
When I select an item in the filterlist on a
column, it applies that filter to the grid - magic. When I
select another value, it adds that
value to the first one selected and my column is now
filtered for both those values. By default, the filter
strings are cumulative. You can replace the selection in the
drop down filter window, by resetting the FilterType
property of the Column
object, during the FilterChange
event, like in the following VB sample:
Private Sub Grid1_FilterChange()
Dim c As EXGRIDLibCtl.Column
With Grid1
For Each c In .Columns
c.FilterType = exAll
Next
.FilterBarCaption = "new filter"
End With
End Sub
The sample changes the FilterType property to exAll, so
next time when the user opens the drop down filter window,
the 'All Items' filter option is selected, so user can
select a new items from the drop down filter window, without
filtering with two or more values. The code doesn't change
the filter, because the ApplyFilter method is not called. Use the FilterBarCaption
property to change the caption of the filterbar.
The Change
event is called when the user changes data in the control.
The following sample sorts items when the user changes
data ( The sample sorts the child items only ):
Private Sub Grid1_Change(ByVal Item As EXGRIDLibCtl.HITEM, ByVal ColIndex As Long, NewValue As Variant)
If (iLoading = 0) Then
iLoading = iLoading + 1
With Grid1.Items
.CellValue(Item, ColIndex) = NewValue
.SortChildren .ItemParent(Item), ColIndex, True
Grid1.EditClose
End With
iLoading = iLoading - 1
End If
End Sub
The iLoading counter ensures that the Change event is not
called recursively. The .CellValue(Item, ColIndex) = NewValue
assignment is very important because it ensures that
the CellValue property is filled before calling the SortChildren
method. The Change event is called just before putting the
NewValue parameter to the CellValue
property.
The following sample sorts the entire column, when a cell
on this column is changed ( The sample sorts all items ):
Private Sub Grid1_Change(ByVal Item As EXGRIDLibCtl.HITEM, ByVal ColIndex As Long, NewValue As Variant)
If (iLoading = 0) Then
iLoading = iLoading + 1
With Grid1.Items
.CellValue(Item, ColIndex) = NewValue
Grid1.Columns(ColIndex).SortOrder = SortAscending
Grid1.EditClose
End With
iLoading = iLoading - 1
End If
End Sub
The .CellValue(Item, ColIndex) = NewValue assignment is very
important because it ensures that the CellValue property
is filled before calling the SortOrder
method. The EditClose
method closes the editor.
The conditional formatting feature allows you to apply
formats to a cell or range of cells, and have that
formatting change depending on the value of the cell or the
value of a formula. Yes, the control supports conditional
format. The ConditionalFormats
property gets the control's collection of ConditionalFormat
objects.
For instance, the following sample bolds the items where
the sum between first two columns is greater than 0:
The control supports filtering items using AND, OR, NOT
operators between columns. The FilterCriteria
property specifies the filter criteria. In your case, if you
have three columns, the control's FilterCriteria property
should be "%0 or %1 or %2". The "not
%1" specifies that the second column ( column's index
is 1 ) excludes the values selected in the drop down filter
window.
Use the SearchColumnIndex
property to change the column where the user is able to
search for items by typing characters. The trick is to
disable the default implementation of the Tab key, and to
provide a new one using the KeyDown event like in the
following handler:
Private Sub Grid1_KeyDown(KeyCode As Integer, Shift As Integer)
If (KeyCode = vbKeyTab) Then
KeyCode = 0
Grid1.SearchColumnIndex = 1
End If
End Sub
The control provides the Export method, which allows you to export data in CSV or HTML format.
The control provides the GetItems
method to put grid's data to a safe array. An alternative is the following
sample enumerates the data in a safe array and put in a TAB
separated file:
Dim r As String
With Grid1
Dim j As Long, n As Long
j = 0
n = .Columns.Count
For Each i In .GetItems()
r = r & IIf(j <> 0, vbTab, "") & i
j = (j + 1) Mod n
If j = 0 Then
r = r + vbCrLf
End If
Next
End With
Debug.Print r
Or an alternative sample is:
Dim r As String, v As Variant, i As Long, j As Long
v = Grid1.GetItems()
For j = 0 To UBound(v, 2)
For i = 0 To UBound(v, 1)
r = r & IIf(i = 0, "", vbTab) & v(i, j)
Next i
r = r + vbCrLf
Next j
Debug.Print r
Use the <img> built-in HTML tag in the HTMLCaption
property, like: HTMLCaption = "<img>pic1</pic>",
where pic1 was added using the HTMLPicture
property.
The Background(exCursorHoverColumn)
property specifies the visual appearance of the column's
header when cursor hovers it. By default, the
Background(exCursorHoverColumn) property is zero, and in
this case it has no effect. Use the Add
method to assign new skins to the control. Use the
Background(exCursorHoverColumn) property to display a skin
on the header, when the cursor hovers the column.
The sample loads the Orders table from the sample.mdb
file. If loading the table takes too much time, you can run
the control in virtual mode, by calling VirtualMode
property on True, before setting the DataSource
property like follows:
The control provides the following options to define the visual effect when drag
and drop items:
Background(exDragDropBefore),
Specifies the visual appearance for the drag and drop cursor before showing
the items. This option can be used to apply a background to the dragging
items, before painting the items. By default, the control doesn't draw any
background for the items being dragged. For instance, use the
Background(exDragDropBefore)
= SelBackColor property to specify the same background color/skin for items
being dragged as they are selected.
Background(exDragDropAfter), Specifies the visual appearance for the
drag and drop cursor after showing the items. This option can be used to
apply a semi-transparent/opaque background to the dragging items, after
painting the items. Use this option to apply a transparent/opaque skin,
after the items are painted. For instance, using an color or an opaque skin
you can show something else when dragging the items.
Background(exDragDropListTop), Specifies the graphic feedback of the item
from the drag and drop cursor if the cursor is in the top half of the row.
Use this option to indicate the graphic to be displayed on the item, when
the cursor is in the top half row. By default, nothing is displayed.
Background(exDragDropListBottom), Specifies the graphic feedback of the
item from the drag and drop cursor if the cursor is in the bottom half of
the row. Use this option to indicate the graphic to be displayed on the
item, when the cursor is in the bottom half row. By default, nothing is
displayed. Use the HitTestInfoEnum.exHTBottomHalf flag to check whether the
user drags the items in the top half or bottom half of the row.
Background(exDragDropForeColor), Specifies the foreground color for the
items being dragged. By default, the foreground color is black.
All options, excepts the exDragDropForeColor option accept skins. Use the Appearance.Add
method to define new skins in the control.
The Column.Def(exCellPaddingLeft), Column.Def(exCellPaddingRight) defines
the cell's horizontal padding, while the Column.Def(exCellPaddingTop),
Column.Def(exCellPaddingBottom) defines the cell's vertical padding. If the
Items.CellSingleLine property is False ( so the cell displays its content on
multiple lines ), the Column.Def(exCellPaddingTop), Column.Def(exCellPaddingBottom)
are added to the computed item's height. The exHeaderPaddingLeft,
exHeaderPaddingRight, exHeaderPaddingTop, exHeaderPaddingBottom defines the
padding for captions in the control's header.
The control already supports cell padding, using the exCRD
feature. The Custom Row Designer is a WYSWYG tool to build new
layouts for cells/nodes, items/rows or columns/fields. The exCRD tool generates
CRD strings from the layout you built. The syntax of CRD strings is designed to
be easy to build, change and read. Using CRD strings is powerful than
preformatted card view, group view formats, nested bands, and so on, since you
are free to define the full layout of the cell/node, item/row or a column/field.
The CellFormatLevel
property or Column.Def(exCellFormatLevel)
property define the layout of the cell/column using CRD strings.
For instance, this layout [dgl=1]""[b=0]:4,(4;""[b=4]/0/4;""[b=1]),""[b=0]:4
adds a 4 pixel borders around to the object its applies, like in the following
picture:
The original problem was that it was not possible to use the ExGrid control in
VFP9 when using Virtual mode. The moment the UnboundHandler ReadItem method is
called, a GPF occurs. When I run the 'VirtualMode' application under VFP8, it
runs perfectly. When the need arose to use the virtual mode for real (number of
lines were unpredictably high), we went for a solution I should have thought of
before: we created a wrapper for the Unboundhandler in .Net. This allowed
us to use the Exgrid control in VFP9 in a virtual mode. Here
you can download the wrapper.
Thanks to Timo Zuidema, AccountView B.V., Netherlands, who submitted this note.
The HitTestInfoEnum.exHTBetween
value indicates whether the cursor is between two items. For instance, you can
provide a visual effect for the item while performing OLE drag and drop
operations, when the cursor is in the top half of the item, using the exDragDropListTop,
or in the second half using the exDragDropListBottom value. In the same way you
can provide a visual effect when the cursor is over or between two items, using
the exDragDropListOver and exDragDropListBetween values. The ItemFromPoint
property retrieves the handle of the item from the cursor, and retrieves also a
code (HitTestInfo parameter), to indicate the part in the item where the cursor
is. So, the exHTBetween value indicates whether the cursor is between items. The
exHTBetween is an OR combination with other predefined values, so you must call HitTestInfo
AND 0x1000 to check if the cursor is between rows/items as in the following
samples:
The following VB sample displays a message when the cursor is between two
items:
Private Sub Grid1_MouseMove(Button As Integer, Shift As Integer, X As Single, Y As Single)
Dim i As HITEM, c As Long, h As HitTestInfoEnum
i = Grid1.ItemFromPoint(-1, -1, c, h)
If Not (i = 0) Then
If (h And exHTBetween) Then
Debug.Print "The cursor is between two items."
Else
Debug.Print "The cursor is over the item."
End If
End If
End Sub
The following VB.NET sample displays a message when the cursor is between two
items:
Private Sub AxGrid1_MouseMoveEvent(ByVal sender As System.Object, ByVal e As AxEXGRIDLib._IGridEvents_MouseMoveEvent) Handles AxGrid1.MouseMoveEvent
With AxGrid1
Dim c As Integer, h As EXGRIDLib.HitTestInfoEnum
Dim i As Integer = .get_ItemFromPoint(-1, -1, c, h)
If Not i = 0 Then
If (h And EXGRIDLib.HitTestInfoEnum.exHTBetween) Then
Debug.Print("The cursor is between items.")
Else
Debug.Print("The cursor is over the item.")
End If
End If
End With
End Sub
The following C# sample displays a message when the cursor is between two
items:
private void axGrid1_MouseMoveEvent(object sender, AxEXGRIDLib._IGridEvents_MouseMoveEvent e)
{
int c = 0;
EXGRIDLib.HitTestInfoEnum h;
int i = axGrid1.get_ItemFromPoint(-1, -1, out c, out h);
if (i != 0)
if ( (h & EXGRIDLib.HitTestInfoEnum.exHTBetween) == EXGRIDLib.HitTestInfoEnum.exHTBetween )
System.Diagnostics.Debug.Print("The cursor is between items.");
else
System.Diagnostics.Debug.Print("The cursor is over the item.");
}
The following C++ sample displays a message when the cursor is between two
items:
void OnMouseMoveGrid1(short Button, short Shift, long X, long Y)
{
long c = 0, h = 0;
long i = m_Grid.GetItemFromPoint( -1, -1, &c, &h );
if ( i != 0 )
if ( h & 0x1000 /*exHTBetween*/ )
OutputDebugString( "The cursor is between items.\n" );
else
OutputDebugString( "The cursor is over the item.\n" );
}
The following VFP sample displays a message when the cursor is between two
items:
*** ActiveX Control Event ***
LPARAMETERS button, shift, x, y
local c, hit
c = 0
hit = 0
with thisform.Grid1
.Items.DefaultItem = .ItemFromPoint( x, y, @c, @hit )
if ( .Items.DefaultItem <> 0 )
if bitand(hit,0x1000) = 0x1000
wait window nowait "The cursor is between items."
else
wait window nowait "The cursor is over the item."
endif
endif
endwith
The following samples add the values from a column with 20000 rows/cells, and
get the sum displayed on a locked item on the bottom side:
1. The following sample adds the locked item before adding rows, with initial
value 0, and computes the sum progressively:
Dim iChange As Long
Private Sub Grid1_Change(ByVal Item As EXGRIDLibCtl.HITEM, ByVal ColIndex As Long, NewValue As Variant)
If (iChange = 0) Then
iChange = iChange + 1
With Grid1.Items
h = .LockedItem(exBottom, 0)
' Removes the OldValue, and adds the NewValue
.CellValue(h, 0) = .CellValue(h, 0) - .CellValue(Item, ColIndex) + NewValue
End With
iChange = iChange - 1
End If
End Sub
Private Sub Form_Load()
iChange = 0
With Grid1
.BeginUpdate
.FullRowSelect = exColumnSel
.Columns.Add("Value").Editor.EditType = 1
With .Items
' Adds the divider item that displays the sum
.LockedItemCount(exBottom) = 1
h = .LockedItem(exBottom, 0)
.ItemDivider(h) = 0
.ItemDividerLineAlignment(h) = DividerTop
.CellHAlignment(h) = RightAlignment
.CellValue(h, 0) = 0
' Adds 20.000 rows
For i = 1 To 20000
.AddItem i
Next
End With
.EndUpdate
End With
End Sub
2. The following sample adds the locked item after adding the rows, and
computes the entire sum each time a value is changed:
Dim iChange As Long
Private Function Sum() As Double
Dim s As Double
With Grid1.Items
For Each i In Grid1.Items
s = s + .CellValue(i, 0)
Next
End With
Sum = s
End Function
Private Sub Grid1_Change(ByVal Item As EXGRIDLibCtl.HITEM, ByVal ColIndex As Long, NewValue As Variant)
If (iChange = 0) Then
iChange = iChange + 1
With Grid1.Items
' Updates the value of the cell before calling the Sum
.CellValue(Item, ColIndex) = NewValue
' Call the Sum to update the sum cell
.CellValue(.LockedItem(exBottom, 0), 0) = Sum()
End With
iChange = iChange - 1
End If
End Sub
Private Sub Form_Load()
iChange = 0
With Grid1
iChange = iChange + 1
.BeginUpdate
.FullRowSelect = exColumnSel
.Columns.Add("Value").Editor.EditType = 1
With .Items
' Adds 20.000 rows
For i = 1 To 20000
.AddItem i
Next
' Adds the divider item that displays the sum
.LockedItemCount(exBottom) = 1
h = .LockedItem(exBottom, 0)
.ItemDivider(h) = 0
.ItemDividerLineAlignment(h) = DividerTop
.CellHAlignment(h) = RightAlignment
.CellValue(h, 0) = Sum()
End With
.EndUpdate
iChange = iChange - 1
End With
End Sub
The computed field is trying to convert the value to double, but if it can be
converted to a date, ( 1:00:00 AM ), the date value is used instead. You can
convert the type using dbl operator in the ComputedField formula as ( dbl(%0) +
dbl(%1) means adding the values converted to double ) or convert the
NewValue parameter of the Change event as follows:
Private Sub Grid1_Change(ByVal Item As EXGRIDLibCtl.HITEM, ByVal ColIndex As Long, NewValue As Variant)
NewValue = CDbl(NewValue)
End Sub
There are several options in order to display a different content for the
column. By default, the Items.CellValue property indicates the value being shown
in the cell.
Column.FormatColumn property specifies a formula to display the column's
new content, using predefined functions for numbers, strings, dates and so
on.
Change the Value parameter of the FormatColumn event which is fired if the
Column.FireFormatColumn property is True. For instance the following sample
displays the second column using current currency format with 2
decimals. The Item parameter of the FormatColumn event indicates the item
where the cell is hosted, the ColIndex indicates the column where the cell
belongs, while the Value parameter indicates the cell's value before
formatting and after. In case you need formatting multiple columns, you
can distingue them using the ColIndex parameter.
Private Sub Form_Load()
With Grid1
.BeginUpdate
.Columns.Add "A"
.Columns.Add("B").FireFormatColumn = True ' Index of it is 1
With .Items
.AddItem Array("One", 1)
.AddItem Array("Two", 2)
End With
.EndUpdate
End With
End Sub
Private Sub Grid1_FormatColumn(ByVal Item As EXGRIDLibCtl.HITEM, ByVal ColIndex As Long, Value As Variant)
Value = FormatCurrency(Value, 2, vbUseDefault)
End Sub
Items.CellOwnerDraw property indicates an object that perform owner draw
on cells.
Assigns an editor to a cell or column using the Items.CellEditor or
Column.Editor. For instance, you have a drop down list editor (
DropDownListType(3) ), which lists predefined values including HTML format,
and so, the cell/column will display the associated string to the cell's
value.
The OLEDropMode
property of the control must be set on exOLEDropManual (1). If this property is
set, the control fires the OLEDragDrop
event which notifies that the user drags data to the control. The Files
collection holds a collection of files being dragged.
The following VB sample copies the original icon being displayed in
Windows Explorer and displays it on the control:
Private Declare Function SHGetFileInfo Lib "shell32.dll" Alias "SHGetFileInfoA" (ByVal pszPath As String, ByVal dwFileAttributes As Long, psfi As SHFILEINFO, ByVal cbFileInfo As Long, ByVal uFlags As Long) As Long
Private Const SHGFI_OPENICON = &H2 ' get open icon
Private Const SHGFI_SMALLICON = &H1 ' get small icon
Private Const SHGFI_SYSICONINDEX = &H4000
Private Const SHGFI_ICON = &H100 ' get icon
Private Const MAX_PATH = 260
Private Type SHFILEINFO
hIcon As Long ' out: icon
iIcon As Long ' out: icon index
dwAttributes As Long ' out: SFGAO_ flags
szDisplayName As String * MAX_PATH ' out: display name (or path)
szTypeName As String * 80 ' out: type name
End Type
Private iIcon As Long
Private Sub Form_Load()
iIcon = 1
With Grid1
.BeginUpdate
.OLEDropMode = exOLEDropManual
.FullRowSelect = False
.DefaultItemHeight = 18
.Columns.Add "Icons"
.EndUpdate
End With
End Sub
Private Sub Grid1_OLEDragDrop(ByVal Data As EXGRIDLibCtl.IExDataObject, Effect As Long, ByVal Button As Integer, ByVal Shift As Integer, ByVal X As Single, ByVal Y As Single)
With Data.Files
If (.Count > 0) Then
For i = 0 To .Count - 1
With Grid1
Dim g As SHFILEINFO
.BeginUpdate
SHGetFileInfo Data.Files.Item(i), 0, g, Len(g), SHGFI_ICON Or SHGFI_SMALLICON
.ReplaceIcon g.hIcon
.Items.CellImage(Grid1.Items.AddItem(Data.Files.Item(i)), 0) = iIcon
iIcon = iIcon + 1
.EndUpdate
End With
Next
End If
End With
End Sub
Private Sub Grid1_OLEDragOver(ByVal Data As EXGRIDLibCtl.IExDataObject, Effect As Long, ByVal Button As Integer, ByVal Shift As Integer, ByVal X As Single, ByVal Y As Single, ByVal State As Integer)
If (Data.Files.Count = 0) Then
Effect = 0
End If
End Sub
The sample uses the SHGetFileInfo API function to retrieve the handle of the
icon ( HICON ) to be copied and displayed in the control.
The following sample moves the focus to a new cell / field once the user
presses the ENTER key:
Private Sub Grid1_KeyDown(KeyCode As Integer, Shift As Integer)
If (KeyCode = 13) Then
KeyCode = 9
End If
End Sub
The sample check if the user presses the ENTER key, and sends back to the
control the TAB key. By default, the TAB key moves the focused cell or column to
the next available psotion.
You can use the FocusColumnIndex
property to change programmatically the focused column, and so the focused field
or cell. Use the FocusItem
property to determine the focused item.
Here are a few options to remove the selected items in the control:
Use the RemoveSelection method of the Items object
to remove the selected items (including the descendents) (available starting from version 20.0)
Collects the items to be removed, using the Items.SelectCount and
Items.SelectedItem properties. Once the collection is completed, you can
call the Items.RemoveItem for each element being found (method 1)
While the Items.SelectCount property is greater than 0, call the
Items.RemoveItem( Items.SelectedItem(0) ), so removes the first selected
item until all all released (method 2)
The following VB sample shows the method 1:
Private Sub removeSelection1()
Dim i As Long, h As Variant
Dim cItems As New Collection
Grid1.BeginUpdate
With Grid1.Items
For i = 0 To .SelectCount - 1
cItems.Add .SelectedItem(i)
Next
For Each h In cItems
.RemoveItem h
Next
End With
Grid1.EndUpdate
End Sub
The following VB sample shows the method 2:
Private Sub removeSelection2()
Grid1.BeginUpdate
With Grid1.Items
While .SelectCount > 0
.RemoveItem .SelectedItem(0)
Wend
End With
Grid1.EndUpdate
End Sub
The SelectionChanged event is fired once the user changes the selection/focused
item. The Items.FocusItem property retrieves the handle of the focused item,
while the Items.ItemToIndex property gives the index of the item within the
Items collection.
The following VB sample displays the index of the focused item/row:
Private Sub Grid1_SelectionChanged()
With Grid1.Items
Dim nFocusIndex As Long
nFocusIndex = .ItemToIndex(.FocusItem)
Debug.Print "Focus Index is " & nFocusIndex
End With
End Sub
You should call the DoEvents method before calling the EnsureVisibleItem method.
For /NET you should use the Application.DoEvents method. For Delphi, you should
use the Application.ProcessMessages.
The Background(exCursorHoverColumn) property specifies the column's visual
appearance when the cursor hovers the column's header bar. The idea is to
provide an empty or transparent EBN to be displayed when the cursor hovers the
column as in the following VB sample:
With Grid1
.VisualAppearance.Add 1,"gBFLBCJwBAEHhEJAEGg4BI0IQAAYAQGKIYBkAKBQAGaAoDDUOQzQwAAxDKKUEwsACEIrjKCYVgOHYYRrIMYgBCMJhLEoaZLhEZRQiqDYtRDFQBSDDcPw/EaRZohGaYJgEgI="
.Background(exCursorHoverColumn) = &H1000000
End With
There are several ways to export data from the control to Excel, including using the AutoDrag, AllowCopyPaste property, CopySelection, or Export method, as explained below:
AutoDrag property, defines how the control can automatically handle drag-and-drop operations. For example, setting AutoDrag to exAutoDragCopyText allows the user to select, drag, and drop items into Excel to export them.
AllowCopyPaste property, enables the control to automatically handle Copy (CTRL + C), Cut (CTRL + X), and Paste (CTRL + V) operations. This allows users to easily copy and paste items from the control to Excel.
CopySelection method, copies the selected items to the clipboard, so they can be pasted elsewhere without being removed from the control. This lets you programmatically copy selections without needing user input like CTRL + C.
Export method, exports the control's data to an array, CSV, or HTML format, or saves it to an ADO or DAO recordset. For example, Export("c:/temp/data.csv", "sel") saves the selected items to a CSV file that can be opened in Excel.
Manually, you can copy data from your application to another using the Clipboard (CTRL + C to copy, CTRL + V to paste). Create a string with the data you want to copy and set it as the clipboard content. The examples below use Items.FocusItem to get the focused item handle, Items.CellValue for the value of a specific cell, and Columns.Count for the number of columns. You can also use Items.SelectCount and Items.SelectedItem to get selected items.
The following VB sample copies the content of the focused row to the
clipboard so it can be pasted to any OLE application, including MS Excel.
Private Sub CopyFocusItem(ByVal g As Object)
On Error Resume Next
Dim sCopy As String
With g.Items
For i = 0 To g.Columns.Count - 1
sCopy = sCopy + .CellValue(.FocusItem, i) + vbTab
Next
End With
Clipboard.Clear
Clipboard.SetText sCopy
End Sub
So, call the CopyFocusItem method whenever you need to copy the focused item
( clicking of a button, pressing the CTRL + C key, and so on ), and paste the
clipboard's content to your MS Excel.
Call the CopyFocusItem method.
Open MS Excel
Click a cell where you need to paste the content
Press the CTRL + V, so the content of the clipboard is pasted.
The sample can be extended so it will include the column's captions as:
Private Sub CopyFocusItem(ByVal g As Object)
On Error Resume Next
Dim sCopy As String
With g.Columns
For i = 0 To g.Columns.Count - 1
sCopy = sCopy + g.Columns(i).Caption + vbTab
Next
End With
sCopy = sCopy + vbCrLf
With g.Items
For i = 0 To g.Columns.Count - 1
sCopy = sCopy + .CellValue(.FocusItem, i) + vbTab
Next
End With
Clipboard.Clear
Clipboard.SetText sCopy
End Sub
The following VB sample copies the selected items to the clipboard ( in case
your application lets user selects multiple items, SingleSel property ):
Private Sub CopySelectedItems(ByVal g As Object)
On Error Resume Next
Dim sCopy As String
With g.Items
For j = 0 To .SelectCount - 1
For i = 0 To g.Columns.Count - 1
sCopy = sCopy + .CellValue(.SelectedItem(j), i) + vbTab
Next
sCopy = sCopy + vbCrLf
Next
End With
Clipboard.Clear
Clipboard.SetText sCopy
End Sub
The following VB sample copies the selected items to the clipboard, including
the column's captions ( in case your application lets user selects multiple
items, SingleSel property ):
Private Sub CopySelectedItems(ByVal g As Object)
On Error Resume Next
Dim sCopy As String
With g.Columns
For i = 0 To g.Columns.Count - 1
sCopy = sCopy + g.Columns(i).Caption + vbTab
Next
End With
sCopy = sCopy + vbCrLf
With g.Items
For j = 0 To .SelectCount - 1
For i = 0 To g.Columns.Count - 1
sCopy = sCopy + .CellValue(.SelectedItem(j), i) + vbTab
Next
sCopy = sCopy + vbCrLf
Next
End With
Clipboard.Clear
Clipboard.SetText sCopy
End Sub
Here's some ideas on how you can use arrays with the
control.
A). Using the GetItems/PutItems to get or put the
items/cells using arrays. The GetItems method gets the
items/cells of the control to a safe array. The PutItems
inserts the array of values to the control. For instance the
following sample adds 3 columns and 1001 items from an
array:
/COM version
With Grid1
.Columns.Add "C1"
.Columns.Add "C2"
.Columns.Add "C3"
Dim v(2, 1000) As String
v(1, 10) = "zece"
.PutItems v
End With
In VB the arrays is zero-based, so 2 indicates actually
0, 1 and 2 ( 3 columns ).
/NET or /WPF version
With Exgrid1
.Columns.Add("C1")
.Columns.Add("C2")
.Columns.Add("C3")
Dim v(2, 1000) As String
v(1, 10) = "zece"
.PutItems(v)
End With
B1). You can use the PutItems method to insert a
hierarchy, for single-column control. The following sample
adds a hierarchy as Root\Child 1, Child 2\SubChild 1,
SubChild 2
/COM version
With Grid1
.LinesAtRoot = exLinesAtRoot
.Columns.Add "Nodes"
.PutItems Array("Root", Array("Child 1", "Child 2", Array("SubChild 1", "SubChild 2")))
End With
/NET or /WPF version
With Exgrid1
.LinesAtRoot = exontrol.EXGRIDLib.LinesAtRootEnum.exLinesAtRoot
.Columns.Add("Nodes")
.PutItems(New Object() {"Root", New Object() {"Child 1", "Child 2", New Object() {"SubChild 1", "SubChild 2"}}})
End With
B2). You can use the PutItems method to insert a
hierarchy, for single-column control, as child items. The following sample
adds an item New, and a sub-hierarchy Root\Child 1, Child 2\SubChild 1,
SubChild 2
/COM version
With Grid1
.LinesAtRoot = exLinesAtRoot
.Columns.Add "Nodes"
.PutItems Array("Root", Array("Child 1", "Child 2", Array("SubChild 1", "SubChild 2"))), .Items.AddItem("new")
End With
/NET or /WPF version
With Exgrid1
.LinesAtRoot = exontrol.EXGRIDLib.LinesAtRootEnum.exLinesAtRoot
.Columns.Add("Nodes")
.PutItems(New Object() {"Root", New Object() {"Child 1", "Child 2", New Object() {"SubChild 1", "SubChild 2"}}}, .Items.AddItem("new"))
End With
C). You can use the arrays to fill a
multiple-columns control in Items.AddItem/Items.InsertItem
methods as in the following sample:
/COM version
With Grid1
.Columns.Add "C1"
.Columns.Add "C2"
.Columns.Add "C3"
With .Items
.AddItem Array("Cell 1.1", "Cell 1.2", "Cell 1.3")
.AddItem Array("Cell 2.1", "Cell 2.2", "Cell 2.3")
End With
End With
/NET or /WPF version
With Exgrid1
.Columns.Add("C1")
.Columns.Add("C2")
.Columns.Add("C3")
With .Items
.AddItem(New Object() {"Cell 1.1", "Cell 1.2", "Cell 1.3"})
.AddItem(New Object() {"Cell 2.1", "Cell 2.2", "Cell 2.3"})
End With
End With
For some events, calling the Edit method programmatically requires be calling outside
of the event, or when the event ends. You can use the following tricks:
Private Declare Function RegisterWindowMessage Lib "user32" Alias "RegisterWindowMessageA" (ByVal lpString As String) As Long
Private Declare Function PostMessage Lib "user32" Alias "PostMessageA" (ByVal hwnd As Long, ByVal wMsg As Long, ByVal wParam As Long, ByVal lParam As Long) As Long
Private Sub Grid1_DblClick(Shift As Integer, X As Single, Y As Single)
MsgBox "DblClick event"
PostMessage Grid1.hwnd, RegisterWindowMessage("WM_EDITOPEN"), 0, 0
End Sub
Private Sub Grid1_DblClick(Shift As Integer, X As Single, Y As Single)
MsgBox "Edit is gone"
Timer1.Enabled = True
End Sub
Private Sub Timer1_Timer()
Timer1.Enabled = False
Grid1.Edit
End Sub
The both samples forces calling the Edit method once the event is processed
and returned to the control. The first sample uses the PostMessage to invokes
the Edit method once the control is available to process new messages, while the
second sample uses a timer to call the Edit method later.
The /COM version of the component provides the DataSource property, which can be
used to bound the control's view to a DAO recordset. By default, once you set
the DataSource property to a recordset, all changes you do on the control will
be updated in the associated recordset. Because the DAO object does not provide
any notifications or events the control is not able to detect any AddNew or
Delete method that has been called. Instead, the control provides the AddItem
and RemoveItem events that notifies your application once a new item is added to
the control, or when an item is deleted. Based on these events, you will be able
to manipulate the DAO recordset appropriate as in the following samples. In
addition, the control fires the Error event in case any error occurs when
handling the ADO or DAO recordsets, For instance, trying to update a read-only
field. In conclusion, if user changes a cell/value in the control, the
associated field in the recordset is automatically updated. If any error occurs
on updating the associated record, the Error event is fired which describes the
error.
Handling the AddNew method in the control, using the DAO recordset on MS
Access
Insert a Button and the Control to a form, and name them as cmdAddNew
and Grid1
Add the Form_Load event of the form with the following code:
Private Sub Form_Load()
With Grid1
.BeginUpdate
.DataSource = CurrentDb.OpenRecordset("Employees")
.DetectAddNew = True
.EndUpdate
End With
End Sub
The code binds the control to a DAO recordset. Please notice, that the
DetectAddNew property is set after calling the DataSource method. Setting the
DetectAddNew property on True, makes the control associate new items with new
records added during the AddItem event as shown bellow.
Add the Click event of the cmdAddNew button with the following code
Private Sub cmdAddNew_Click()
With Grid1.Items
.EnsureVisibleItem .AddItem
End With
End Sub
The code adds a new item to the control and ensures that the new item fits
the control's client area. The Items.AddItem call makes the control to fire
the AddItem event, which will actually add the new record to the database, as
in the following code
Add the AddItem event of the Control with the following code:
Private Sub Grid1_AddItem(ByVal Item As Long)
With Grid1
If .DetectAddNew Then
With .DataSource
.AddNew
!Lastname = "new"
!FirstName = "new"
.Update
End With
End If
End With
End Sub
The code adds a new record to the bounded recordset. Here you need to
insert or update the required fields so the new record is added to the DAO
recordset. Once the event is finished, the new item is associated with the new
record in the database, so from now on, any change to the item will be
reflected in the recordset.
Handling the Delete method in the control, using the DAO recordset on MS
Access
Insert a Button and the Control to a form, and name them as cmdRemove
and Grid1
Add the Form_Load event of the form with the following code:
Private Sub Form_Load()
With Grid1
.BeginUpdate
.DataSource = CurrentDb.OpenRecordset("Employees")
.DetectDelete = True
.EndUpdate
End With
End Sub
The code binds the control to a DAO recordset. The DetectDelete property on
True, makes the control to move the current record on the item to be deleted,
and to remove any reference to the record to be deleted.
Add the Click event of the cmdRemove button with the following code
Private Sub cmdRemove_Click()
With Grid1.Items
.RemoveItem .FocusItem
End With
End Sub
The code removes the focused item. The Items.RemoveItem call makes the
control to fire the RemoveItem event, which will actually delete the
associated record in the database, as in the following code
Add the RemoveItem event of the Control with the following code:
Private Sub Grid1_RemoveItem(ByVal Item As Long)
With Grid1
If .DetectDelete Then
With .DataSource
.Delete
End With
End If
End With
End Sub
The code deletes the current record.
This sample just gives the basic idea of handling the AddNew/Delete methods
of the DAO recordset. You can customize the sample, so you can add or remove new
items by selecting items on a context menu, and so on.
The /COM version of the component provides the DataSource property, which can be
used to bound the control's view to an ADO recordset. By default, once you set
the DataSource property to a recordset, all changes you do on the control will
be updated in the associated recordset.
Handling the AddNew method in the control, using the ADO recordset in VB
Insert a Button and the Control to a form, and name them as cmdAddNew
and Grid1
Add the Form_Load event of the form with the following code:
Private Sub Form_Load()
With Grid1
Set rs = CreateObject("ADOR.Recordset")
With rs
.Open "Employees", "Provider=Microsoft.ACE.OLEDB.12.0;Data Source=\sample.accdb", 3, 3
End With
.DataSource = rs
.DetectAddNew = True
End With
End Sub
The code binds the control to an ADO recordset.
Add the Click event of the cmdAddNew button with the following code
Private Sub cmdAddNew_Click()
With Grid1.DataSource
.AddNew Array("FirstName", "LastName"), Array("new", "new")
.Update
End With
End Sub
The code adds a new record to the attached recordset, and the control will
add a new associated item, because the DetectAddNew method is True.
Handling the Delete method in the control, using the ADO recordset in VB
Insert a Button and the Control to a form, and name them as cmdRemove
and Grid1
Add the Form_Load event of the form with the following code:
Private Sub Form_Load()
With Grid1
Set rs = CreateObject("ADOR.Recordset")
With rs
.Open "Employees", "Provider=Microsoft.ACE.OLEDB.12.0;Data Source=\sample.accdb", 3, 3
End With
.DataSource = rs
.DetectDelete = True
End With
End Sub
The code binds the control to an ADO recordset.
Add the Click event of the cmdRemove button with the following code
Private Sub cmdRemove_Click()
With Grid1.DataSource
.Delete
End With
End Sub
The Delete method of the recordset removes the current record ( select a
new item to the control, and the current record is changed ), and due
DetectDelete the associated item is removed from the view.
This sample just gives the basic idea of handling the AddNew/Delete methods
of the ADO recordset. You can customize the sample, so you can add or remove new
items by selecting items on a context menu, and so on.
The /COM version of the component provides the DataSource property, which can be
used to bound the control's view to an ADO or DAO recordset. Once you assign the
control's DataSource property, the control's AddItem event is fired, and so you
can change the cell's icon / image once the control is tied to your data source.
The Images method of the control should be used to load the icons that your view
should display. The Items.CellImage or Items.CellImages property should be used
to assign a single or multiple icons to specified cell. The Items.CellValue
property specifies the cell's value.
The following VB6 sample loads 9 icons using the Images method, and change the
Items.CellImage property according to Items.CellValue during the AddItem event:
Private Sub Grid1_AddItem(ByVal Item As EXGRIDLibCtl.HITEM)
With Grid1.Items
.CellImage(Item, 1) = .CellValue(Item, 1)
End With
End Sub
Private Sub Form_Load()
With Grid1
.BeginUpdate
Dim s As String
s = "gBJJgBAIJAAOAAEAAQhYAf8Pf4hh0QihCJo2AEZjQAjEZFEaIEgjQBAAgjcZkMnlUrlktl0vmExmUzmk"
s = s + "1m03nE5nU7nk9n0/oFBoVDolFo1HpFJpVLplNp1PqFRqVTqlVq1XrFZrVbrldr1fsFhsVjslls1ntFpt"
s = s + "Vrtltt1vuFxuVzul1u13vF5vV7vl9v1/wGBwWDwmFw2HxGJxWLxmNx0wiETf+PylCyMsy+VzVEzObz03"
s = s + "yOhh+f0kyzsn0+l1Wo0eY1ur2Guyep2O12233G53W73m932/4HB4XD4nF42l0WTrnJru0rXMrHOyVV6X"
s = s + "SqHWqfV19e7FK7XKq/dqPf6nb1ngqXM8VU9dP6Hh0fvq3t5/m9n2jX0ov66/4jL+Pc/ymvI+7ZvjA70P"
s = s + "LA0EwK6b5QU6bjwlCcKQrC0LwxDMNQ3DkOw9D8QM5AUGvVEcAwWsMAO9Ez0xZCDZObFz+wYrcVRfE8HQ"
s = s + "RCL4Ro7kZOzH6jQJGsgqzGymSOn7TySy0dOXAUmJ7Ib5ydIkeyNKr6xQsEoxDL0vzBEKLB8lcyI8kSUJ"
s = s + "GACSJOASdS6xZ/nAlR/nhOh8JUeA6JUYCEJOQAHpVQCVgPQlDJVQtEUFQM/0YjZgA/PI/zocE5UtSp4T"
s = s + "rTVMnwf9O0/PVQjpPU+1KB0+0BVIH1VVlA0LV4AVhWVY1pWdbVrWNW11VYH0hXwP0geA/2FYg/0vY9M2"
s = s + "TTVP09T1RVFU1TV3XdcVva1q2xWVp15VVf1/YtioCA=="
.Images (s)
Set rs = CreateObject("ADOR.Recordset")
With rs
.Open "Orders", "Provider=Microsoft.Jet.OLEDB.4.0;Data Source=\SAMPLE.MDB", 3, 3
End With
.DataSource = rs
.EndUpdate
End With
End Sub
The sample just gives a basic idea on how you can assign/change the cell's
icon based on the cell's value. Please change the \SAMPLE.MDB with the path of
your database. For instance: C:\Program Files\Exontrol\ExGrid\Sample\SAMPLE.MDB
The following
VBA/Access sample loads 9 icons using the Images method, and change the
Items.CellImage property according to Items.CellValue during the AddItem event:
Private Sub Grid1_AddItem(ByVal Item As Long)
With Grid1.Items
.CellImage(Item, 1) = .CellValue(Item, 1)
End With
End Sub
Private Sub Form_Load()
With Grid1
.BeginUpdate
Dim s As String
s = "gBJJgBAIJAAOAAEAAQhYAf8Pf4hh0QihCJo2AEZjQAjEZFEaIEgjQBAAgjcZkMnlUrlktl0vmExmUzmk"
s = s + "1m03nE5nU7nk9n0/oFBoVDolFo1HpFJpVLplNp1PqFRqVTqlVq1XrFZrVbrldr1fsFhsVjslls1ntFpt"
s = s + "Vrtltt1vuFxuVzul1u13vF5vV7vl9v1/wGBwWDwmFw2HxGJxWLxmNx0wiETf+PylCyMsy+VzVEzObz03"
s = s + "yOhh+f0kyzsn0+l1Wo0eY1ur2Guyep2O12233G53W73m932/4HB4XD4nF42l0WTrnJru0rXMrHOyVV6X"
s = s + "SqHWqfV19e7FK7XKq/dqPf6nb1ngqXM8VU9dP6Hh0fvq3t5/m9n2jX0ov66/4jL+Pc/ymvI+7ZvjA70P"
s = s + "LA0EwK6b5QU6bjwlCcKQrC0LwxDMNQ3DkOw9D8QM5AUGvVEcAwWsMAO9Ez0xZCDZObFz+wYrcVRfE8HQ"
s = s + "RCL4Ro7kZOzH6jQJGsgqzGymSOn7TySy0dOXAUmJ7Ib5ydIkeyNKr6xQsEoxDL0vzBEKLB8lcyI8kSUJ"
s = s + "GACSJOASdS6xZ/nAlR/nhOh8JUeA6JUYCEJOQAHpVQCVgPQlDJVQtEUFQM/0YjZgA/PI/zocE5UtSp4T"
s = s + "rTVMnwf9O0/PVQjpPU+1KB0+0BVIH1VVlA0LV4AVhWVY1pWdbVrWNW11VYH0hXwP0geA/2FYg/0vY9M2"
s = s + "TTVP09T1RVFU1TV3XdcVva1q2xWVp15VVf1/YtioCA=="
.Images (s)
Set .DataSource = CurrentDb.OpenRecordset("Orders")
.EndUpdate
End With
End Sub
Open the C:\Program Files\Exontrol\ExGrid\Sample\SAMPLE.MDB
database
The /COM version of the component provides the DataSource property, which can be
used to bound the control's view to an ADO or DAO recordset. The Images method
of the control should be used to load the icons that your view should display.
Instead of Items.CellImage or Items.CellImages property you can use the <img>
HTML built-in tags to display one or more icons to each cell based on the value.
The method uses the Column.FormatColumn property to specify the format to be
displayed on the column such as <img>1</img> which means displaying
the icon with the index 1.
The following VB6 sample loads 9 icons using the Images method, and displays
an icon based on the cell's value.
Private Sub Form_Load()
With Grid1
.BeginUpdate
Dim s As String
s = "gBJJgBAIJAAOAAEAAQhYAf8Pf4hh0QihCJo2AEZjQAjEZFEaIEgjQBAAgjcZkMnlUrlktl0vmExmUzmk"
s = s + "1m03nE5nU7nk9n0/oFBoVDolFo1HpFJpVLplNp1PqFRqVTqlVq1XrFZrVbrldr1fsFhsVjslls1ntFpt"
s = s + "Vrtltt1vuFxuVzul1u13vF5vV7vl9v1/wGBwWDwmFw2HxGJxWLxmNx0wiETf+PylCyMsy+VzVEzObz03"
s = s + "yOhh+f0kyzsn0+l1Wo0eY1ur2Guyep2O12233G53W73m932/4HB4XD4nF42l0WTrnJru0rXMrHOyVV6X"
s = s + "SqHWqfV19e7FK7XKq/dqPf6nb1ngqXM8VU9dP6Hh0fvq3t5/m9n2jX0ov66/4jL+Pc/ymvI+7ZvjA70P"
s = s + "LA0EwK6b5QU6bjwlCcKQrC0LwxDMNQ3DkOw9D8QM5AUGvVEcAwWsMAO9Ez0xZCDZObFz+wYrcVRfE8HQ"
s = s + "RCL4Ro7kZOzH6jQJGsgqzGymSOn7TySy0dOXAUmJ7Ib5ydIkeyNKr6xQsEoxDL0vzBEKLB8lcyI8kSUJ"
s = s + "GACSJOASdS6xZ/nAlR/nhOh8JUeA6JUYCEJOQAHpVQCVgPQlDJVQtEUFQM/0YjZgA/PI/zocE5UtSp4T"
s = s + "rTVMnwf9O0/PVQjpPU+1KB0+0BVIH1VVlA0LV4AVhWVY1pWdbVrWNW11VYH0hXwP0geA/2FYg/0vY9M2"
s = s + "TTVP09T1RVFU1TV3XdcVva1q2xWVp15VVf1/YtioCA=="
.Images (s)
Set rs = CreateObject("ADOR.Recordset")
With rs
.Open "Orders", "Provider=Microsoft.Jet.OLEDB.4.0;Data Source=\SAMPLE.MDB", 3, 3
End With
.DataSource = rs
With .Columns(1)
.Def(exCellValueFormat) = exHTML
.FormatColumn = "`<img>` + value + `</img>`"
End With
.EndUpdate
End With
End Sub
This sample does not use the AddItem event, instead the cell's icon is
automatically updated once the cell's value. Please change the
\SAMPLE.MDB with the path of
your database. For instance: C:\Program Files\Exontrol\ExGrid\Sample\SAMPLE.MDB
The following
VBA/Access sample loads 9 icons using the Images method, and displays
an icon based on the cell's value.
Private Sub Form_Load()
With Grid1
.BeginUpdate
Dim s As String
s = "gBJJgBAIJAAOAAEAAQhYAf8Pf4hh0QihCJo2AEZjQAjEZFEaIEgjQBAAgjcZkMnlUrlktl0vmExmUzmk"
s = s + "1m03nE5nU7nk9n0/oFBoVDolFo1HpFJpVLplNp1PqFRqVTqlVq1XrFZrVbrldr1fsFhsVjslls1ntFpt"
s = s + "Vrtltt1vuFxuVzul1u13vF5vV7vl9v1/wGBwWDwmFw2HxGJxWLxmNx0wiETf+PylCyMsy+VzVEzObz03"
s = s + "yOhh+f0kyzsn0+l1Wo0eY1ur2Guyep2O12233G53W73m932/4HB4XD4nF42l0WTrnJru0rXMrHOyVV6X"
s = s + "SqHWqfV19e7FK7XKq/dqPf6nb1ngqXM8VU9dP6Hh0fvq3t5/m9n2jX0ov66/4jL+Pc/ymvI+7ZvjA70P"
s = s + "LA0EwK6b5QU6bjwlCcKQrC0LwxDMNQ3DkOw9D8QM5AUGvVEcAwWsMAO9Ez0xZCDZObFz+wYrcVRfE8HQ"
s = s + "RCL4Ro7kZOzH6jQJGsgqzGymSOn7TySy0dOXAUmJ7Ib5ydIkeyNKr6xQsEoxDL0vzBEKLB8lcyI8kSUJ"
s = s + "GACSJOASdS6xZ/nAlR/nhOh8JUeA6JUYCEJOQAHpVQCVgPQlDJVQtEUFQM/0YjZgA/PI/zocE5UtSp4T"
s = s + "rTVMnwf9O0/PVQjpPU+1KB0+0BVIH1VVlA0LV4AVhWVY1pWdbVrWNW11VYH0hXwP0geA/2FYg/0vY9M2"
s = s + "TTVP09T1RVFU1TV3XdcVva1q2xWVp15VVf1/YtioCA=="
.Images (s)
Set .DataSource = CurrentDb.OpenRecordset("Orders")
With .Columns(1)
.Def(EXGRIDLib.DefColumnEnum.exCellValueFormat) = EXGRIDLib.ValueFormatEnum.exHTML
.FormatColumn = "`<img>` + value + `</img>`"
End With
.EndUpdate
End With
End Sub
Open the C:\Program Files\Exontrol\ExGrid\Sample\SAMPLE.MDB
database
The /COM version of the component provides the DataSource property, which can be
used to bound the control's view to an ADO or DAO recordset. Once you assign the
control's DataSource property, the control's AddItem event is fired, and so you
can change the cell's picture once the control is tied to your data source. The
Items.CellPicture property can be used to assign a custom-size picture to a
cell. The following sample uses the HTMLPicture property just to hold a
collection of pictures, so we do not need to load a new picture for each cell,
in other words we assign the same reference to a picture for all cells with the
same picture, instead loading the same picture for different cells with the same
picture.
The following VB6 sample loads 9 pictures using the HTMLPicture property, and
change the Items.CellPicture property according to Items.CellValue during the
AddItem event:
Private Sub Grid1_AddItem(ByVal Item As EXGRIDLibCtl.HITEM)
With Grid1.Items
.CellPicture(Item, 1) = Grid1.HTMLPicture(.CellValue(Item, 1))
End With
End Sub
Private Sub Form_Load()
With Grid1
.BeginUpdate
For i = 1 To 9
.HTMLPicture(i) = "\PICTURES\" & i & ".jpg"
Next
Set rs = CreateObject("ADOR.Recordset")
With rs
.Open "Orders", "Provider=Microsoft.Jet.OLEDB.4.0;Data Source=\SAMPLE.MDB", 3, 3
End With
.DataSource = rs
.EndUpdate
End With
End Sub
The sample just gives a basic idea on how you can assign/change the cell's
picture based on the cell's value. Please change the \SAMPLE.MDB with the path of
your database. For instance: C:\Program Files\Exontrol\ExGrid\Sample\SAMPLE.MDB. Also, please change the \PICTURES with the path where you can
locate the 1.jpg, 2.jpg, ..., 9.jpg
In addition, you can use the following properties:
DefaultItemHeight property to specify the default height for items to be
added.
Items.CellPictureWidth property to specify the width of the picture to be
displayed on the cell.
Items.CellPictureHeight property to specify the height of the picture to
be displayed on the cell.
The following VBA/Access sample loads 9 pictures using the HTMLPicture property, and
change the Items.CellPicture property according to Items.CellValue during the
AddItem event:
Private Sub Grid1_AddItem(ByVal Item As Long)
With Grid1.Items
.CellPicture(Item, 1) = Grid1.HTMLPicture(.CellValue(Item, 1))
End With
End Sub
Private Sub Form_Load()
With Grid1
.BeginUpdate
Dim i As Long
For i = 1 To 9
.HTMLPicture(i) = "\PICTURES\" & i & ".jpg"
Next
Set .DataSource = CurrentDb.OpenRecordset("Orders")
.EndUpdate
End With
End Sub
Open the C:\Program Files\Exontrol\ExGrid\Sample\SAMPLE.MDB
database
create a new form,
add the control to the form with the name
Grid1
paste the above code
change the \PICTURES with the path where you can
locate the 1.jpg, 2.jpg, ..., 9.jpg
The /COM version of the component provides the DataSource property, which can be
used to bound the control's view to an ADO or DAO recordset. Instead of
Items.CellPicture property you can use the <img> HTML built-in tags to
display one or more custom-size pictures to each cell based on the value. The
method uses the Column.FormatColumn property to specify the format to be
displayed on the column such as <img>P1</img> which means displaying
the picture with the key P1. The HTMLPicture property should be used to assign
the pictures to be used in the control.
The following VB6 sample loads 9 pictures using the HTMLPicture property, and
specify the Column.FormatColumn to display them based on the cell's value:
Private Sub Form_Load()
With Grid1
.BeginUpdate
For i = 1 To 9
.HTMLPicture("P" & i) = "\PICTURES\" & i & ".jpg"
Next
Set rs = CreateObject("ADOR.Recordset")
With rs
.Open "Orders", "Provider=Microsoft.Jet.OLEDB.4.0;Data Source=\SAMPLE.MDB", 3, 3
End With
.DataSource = rs
With .Columns(1)
.Def(exCellValueFormat) = exHTML
.FormatColumn = "`<img>P` + value + `</img>`"
End With
.EndUpdate
End With
End Sub
This sample does not use the AddItem event, instead the cell's picture is
automatically updated once the cell's value. Please change the
\SAMPLE.MDB with the path of
your database. For instance: C:\Program Files\Exontrol\ExGrid\Sample\SAMPLE.MDB. Also, please change the \PICTURES with the path where you can
locate the 1.jpg, 2.jpg, ..., 9.jpg
The following VBA/Access sample loads 9 pictures using the HTMLPicture property, and
specify the Column.FormatColumn to display them based on the cell's value:
Private Sub Form_Load()
With Grid1
.BeginUpdate
Dim i As Long
For i = 1 To 9
.HTMLPicture("P" & i) = "\PICTURES\" & i & ".jpg"
Next
Set .DataSource = CurrentDb.OpenRecordset("Orders")
With .Columns(1)
.Def(exCellValueFormat) = exHTML
.FormatColumn = "`<img>P` + value + `</img>`"
End With
.EndUpdate
End With
End Sub
Open the C:\Program Files\Exontrol\ExGrid\Sample\SAMPLE.MDB
database
create a new form,
add the control to the form with the name
Grid1
paste the above code
change the \PICTURES with the path where you can
locate the 1.jpg, 2.jpg, ..., 9.jpg
The control provides the Print and Print Preview using the ExPrint
component. Please check
the printing FAQ for
adding Print and Print Preview support in your programming language.
In order to prevent updating the control during Print and PrintPreview you
need to call the BeginUpdate of the control during the Refreshing
event of the ExPrint, and call the EndUpdate once the Refresh
event of the ExPrint occurs, like in the following sample.
Private Sub Print1_Refreshing()
Grid.BeginUpdate
End Sub
Private Sub Print1_Refresh()
Grid.EndUpdate
End Sub
The control provides the Print and Print Preview using the ExPrint
component. By default, the Print and Print Preview displays all visible columns
of the control. The Visible property of the Column object specifies whether the
column is visible or hidden. In conclusion, all you need is to specify the
columns to be shown on the print and print preview, and restore the Visible
property once the preview is done. For that, all you need is to handle the Refreshing
and Refresh
events of the ExPrint component. Please check
the printing FAQ for
adding Print and Print Preview support in your programming language.
The following VB sample sets the visible columns to be the first column only,
and restore the visibility once the previewing is done:
Create a new form
Add the ExPrint and ExGrid components to the same form, named Print1 and
Grid1
Copy/Translate the following code.
Private Sub Print1_Refreshing()
Dim c As Variant
With Grid1
For Each c In .Columns
c.Data = c.Visible
c.Visible = False
Next
.Columns(0).Visible = True
End With
End Sub
Private Sub Print1_Refresh()
Dim c As Variant
For Each c In Grid1.Columns
c.Visible = c.Data
Next
End Sub
The sample enumerates all columns and stores the Visible property of the Column to Data property ( you
can hold any value to Data property ), hides the column, and set the Visible
property for the first column to be visible. This way the Print and Print
Preview will display only the columns you need, not all Visible columns. The
Refresh event just restores the Visible properties with saved data. Also, You
can use the Item and Count properties of the Columns to enumerate the Column
objects in the Columns collection.
The Change event of the control notifies your application once the cell's
value is changed. The EditOpen and EditClose events are fired
before and after the user edits a cell, so you can use them to know when user
changes a value in a cell.
The edit events are fired in the following order:
Edit event. Prevents editing cells, before showing the cell's editor.
EditOpen event. The edit operation started, the cell's editor is shown. The Editing property gives the window's handle of the built-in editor being started.
Change event. The Change event is fired if the cell's value is
changed
EditClose event. The cell's editor is hidden and closed.
In conclusion, there are 2 ways of finding when the user changes a value
using the control's UI elements
check the Editing property during the Change event, and if
it returns a non-zero value, the cell's value has been changed using the
control's UI.
use an internal member initialized with zero, increases the member value
when the EditOpen event, and decreases the member value if the
EditClose event occurs.During the Change event you can
check the member if it is zero or not, so you know if there were a change
using the control's UI.
You need to enumerate the Column objects in the Columns collection, get sorted
by Column.Position property, and filtered by Column.Visible property like shown
in the following samples:
In VB you can use the following function:
Private Sub enumColumns(ByVal g As EXGRIDLibCtl.Grid)
Dim cArray() As EXGRIDLibCtl.Column
With g
ReDim Preserve cArray(.Columns.Count)
For Each c In .Columns
If (c.Visible) Then
Set cArray(c.Position) = c
End If
Next
End With
For Each c In cArray
If Not c Is Nothing Then
Debug.Print c.Caption & "(" & c.Index & ")"
End If
Next
End Sub
In C++ you can use the following function:
static void enumColumns( EXGRIDLib::IGrid* pGrid )
{
if ( pGrid != NULL )
{
EXGRIDLib::IColumnsPtr spColumns = pGrid->Columns;
if ( spColumns != NULL )
{
long nColumns = spColumns->Count;
long* rgVisibleColumns = new long[nColumns]();
for ( long iColumn = 0; iColumn < nColumns; iColumn++ )
if ( EXGRIDLib::IColumn* pColumn = spColumns->GetItem( iColumn ) )
if ( pColumn->Visible )
rgVisibleColumns[pColumn->Position] = pColumn->Index + 1;
for ( long iColumn = 0; ( iColumn < nColumns ); iColumn++ )
if ( rgVisibleColumns[iColumn] != 0 )
if ( EXGRIDLib::IColumn* pColumn = spColumns->GetItem( rgVisibleColumns[iColumn] - 1 ) )
{
OutputDebugString( pColumn->Caption );
}
}
}
}
The SingleSel property specifies whether the control supports single or multiple
selected items. If the SingleSel property is True ( by default ), the user can
select a single item/row only. The Items.FocusItem property indicates the handle
of the item that has the focus. The FocusColumnIndex property indicates the
index of the column that has the focus. The Cell of Items.FocusItem that belongs
to the FocusColumnIndex column, defines the active or the focused cell. The
control fires the SelectionChanged event when the control's selection is
changed. The FocusChanged event occurs when the active cell is changed, in other
words when the Items.FocusItem and/or FocusColumnIndex property is changed. The
SelectCount property specifies the count of selected items/rows. If the
SingleSel property is True, the SelectCount property can be 0 or 1.
The following code displays the active or focused value:
Private Sub Grid1_FocusChanged()
With Grid1.Items
Debug.Print .CellCaption(.FocusItem, Grid1.FocusColumnIndex)
End With
End Sub
The following code displays the selected values:
Private Sub enumSelection(ByVal g As Object)
With g.Items
For i = 1 To .SelectCount
Debug.Print .CellCaption(.SelectedItem(i - 1), 0)
Next
End With
End Sub
Private Sub Grid1_SelectionChanged()
enumSelection Grid1
End Sub
As the control supports multiple columns, the following code displays the
selected values for all columns:
Private Sub enumSelection(ByVal g As Object)
With g.Items
Dim nColumns As Long
nColumns = g.Columns.Count
For i = 1 To .SelectCount
Dim h As HITEM
h = .SelectedItem(i - 1)
For j = 1 To nColumns
Debug.Print .CellCaption(h, j - 1)
Next
Next
End With
End Sub
Private Sub Grid1_SelectionChanged()
enumSelection Grid1
End Sub
You need to enumerate the Column objects in the Columns collection, get sorted
by Column.Position property, and filtered by Column.Visible property like shown
in the following samples.
In VB you can use a function like follows:
Private Function firstVisibleColumn(ByVal g As EXGRIDLibCtl.Grid) As Long
Dim cArray() As EXGRIDLibCtl.Column
With g
ReDim Preserve cArray(.Columns.Count)
For Each c In .Columns
If (c.Visible) Then
Set cArray(c.Position) = c
End If
Next
End With
For Each c In cArray
If Not c Is Nothing Then
firstVisibleColumn = c.Index
Exit Function
End If
Next
firstVisibleColumn = -1
End Function
In C++ you can use a function like follows:
static long firstVisibleColumn( EXGRIDLib::IGrid* pGrid )
{
long nResult = -1;
if ( pGrid != NULL )
{
EXGRIDLib::IColumnsPtr spColumns = pGrid->Columns;
if ( spColumns != NULL )
{
long nColumns = spColumns->Count;
long* rgVisibleColumns = new long[nColumns]();
for ( long iColumn = 0; iColumn < nColumns; iColumn++ )
if ( EXGRIDLib::IColumn* pColumn = spColumns->GetItem( iColumn ) )
if ( pColumn->Visible )
rgVisibleColumns[pColumn->Position] = pColumn->Index + 1;
for ( long iColumn = 0; ( nResult == -1) && ( iColumn < nColumns ); iColumn++ )
if ( rgVisibleColumns[iColumn] != 0 )
nResult = rgVisibleColumns[iColumn] - 1;
delete[] rgVisibleColumns;
}
}
return nResult;
}
In C++ you can use a function like follows: (the sample ignores the sorting
columns, grouping columns ).
static long getFirstVisibleColumnIgnoreSortColumns( EXGRIDLib::IGrid* pGrid )
{
long nResult = -1;
if ( pGrid != NULL )
{
EXGRIDLib::IColumnsPtr spColumns = pGrid->Columns;
if ( spColumns != NULL )
{
long nColumns = spColumns->Count;
long* rgVisibleColumns = new long[nColumns]();
for ( long iColumn = 0; iColumn < nColumns; iColumn++ )
if ( EXGRIDLib::IColumn* pColumn = spColumns->GetItem( iColumn ) )
if ( pColumn->Visible )
rgVisibleColumns[pColumn->Position] = pColumn->Index + 1;
long nSortColumns = spColumns->SortBarColumnsCount;
for ( long iColumn = 0; iColumn < nSortColumns; iColumn++ )
if ( EXGRIDLib::IColumn* pColumn = spColumns->GetSortBarColumn( iColumn ) )
rgVisibleColumns[pColumn->Position] = 0;
for ( long iColumn = 0; ( nResult == -1) && ( iColumn < nColumns ); iColumn++ )
if ( rgVisibleColumns[iColumn] != 0 )
nResult = rgVisibleColumns[iColumn] - 1;
delete[] rgVisibleColumns;
}
}
return nResult;
}
You need to handle the LayoutChanged event, and to set the TreeColumnIndex
property on the Index of the first visible column as in the following sample:
Private Function firstVisibleColumn(ByVal g As EXGRIDLibCtl.Grid) As Long
Dim cArray() As EXGRIDLibCtl.Column
With g
ReDim Preserve cArray(.Columns.Count)
For Each c In .Columns
If (c.Visible) Then
Set cArray(c.Position) = c
End If
Next
End With
For Each c In cArray
If Not c Is Nothing Then
firstVisibleColumn = c.Index
Exit Function
End If
Next
firstVisibleColumn = -1
End Function
Private Sub Grid1_LayoutChanged()
With Grid1
.TreeColumnIndex = firstVisibleColumn(Grid1)
End With
End Sub
By default, the TAB key moves the control's searching column ( SearchColumnIndex,
MarkSearchColumn property ). The control receives the TAB key only if the UseTabKey property
is True ( by default ).
In order to override the behavior and do what you
want you have several approaches like follows. These samples are VB6, but the
idea is the same, so you can convert to any other programming languages.
A). Handle the KeyUp event, and changes the FocusColumnIndex property
to SearchColumnIndex such as:
Private Sub Grid1_KeyUp(KeyCode As Integer, Shift As Integer)
If (KeyCode = vbKeyTab) Then
With Grid1
.FocusColumnIndex = Grid1.SearchColumnIndex
.Edit
End With
End If
End Sub
This sample moves the focus column to the next/prev visible column. The
sample does not change the focused item, so it won't advance to the next/prev
row, if last/first visible column is reached. You can move forward or backward
if using the TAB or SHIFT + TAB keys combination.
B). Handle the KeyDown event, and forward the exKeyRight/exKeyLeft key
if the TAB key is pressed, such as:
Private Sub Grid1_KeyDown(KeyCode As Integer, Shift As Integer)
If (KeyCode = vbKeyTab) Then
KeyCode = IIf(Shift = 0, vbKeyRight, vbKeyLeft)
End If
End Sub
This sample moves the focus column to the next/prev visible column and
advances to the next/prev item, if last/first columns is reached. The sample
moves to the right if the TAB key is pressed, SHIFT + TAB moves to the left, and
so on.
C). Handle the KeyDown event, and change the KeyCode parameter to 0, if
it is vbKeyTab (9) ( TAB key pressed ). Once the KeyCode is 0, the control will
do nothing once the event is done, so let's you override the behavior the way
you want.
Here's a VB sample shows how you can do that:
Private Sub Grid1_KeyDown(KeyCode As Integer, Shift As Integer)
If (KeyCode = vbKeyTab) Then
KeyCode = 0
Debug.Print "TAB key catched, do here what you need"
End If
End Sub
The code let you override the TAB key behavior.
For instance the next sample,
changes the control's FocusColumnIndex property, so the next editor in row is
shown ( the columns must provide a specified editor, as by default, the columns
has no assigned editors ). If the FocusColumnIndex points to the first column,
moves the focus to the next row, and so on.
Private Sub Grid1_KeyDown(KeyCode As Integer, Shift As Integer)
If (KeyCode = vbKeyTab) Then
KeyCode = 0
With Grid1
.FocusColumnIndex = (.FocusColumnIndex + 1) Mod .Columns.Count
If (.FocusColumnIndex = 0) Then
With .Items
Dim h As HITEM
h = .NextVisibleItem(.FocusItem)
If Not (h = 0) Then
.SelectItem(h) = True
End If
End With
End If
End With
End If
End Sub
This sample moves the focus column based on the index, not the position of
the column. This can be improved and adjusted to your needs, so it just gives an idea on
how you can personalize pressing a specified key.
Now, this sample can changed so the TAB key will navigate through the visible
columns only, as they are displayed. The BASE idea is the same, just we need to
get the collection of visible columns as shown here: How do I enumerate all visible columns as they are displayed?.
Once that collection is built, all we need is to change the FocusColumnIndex to
one of the enumerated collections.
Here's the changed sample:
Private Sub Grid1_KeyDown(KeyCode As Integer, Shift As Integer)
If (KeyCode = vbKeyTab) Then
KeyCode = 0
With Grid1
Dim cColumns As Collection
Set cColumns = enumColumns(.Object)
If Not (cColumns.Count = 0) Then
.FocusColumnIndex = cColumns.Item((findIndex(.FocusColumnIndex, cColumns) Mod cColumns.Count) + 1)
If (.FocusColumnIndex = cColumns.Item(1)) Then
With .Items
Dim h As HITEM
h = .NextVisibleItem(.FocusItem)
If Not (h = 0) Then
.SelectItem(h) = True
End If
End With
End If
End If
End With
End If
End Sub
where the enumColumns and findIndex functions are:
Private Function enumColumns(ByVal g As Object) As Collection
Dim cResult As New Collection
Dim cArray() As EXGRIDLibCtl.Column
With g
ReDim Preserve cArray(.Columns.Count)
For Each c In .Columns
If (c.Visible) Then
Set cArray(c.Position) = c
End If
Next
End With
For Each c In cArray
If Not c Is Nothing Then
cResult.Add c.Index
End If
Next
Set enumColumns = cResult
End Function
Private Function findIndex(ByVal nIndex As Long, ByVal col As Collection) As Long
Dim c As Variant, i As Long
i = 1
For Each c In col
If (c = nIndex) Then
findIndex = i
Exit Function
End If
i = i + 1
Next
findIndex = 1
End Function
Now, the sample shows how you can navigate through visible columns as they
are displayed. If you need to move the focus through the columns with an editor
assigned all you need is to change the If (c.Visible)
Then with If (c.Visible) And Not (c.Editor.EditType = 0) Then
or with any other condition you need.
If your control displays hundred of columns, you can store the enumColumns
result to a member variable each time the LayoutChanged event occurs, and use
the member during the KeyDown event, instead calling the enumColumns function
each time the TAB key is pressed.
These samples give you an idea of how to override the TAB/ENTER key behavior, they can be changed or improved.
By default, clicking a column means sorting the column. If you need to change
this behavior, you need to
set the SingleSel property on False
set the FullRowSelect on exRectSel
set the SortOnClick property on exNoSort, so no sorting is performed when
user clicks the column's header.
Next, you need to handle the Mouse events to query for the column from point,
and change the Selected property of the column, including calling the SelectAll
method of the Items object like in the following sample:
Private Sub Grid1_MouseDown(Button As Integer, Shift As Integer, X As Single, Y As Single)
Dim c As Long
With Grid1
c = .ColumnFromPoint(-1, -1)
If (c >= 0) Then
.BeginUpdate
.Columns(c).Selected = Not Grid1.Columns(c).Selected
.Items.SelectAll
.EndUpdate
End If
End With
End Sub
By default, clicking the column's header indicates sorting the column. The
control's SortOnClick property specifies the action should do when user clicks
the column's header. In order to change this behavior, we need to set the SortOnClick
property on exNoSort, and so we can do the action we need using the
ColumnFromPoint property during the MouseDown event lick shown in the following
VB sample:
Private iColumnSelected As Long
Private Sub Form_Load()
init
End Sub
Private Sub init()
iColumnSelected = -1
With Grid1
.SortOnClick = exNoSort
End With
End Sub
Private Sub sel(ByVal c As Long, ByVal bSel As Boolean)
With Grid1
.BeginUpdate
If (bSel) Then
' unselects any selected item
Dim b As Boolean
b = .SingleSel
.SingleSel = False
.Items.UnselectAll
.SingleSel = b
End If
' unselects the previously column
If (iColumnSelected >= 0) Then
.Columns(iColumnSelected).Def(exCellForeColor) = 0
.Columns(iColumnSelected).Def(exCellBackColor) = 0
End If
' selects the clicked column
iColumnSelected = c
If (c >= 0) Then
.FocusColumnIndex = c
.Columns(iColumnSelected).Def(exCellForeColor) = .SelForeColor
.Columns(iColumnSelected).Def(exCellBackColor) = .SelBackColor
End If
.EndUpdate
End With
End Sub
Private Sub Grid1_MouseDown(Button As Integer, Shift As Integer, X As Single, Y As Single)
' selects the column being clicked
sel Grid1.ColumnFromPoint(-1, -1), True
End Sub
Private Sub Grid1_SelectionChanged()
' unselects the previously selected column
sel -1, False
End Sub
The sample selects the column being clicked, and when the items selection is
changed the selected column is not shown anymore. This sample give you an idea of how
you can select a column by clicking the column's header.
By default, clicking an item selects the item. Once you click a different
item or column, the FocusChanged event is fired. The Column.Def(exCellBackColor)
property specifies the color for the entire column.
The following VB sample shows how you can highlight/select the column once
you click a cell in the item.
Dim iFocusColumnChanged As Long
Private Sub Form_Load()
iFocusColumnChanged = -1
End Sub
Private Sub Grid1_FocusChanged()
With Grid1
.BeginUpdate
If Not (iFocusColumnChanged = .FocusColumnIndex) Then
If (iFocusColumnChanged >= 0) Then
.Columns(iFocusColumnChanged).Def(exCellBackColor) = 0
End If
iFocusColumnChanged = .FocusColumnIndex
If (iFocusColumnChanged >= 0) Then
.Columns(iFocusColumnChanged).Def(exCellBackColor) = .SelBackColor
End If
End If
.EndUpdate
End With
End Sub
By default, the Left/Right arrow keys moves the focusing column to previously
or next column, if the columns has any editors assigned. If no editors are
assigned to columns, the left/right collapse/expands the current item, and go to
the next visible item after collapsing or expanding the item. The FullRowSelect
property indicates how the selection is shown, or if the entire row gets
selected or just columns/cells are shown as selected. The EnsureVisibleColumn
method ensures that the specified index ( in the column's collection ) fits the
control's client area, or in other words, it scrolls the control's content so
the column fits the control's client area.
The following VB sample shows how you can navigate per cell ( if each columns
have an editor assigned, or the Column.Editor.EditType property is not ReadOnly
) :
With Grid1
.ShowFocusRect = True
.ReadOnly = exReadOnly
.FullRowSelect = exRectSel
End With
The following VB sample shows how you can navigate per cell ( if columns have
no editor assigned, or the Column.Editor.EditType property is ReadOnly ) :
Private Sub Grid1_KeyDown(KeyCode As Integer, Shift As Integer)
With Grid1
If (KeyCode = vbKeyRight) Then
.SearchColumnIndex = (.SearchColumnIndex + 1) Mod .Columns.Count
.EnsureVisibleColumn .SearchColumnIndex
KeyCode = 0
Else
If (KeyCode = vbKeyLeft) Then
.SearchColumnIndex = IIf(.SearchColumnIndex = 0, .Columns.Count - 1, .SearchColumnIndex - 1)
.EnsureVisibleColumn .SearchColumnIndex
KeyCode = 0
End If
End If
End With
End Sub
The sample overrides the KeyDown event so when the Left/Right key is pressed
the searching/selecting/focusing column is changed to previously or next column.
The KeyCode = 0 indicates that control should take no action when the KeyDown
event ends. The sample gives an idea how you can change the
searching/selecting/focusing column by handling the KeyDown event of the
control.
Private Sub Grid1_KeyDown(KeyCode As Integer, Shift As Integer)
With Grid1
If (KeyCode = vbKeyRight) Then
Dim iNext As Long
iNext = getIndex2VisiblePosition(.SearchColumnIndex, Grid1)
If (iNext >= 0) Then
iNext = (iNext + 1) Mod UBound(enumColumns(Grid1))
.SearchColumnIndex = getVisiblePositon2Index(iNext, Grid1)
.EnsureVisibleColumn .SearchColumnIndex
End If
KeyCode = 0
Else
If (KeyCode = vbKeyLeft) Then
Dim iPrev As Long
iPrev = getIndex2VisiblePosition(.SearchColumnIndex, Grid1)
If (iPrev >= 0) Then
iPrev = IIf(iPrev > 0, iPrev - 1, UBound(enumColumns(Grid1)) - 1)
.SearchColumnIndex = getVisiblePositon2Index(iPrev, Grid1)
.EnsureVisibleColumn .SearchColumnIndex
End If
KeyCode = 0
End If
End If
End With
End Sub
where the following functions enumerates the visible column, converts the
index to visible position, and a visible position to an index:
Private Function enumColumns(ByVal g As EXGRIDLibCtl.Grid) As EXGRIDLibCtl.Column()
Dim cArray() As EXGRIDLibCtl.Column
With g
ReDim Preserve cArray(.Columns.Count)
For Each c In .Columns
If (c.Visible) Then
Set cArray(c.Position) = c
End If
Next
End With
enumColumns = cArray
End Function
Private Function getIndex2VisiblePosition(ByVal c As Long, ByVal g As EXGRIDLibCtl.Grid) As Long
Dim cV As Variant, i As Long
i = 0
For Each cV In enumColumns(g)
If (cV.Index = c) Then
getIndex2VisiblePosition = i
Exit Function
End If
i = i + 1
Next
getIndex2VisiblePosition = -1
End Function
Private Function getVisiblePositon2Index(ByVal p As Long, ByVal g As EXGRIDLibCtl.Grid) As Long
Dim cV As Variant, i As Long
i = 0
For Each cV In enumColumns(g)
If (i = p) Then
getVisiblePositon2Index = cV.Index
Exit Function
End If
i = i + 1
Next
getVisiblePositon2Index = -1
End Function
The sample navigate left/right to the next/previously visible columns.
The ItemFromPoint(-1,-1) property gets the handle if the item, index of the
column and the hit-test position from the cursor position. Usually, the you
think that the ItemFromPoint(-1,-1) is not working in debug mode, because you
have set the breakpoint on the property itself, and you are moving the cursor
position by the time the ItemFromPoint property is called. What you can do, is
to set the break-point after calling the ItemFromPoint property is called, so
the correct position of the cursor is taken when the property is invoked. In
other words, please add the following code, and see that the handle of the item
being clicked is displayed correctly, like in the following VB sample:
Private Sub Grid1_Click()
Dim c As Long, hit As EXGRIDLibCtl.HitTestInfoEnum
Debug.Print Grid1.ItemFromPoint(-1, -1, c, hit)
End Sub
The BeforeExpandItem event is fired when an item is about to be expanded, by code or using the control's user interface ( such as
clicking the +/- expanding button ). Also, the BeforeExpandItem event may occur
for items with the ItemHasChildren property set on True, when the user clicks
the filter drop down button. This is by design, to include not-loaded items in
the drop down filter window. Usually, the BeforeExpandItem event is used to load
virtually a hierarchy, for instance, when the user clicks the +/- expanding
button.
The following methods, can be used to prevent firing the BeforeExpandItem event when
the user clicks the drop down filter button:
Use no ItemHasChildren property on True, in other words you
can load on init time, the entire hierarchy collection
Set the FilterList property of the Column object to exRootItems value (4), so no child items are collected in the drop down filter
list
Use a counter that's increased when MouseDown event occurs
and it is decreased when MouseUp event is fired. You can use the ColumnFromPoint property to check if the user clicks the headers.
During the BeforeExpandItem event you can prevent adding a sub-child if the
counter is not zero.
The control's ClearFilter method ( or clicking the X button in the filter bar )
does the following:
set the Column.Filter property on empty, IF the Column.FilterType property
is exNumeric, exCheck or exImage, else
set the Column.FilterType property on exAll. IF the Column.FilterOnType
property is True, the Column.Filter is set on empty too, else the
Column.Filter property remains.
The FilterType property of the Column object indicates the type of the filter
to be applied on the column. Generally, you can check for exAll on FiterType
unless you are not using the exNumeric, exCheck or exImage type of column's
filters.
The following VB function returns False, if no filter is applied, or True,
if any filter is applied. This sample works ok, if no using any of exNumeric,
exCheck or exImage types
Private Function hasFilter(ByVal g As Object) As Boolean
Dim c As Object
For Each c In g.Columns
If Not (c.FilterType = 0) Then
hasFilter = True
Exit Function
End If
Next
hasFilter = False
End Function
The following VB function returns False, if no filter is applied, or True,
if any filter is applied. This sample works for all type of filters:
Private Function hasFilter(ByVal g As Object) As Boolean
Dim c As Object
For Each c In g.Columns
Select Case c.FilterType
Case 5, 6, 10 ' exNumeric, exCheck, exImage
hasFilter = Not (c.Filter.Length = 0)
Case Else
hasFilter = Not (c.FilterType = 0) ' exAll
End Select
If (hasFilter) Then
Exit Function
End If
Next
hasFilter = False
End Function
The ColumnAutoResize, makes the columns to resize so all fit the control's width
area. The AllowSizing property of the Column object specifies whether the user
can resize the column at runtime.
The following VB sample fixes the first column, and let the second to extent
so it matches the right border.
Private Sub Form_Load()
With Grid1
.BeginUpdate
.ColumnAutoResize = True
With .Columns
With .Add("Fixed")
.AllowSizing = False
.Width = 48
End With
With .Add("Resizable")
End With
End With
.EndUpdate
DoEvents
.Columns("Fixed").AllowSizing = True
End With
End Sub
Private Sub Form_Resize()
With Grid1
.Columns("Fixed").AllowSizing = False
.Width = ScaleWidth - 2 * .Left
.Height = ScaleHeight - 2 * .Top
.Columns("Fixed").AllowSizing = True
End With
End Sub
The sample can be extended for any number of fixed columns as shown bellow:
Private Sub Form_Load()
With Grid1
.BeginUpdate
.ColumnAutoResize = True
With .Columns
For i = 1 To 4
With .Add("Fixed")
.AllowSizing = False
.Width = 16
.Data = "fixed"
End With
Next
With .Add("Resizable")
End With
End With
.EndUpdate
DoEvents
AllowSizing Grid1, True
End With
End Sub
Private Sub Form_Resize()
With Grid1
AllowSizing Grid1, False
.Width = ScaleWidth - 2 * .Left
.Height = ScaleHeight - 2 * .Top
.Columns("Fixed").AllowSizing = True
AllowSizing Grid1, True
End With
End Sub
Private Sub AllowSizing(ByVal o As Object, ByVal bAllowSizing As Boolean)
With o
Dim c As Variant
For Each c In .Columns
If (c.Data = "fixed") Then
c.AllowSizing = bAllowSizing
End If
Next
End With
End Sub
The Items.ItemByIndex(index) property gets the handle of the item/row giving its
index.
If you can not locate the ItemByIndex property in the Items collection you
should look for Items.get_ItemByIndex(index), Items[index]
or Items(index) instead.
The tooltip is automatically hidden when user moves the mouse or a key is
pressed. In case a message box or a form is shown, none of them is happen, so
the tooltip may still be shown. For that, you can call the PostMessage .hwnd,
512, 0, 0 before showing your message or dialog like in the following sample.
The hWnd indicates the handle of the control ( hWnd property ).
Private Sub Grid1_MouseUp(Button As Integer, Shift As Integer, X As Single, Y As Single)
If (Button = 2) Then
With Grid1
Dim i As Long, c As Long, hit As HitTestInfoEnum
i = .ItemFromPoint(-1, -1, c, hit)
If Not i = 0 Then
PostMessage .hwnd, &H200, 0, 0
MsgBox .Items.CellCaption(i, c)
End If
End With
End If
End Sub
If you want to display a value from a context-menu instead showing a
message-box, you should use &H114 instead &H200.
The ScrollPos property changes the control's scroll position ( horizontal or
vertical scroll position ). The OffsetChanged event occurs when the control's
scroll horizontal or vertical position is changed, in other words all it is
required is calling the ScrollPos during the OffsetChanged like in the following
sample. Because the ScrollPos property invokes the OffsetChanged, you must use a
member flag ( iSyncing ) to prevent recursive calls:
Private iSyncing As Long
Private Sub Grid1_OffsetChanged(ByVal Horizontal As Boolean, ByVal NewVal As Long)
If (iSyncing = 0) Then
iSyncing = iSyncing + 1
Grid2.ScrollPos(Not Horizontal) = NewVal
iSyncing = iSyncing - 1
End If
End Sub
Private Sub Grid2_OffsetChanged(ByVal Horizontal As Boolean, ByVal NewVal As Long)
If (iSyncing = 0) Then
iSyncing = iSyncing + 1
Grid1.ScrollPos(Not Horizontal) = NewVal
iSyncing = iSyncing - 1
End If
End Sub
This sample synchronizes the vertical / horizontal scroll bars of both
controls, so when the user scrolls one of the control's content, the other
component is syncing as well.
The KeyPress event notifies your application once the user presses the SPACE
key, or any other character. In other words, you can disable handing the space
key by setting the KeyAscii parameter on 0 as in the following sample:
Private Sub Grid1_KeyPress(KeyAscii As Integer)
With Grid1
If (.Editing = 0) Then
If (KeyAscii = vbKeySpace) Then ' vbKeySpace is 32
KeyAscii = 0
End If
End If
End With
End Sub
The FullRowSelect property of the control specifies whether the entire row is
displaying as selected or just a cell. The idea is to change the FullRowSelect
property from exItemSel to/from exRectSel/exColumnSel, when the user clicks a
column. The ItemFromPoint method gets the column being clicked in the items
section, while the ColumnFromPoint property gets the column being clicked in the
control's header section only.
The following sample handles the MouseDown event:
Private Sub Grid1_MouseDown(Button As Integer, Shift As Integer, X As Single, Y As Single)
If (Button = 1) Then
With Grid1
Dim h As Long, c As Long, hit As HitTestInfoEnum
h = .ItemFromPoint(-1, -1, c, hit)
.FullRowSelect = IIf(c = 0, exItemSel, exRectSel)
End With
End If
End Sub
The control fires the Change event whenever the Items' CellValue
property is changed, so a recursive call may occur, if changing the
Items.CellValue property during the Change event. The following
sample shows you how to prevent this situation:
Dim iChange As Long = 0
Private Sub Grid1_Change(ByVal Item As EXGRIDLibCtl.HITEM, ByVal ColIndex As Long, NewValue As Variant)
If (iChange = 0) Then
iChange = iChange + 1
' Here you can call/change any CellValue property, and so the Change event is not called
iChange = iChange - 1
End If
End Sub
The control fires the FilterChanging event just about applying the new filter on
the control, so the idea is to change the column's Filter property to include
the "*" characters.
The following sample shows how you can update the Filter property to include
* characters, so a Contains clause is applied when filtering:
Private Sub Grid1_MouseDown(Button As Integer, Shift As Integer, X As Single, Y As Single)
With Grid1
Dim iFilterColumnIndex As Long
iFilterColumnIndex = .ColumnFromPoint(-1, -1)
If (iFilterColumnIndex >= 0) Then
.SearchColumnIndex = iFilterColumnIndex
With Grid1.Columns(iFilterColumnIndex)
If (.FilterType = exPattern) Then
.Filter = Replace(.Filter, "*", "")
End If
End With
End If
End With
End Sub
Private Sub Grid1_FilterChanging()
With Grid1
If (.SearchColumnIndex >= 0) Then
With .Columns(.SearchColumnIndex)
If (.FilterType = exPattern) Then
If (Len(.Filter) > 0) Then
.Filter = "*" & .Filter & "*"
End If
End If
End With
End If
End With
End Sub
The FilterChanging event adds the * characters for a column ( with the
exPattern set ) while the MouseDown handler removes any * characters in the
Filter property, so no * characters will be displayed when Filter For prompt is
shown.
The "Method 'CellValue' of object 'IItems' failed" error occurs because the code
tries to access a non-existent cell. For instance, you refer the forth cell in
the current item, while the control has three columns only.
You can add a new column after DataSource property, using the Columns.Add
method. You must know that the AddItem event is calling during the DataSource
property, so at that time the newly column is not known and that is why you get
the "Method 'CellValue' of object 'IItems' failed" error. Instead you should enumerate the items and use the new column
after adding it.
The AutoDrag property indicates what the control does when the user clicks an item and starts dragging it. For instance, using the AutoDrag feature you can automatically lets the user to drag and drop the data to OLE compliant applications like Microsoft Word, Excel and so on.
In order to let user scrolls the control's content set the AutoDrag property on:
Send the WM_KEYDOWN message with the code 33 ( Page-Up), 34 (Page-Down) to the
control's hWnd handle as in the following sample:
Private Const WM_KEYDOWN = &H100
Private Declare Function SendMessage Lib "user32" Alias "SendMessageA" _
(ByVal hwnd As Long, ByVal wMsg As Long, ByVal wParam As Long, lParam As Any) As Long
Private Sub Command1_Click()
SendMessage Grid1.hwnd, WM_KEYDOWN, 34, 0
End Sub
In case you need to find out the code of the key you want to send, paste and
run the following x-script to your exhelper:
The control fires the ScrollButtonClick event once a button with-in the scroll
bar is clicked. The ScrollPos property specifies the control's scroll position.
The OffsetChanged event notifies your application once the control's scrolling
position is changed. The ContinueColumnScroll property specifies whether the control scroll
horizontally the content pixel by pixel, or column by column.
A) The following VB6 sample handles the OffsetChanged event, so it advances
16 pixels forward/backward if the user clicks left/right buttons ( 1 pixel
horizontal-scroll )
Dim nOffsetChanged As Long, OldVal As Long
Private Sub Grid1_OffsetChanged(ByVal Horizontal As Boolean, ByVal NewVal As Long)
If (nOffsetChanged = 0) Then
nOffsetChanged = nOffsetChanged + 1
With Grid1
If (Horizontal) Then
If (Abs(NewVal - OldVal) = 1) Then
.ScrollPos(False) = NewVal + IIf(NewVal > OldVal, 16, -16)
End If
OldVal = .ScrollPos(False)
End If
End With
nOffsetChanged = nOffsetChanged - 1
End If
End Sub
where the nOffsetChanged variable member is initialized with zero, and it
ensures that no recursive call of OffsetChanged event occurs, and the OldVal
member variable is initialized with zero, and it indicates the previously value
of the control's scrolling position. The sample works even if clicking continuously
the left/right scrolling buttons.
B) The following VB6 sample advances 16 pixels, once the user clicks the
left/right scrolling buttons ( The ContinueColumnScroll property is True ) :
Private Sub Grid1_ScrollButtonClick(ByVal ScrollBar As EXGRIDLibCtl.ScrollBarEnum, ByVal ScrollPart As EXGRIDLibCtl.ScrollPartEnum)
With Grid1
If (ScrollBar = exHScroll) Then
If (ScrollPart = exLeftBPart) Then
.ScrollPos(False) = .ScrollPos(False) - 15
Else
If (ScrollPart = exRightBPart) Then
.ScrollPos(False) = .ScrollPos(False) + 15
End If
End If
End If
End With
End Sub
The sample works if pressing and releasing the left/right scrolling button.
The ItemsCount method of the IUnboundHandler interface, specifies the number of
virtual items you are about to load within the control.
Here's a trick that counts the number of items being shown while control is running in virtual mode (VirtualMode property is True):
Private Sub Grid1_OversizeChanged(ByVal Horizontal As Boolean, ByVal NewVal As Long)
If Not Horizontal Then
Debug.Print NewVal + Grid1.Items.VisibleCount
End If
End Sub
The idea is to add the NewVal parameter of the OversizeChanged event, with
VisibleCount property of the Items collection
The FormatColumn event lets the user to provide the cell's caption before it is displayed on the control's list.
The FormatColumn event may be fired multiple times for the same cell, for
instance, when the cell's tooltip is required, when collecting captions to be
displayed on the column's filter list, and so on. The FormatColumn event is
fired for each column whose FireFormatColumn property is True ( by default, the
FireFormatColumn property is False, for all columns ). The FormatColumn event
may be locked if the user displays a message box, and so the FormatColumn event
is not fired, and so the cell's value may be displayed instead. In order to
prevent that there are a few options like:
Use the FormatColumn property instead, to format the cell's value. The
FormatColumn property specifies the format to display the cells in the column.
For instance, the "currency(value)" displays the column using the current format for the currency ie, 1000 gets displayed as $1,000.00
if regional setting is US.
Use the Out method of ExSkinBox
component, to display a modal dialog.
The /COM version of the component provides the DataSource property, which can be
used to bound the control's view to an ADO recordset. By default, once you set
the DataSource property to a recordset, all changes you do on the control will
be updated in the associated recordset.
The Requery method of the ADODB.Recordset updates the data in a Recordset object by re-executing the query on which the object is based.
Once the control receives notification that a Requery has been performed, all items are cleared, and new one are inserted by re-iterating the recordset
source.
The following sample shows how you can restore the control's layout (
scrolling position ) once the Requery is performed:
Dim rs As Object
Set rs = Grid1.DataSource
If Not rs Is Nothing Then
Grid1.BeginUpdate
Dim cmd As Object
Set cmd = CreateObject("ADODB.Command")
With cmd
.ActiveConnection = rs.ActiveConnection
.CommandText = "INSERT INTO Orders (EmployeeID) VALUES(12345)"
.CommandType = 1
.Execute
End With
Dim sLayout
sLayout = Grid1.Layout
rs.Requery
Grid1.Layout = sLayout
Grid1.EndUpdate
End If
The samples uses the control's Layout property to store and restore the
control's layout before and after performing a recordset Requery.
Older versions, may require re-calling the DataSource property as in the following sample:
Dim rs As Object
Set rs = Grid1.DataSource
If Not rs Is Nothing Then
Dim cmd As Object
Set cmd = CreateObject("ADODB.Command")
With cmd
.ActiveConnection = rs.ActiveConnection
.CommandText = "INSERT INTO Orders (EmployeeID) VALUES(12345)"
.CommandType = 1
.Execute
End With
With Grid1
.BeginUpdate
rs.Requery
.DataSource = rs
.EndUpdate
End With
End If
Re-calling the DataSource property clears the control's content which includes Columns and Items, and filling it again from the source.
You can use the control's Layout property to store and restore the control's
layout which includes the scrolling positions, the columns width, and so on.
The ValidateValue event notifies your application that the user is about to change the cell's value using the control's UI.
The ValidateValue event is fired only if the CauseValidateValue property is not zero and the user alters the focused value.
The validation can be done per cell or per item, in other words, the validation can be made if the user leaves the focused cell, or focused item.
If the Cancel parameter is True, the user can't move the focus to a new cell/item, until the Cancel parameter is False. If the Cancel parameter is False the
control fires the Change event to notify your application that the cell's value is changed. Use the Edit method to programmatically edit the focused cell. Call the
DiscardValidateValue method to restore back the values being changed during the validation.
During ValidateValue event, the Items.CellValue and Items.CellCaption properties retrieve the original value/caption of the cell. You can access the modified value for any cell in validating item using the Items.CellValue(-1,ColIndex) and Items.CellCaption(-1,ColIndex), or uses the -1 identifier for the Item parameter of the Items.CellValue and Items.CellCaption properties.
In conclusion, the ValidateValue event occurs just before writing the modified value to the cell's value ( CellValue property ).
It is not recommended changing the CellValue during ValidateValue, EditOpen, Edit or EditClose events.
For instance, if you require changing some cell's value on the editing item, you have to postpone the change ( using a timer for instance ),
so you let the control to handle completely the ValidateValue event.
The following sample shows how you can perform changing the CellValue after a ValidateValue event:
Private Sub Grid1_ValidateValue(ByVal Item As EXGRIDLibCtl.HITEM, ByVal ColIndex As Long, ByVal NewValue As Variant, Cancel As Boolean)
Cancel = MsgBox("Validate", vbYesNo) = vbNo
If Not Cancel Then
With Timer1
.Tag = Item ' Stores the item's handle to the Timer's TAG property
.Enabled = True ' Enables the timer, so it will occur right after the control handles the ValidateValue event
End With
End If
End Sub
while Timer handler should look such as:
Private Sub Timer1_Timer()
Dim Item As Long
With Timer1
.Enabled = False
Item = .Tag
End With
With Grid1.Items
With Grid1
.Items.CellValue(Item, ...) = ...
End With
End With
End Sub
The following sample shows how you can use the DiscardValidateValue method to cancel all the changes during the validation:
Private Sub Grid1_ValidateValue(ByVal Item As EXGRIDLibCtl.HITEM, ByVal ColIndex As Long, ByVal NewValue As Variant, Cancel As Boolean)
Dim iMsg As Long
iMsg = MsgBox("Validate?", vbYesNoCancel)
Cancel = Not iMsg = vbYes
If Cancel Then
If (iMsg = vbCancel) Then
With Grid1
.DiscardValidateValue
.Object.Refresh
End With
End If
Else
With Timer1
.Tag = Item
.Enabled = True
End With
End If
End Sub
When using Validation, it is recommended calling the DiscardValidateValue method of the control, when the form is unloading as in the following sample:
Private Sub Form_Unload(Cancel As Integer)
Grid1.DiscardValidateValue
End Sub
The sample shows how you cancel all the changes once the user closes the form ( for instance, clicks the X button of the form, or select the Close from the form's system menu ). For instance, if the DiscardValidateValue method is never called, the last modified value may be written on the database if the control's DataSource property is set.
By default, the item gets expanded/collapsed once the user clicks the +/- glyph.
Once the item gets expanded, the control is trying to ensure that child elements
fits the control client area as more as possible. In other words, the item being
expanded may not keep it's vertical position while expanding, due this. When you
load items while expanding items, this behavior may not work as you expect, so
you can use the following trick.
In order to keep the vertical scroll position, while expand/collapse items,
you can use a trick like follows:
Private nVerticalPos As String
Private Sub Grid1_BeforeExpandItem(ByVal Item As EXGRIDLibCtl.HITEM, Cancel As Variant)
With Grid1
.BeginUpdate
nVerticalPos = .ScrollPos(True)
End With
End Sub
Private Sub Grid1_AfterExpandItem(ByVal Item As EXGRIDLibCtl.HITEM)
With Grid1
.ScrollPos(True) = nVerticalPos
.EndUpdate
End With
End Sub
Shortly, this snippet of code stores the vertical scroll position of the
control before an item gets expanded/collapsed, and restores it back after the
item is expanded. This sample does not uses the EnsureVisibleItem method.
The control fires the FilterChange
event when the the user applies a new filter or closes the filter bar. The
FilterType
property of the Column determines whether a new filter is applied or if the
property is set to exAll for all columns, the filter bar has been closed.
The following VB sample displays a message when the user closes the control's
filter bar:
Private Sub Grid1_FilterChange()
For Each c In Grid1.Columns
If (c.FilterType <> exAll) Then
Debug.Print "Apply Filter"
Exit Sub
End If
Next
Debug.Print "Close Filter"
End Sub
The SelectItem property selects the item giving its handle.
The focused item changes immediately when a new item is selected. The FocusItem property gets the handle of the focused item.
The FocusColumnIndex property changes the focused column.
The SetFocus method is used to move the focus to a specific control within a form. This means that the specified control becomes the active control, and any input from the keyboard will be directed to that control.
The cell's editor automatically opens when the control gains focus, a new cell is selected, and the AutoEdit property is set to True. If the AutoEdit property is set to False, you can use the Edit method to edit the focused cell.
The following VB sample sets the focus on the cell in the first column of the second row (AutoEdit property is True):
With Grid1
With .Items
.SelectItem(.ItemByIndex(1)) = True
End With
.FocusColumnIndex = 1
.SetFocus
End With
The following VB sample sets the focus on the cell in the first column of the second row (AutoEdit property is False):
With Grid1
With .Items
.SelectItem(.ItemByIndex(1)) = True
End With
.FocusColumnIndex = 1
.SetFocus
.Edit
End With
The control does not expose any public property to get the record's Bookmark when it is bound to a database using the DataSource property. Instead, you can do the following:
store the current record's Bookmark in the item's ItemData property or the cell's CellData property (If you're already using the ItemData property for other purposes, you can add an extra hidden column to store the bookmark. To do this, modify your SELECT statement to include a new column, for example: "SELECT *, '' AS Bookmark FROM Orders", as shown in the sample below)
The VB example below demonstrates how to store the record's Bookmark using the ItemData property:
Private rs As Object
Private Sub Form_Load()
With Grid1
.BeginUpdate
Set rs = CreateObject("ADOR.Recordset")
With rs
.Open "Orders", "Provider=Microsoft.Jet.OLEDB.4.0;Data Source=" & App.Path & "\misc.mdb", 3, 3
End With
.DataSource = rs
.EndUpdate
End With
End Sub
Private Sub Grid1_AddItem(ByVal Item As EXGRIDLibCtl.HITEM)
Grid1.Items.ItemData(Item) = rs.Bookmark
End Sub
The following VB example illustrates how to store the record's Bookmark using the CellData property. Note that the CellValue cannot be modified during the AddItem event, as the field is locked during loading, triggering the 'Field cannot be updated' error in the Error event:
Private rs As Object
Private Sub Form_Load()
With Grid1
.BeginUpdate
Set rs = CreateObject("ADOR.Recordset")
With rs
.Open "SELECT *, '' AS Bookmark FROM Orders", "Provider=Microsoft.Jet.OLEDB.4.0;Data Source=" & App.Path & "\misc.mdb", 3, 3
End With
.DataSource = rs
.Columns("Bookmark").Visible = False
.EndUpdate
End With
End Sub
Private Sub Grid1_AddItem(ByVal Item As EXGRIDLibCtl.HITEM)
Grid1.Items.CellData(Item, "Bookmark") = rs.Bookmark
End Sub
The Items.ItemData(item) or Items.CellData(item, column) returns the bookmark of the associated record.
An expandable bullet list is a list where items can be expanded or collapsed to show or hide additional related content, typically in a hierarchical structure.
Example:
Fruits (expanded)
Apple
Banana
Orange
Vegetables (collapsed)
or something like bellow:
The following article demonstrates how to use ExGrid control to simulate an expandable bullet list, including support for multiple columns. Each item can contain sub-items that can be revealed by clicking the +/- expand button.
The basic concept to provide an expandable bullet list using the exgrid is:
disable the default expand/collapse indicators by setting HasButtons and HasLines to false
HasButtons = False;
HasLines = False;
add two PNG images to simulate custom expand/collapse buttons using the HTMLPicture property
len(parent(1 index ``), checks if the item has a parent (i.e., is not a
root)
`<b><fgcolor gray>` + (1 pos ``) + `. </fgcolor></b>`,
displays the 1-based sibling position as a bold, gray-colored prefix followed by a dot and
space
`<a ` + (0 index ``) + `>`, creates an anchor tag with the item's 0-based index for interaction
: ``) + ` ` + value, if no parent (root item), outputs nothing before the text, then appends a space plus the item's text
In summary, the expression determines if an item has a parent, and if it does, prepends a numbered prefix along with the correct expand/collapse icon before showing the item's main text.
handle the AnchorClick event to toggle the expanded state of items at runtime (Items.ExpandItem property). The expand/collapse image is embedded within an <a index> element, allowing it to be clickable (also a hand cursor is shown when hovering it)
Private Sub Grid1_AnchorClick(ByVal AnchorID As String, ByVal Options As String)
Dim i
With Grid1.Items
i = .ItemByIndex(AnchorID)
.ExpandItem(i) = Not .ExpandItem(i)
End With
End Sub
If you want to make the column editable, consider using the Editor.Option(exEditorAdjustPos) property to reposition the editor. This lets you shift the editor to the right, avoiding the relative-position number, the dot character and the expand/collapse icon, by specifying offsets using the "Left Top Right Bottom" format. Each value is a number that can optionally be followed by 'd' or 'D' to indicate DPI-awareness, meaning the value scales based on the current DPI setting. Each number adjusts the respective edge of the editor: Left, Top, Right, and Bottom.